

Piping Frosting 101 – The Frosting Piping Manual!
Piping frosting was something I overthought for about a year.
I must have watched 50 videos on YouTube before I actually picked up a piping bag for the first time.
But even after watching ALL those videos I still felt like I had NO IDEA what I was doing! During my first year of more serious baking, I resorted to rather spooning frosting onto cupcakes just to be safe.
Since my last post was my ultimate Vanilla Frosting Recipe and I have shared my ultimate Chocolate Frosting Recipe with you before, I thought I should complete the circle and write this post on PIPING Frosting.
Over the last 5 years I’ve become, thankfully, super comfortable with piping frosting. But I’ve also realized that there are some practical tips and methods that can help a beginner understand more clearly what they need to do.
Most of those 50 videos didn’t help me at all.
The bakers just said: “Pipe the frosting around… Like that!”
That doesn’t do it for me. I need WORDS to explain to me what I need to do.
Just watching someone isn’t enough. And no one can really afford to frost 1000 guinea pig cupcakes before being able to pipe frosting well enough to sell them!
I’ll start by explaining all the natural MISTAKES beginners tend to make when piping frosting…
FROSTING PIPING MISTAKES:
1. Piping Nozzle is too Small
Tiny star tips are so 1990’s. Stay away from them. The finish looks so bad and it’s also much harder to get the frosting to come out with a consistent thickness all the way through. So use a larger nozzle – it makes the frosting look way more generous and voluptuous!
2. Open Star Nozzles aren’t Ideal
Open star nozzles (except for the French tip) do not create a finish as beautiful as CLOSED star nozzles. Closed star nozzles make DEEPER grooves in the frosting, making the finished effect way more dramatic and shapely.
Definitely go for a large, closed star nozzle. If you can only find open star ones, then bend the spikes into the open center to create a closed star shape. I did this 5 years ago with my first ever stainless steel nozzle (13mm diameter opening) – it’s still my favourite one for piping frosting onto cupcakes 🙂 I highly recommend the Wilton 2D or Wilton 1M tip!
Make sure that the spikes are long enough to bend in all the way to the center. Do leave about 1 mm open in the center though.
Another perk of closed star nozzles is that they SAVE FROSTING! The frosting is more defined when it comes out, but the deeper grooves also mean that less frosting comes out overall. Win-win my friend!
3. Plastic Nozzles – No Go!
You still have plastic nozzles in your house? Whaaaat?! NO! Throw those things away or give it to your kids to play with.
The biggest problem with plastic nozzles is that they fray and decay over time. This fraying creates jagged edges on your frosting – not cool.
Stainless steel nozzles basically have a lifetime warranty. As I’ve said, I’ve used 1 piping nozzle for 5 years and for THOUSANDS of cupcakes.
The finish on my frosting is defined and beautifully smooth every time. I highly recommend the Wilton 2D or Wilton 1M tip!
4. Frosting is too Stiff
Frosting needs a form of “elasticity” to be piped beautifully. If your frosting is too stiff, it will behave as if it’s “brittle”. This means it will break off before you get to pipe around the cupcake.
What you want is ONE, long frosting sausage from beginning to end with no breakage whatsoever.
If you only realize that your frosting is too stiff when you are busy piping, remove all the frosting from the piping bag and fix the consistency first.
Yes, it is more effort, but a shabby finish on your cupcakes is way more exhausting on an emotional level.
5. Frosting is too Runny/Slack
If your frosting is too runny/slack, the grooves in your piped frosting will totally disappear and ruin the cupcake’s aesthetics completely.
If you only realize that your frosting is too runny when you are busy piping, remove all the frosting from the piping bag and fix the consistency first.
Yes, it is more effort, but a shabby finish on your cupcakes is way more exhausting on an emotional level.
6. Holding Nozzle too Close to Cupcake
I’ve realized that piping frosting beautifully onto cupcakes is rather about GUIDING the frosting to gracefully rest in the right position than “putting it on” the cupcakes.
When you have the approach of “putting frosting on” cupcakes, then you tend to hold the nozzle way too close to the cupcake while piping. Any sudden movement then causes you to push the nozzle into the frosting on the cupcake, ruining the finish and clean groove lines.
7. Wrong Angle When Piping Frosting
When you are piping frosting, don’t hold the piping bag diagonal to the cupcake. If you do this then every side of the finished cupcake will look different.
Hold the piping bag perfectly perpendicular to the top of cupcake’s surface. This ensures a consistent frosting pattern all the way around.
👉 Want to SELL your home baked goods so you can make more income?
So now that we know the DON’TS of piping frosting, what are the DOS?
HOW TO PIPE FROSTING PERFECTLY
1. Perfect Piping Consistency
This is quite a sensitive one. We already know that the frosting shouldn’t be too stiff because it will break off when piping. We also know that it shouldn’t be too runny because then our beautifully defined grooves will disappear.
Piping consistency is different from spreading consistency – which is used for layering cakes. To test whether your frosting is piping consistency, you will need a large spoon.
The spoon is handy for 2 reasons. First of all, use it to stir your frosting vigorously for 15 seconds to break any large air pockets and get your frosting smooth.
Secondly you need the spoon for the “plop test”. Yes, this is a term I totally made up just now.

Scoop up a generous spoonful of frosting and hold it up. Now turn your wrist 90 degrees so that the frosting is exposed to gravity, heading towards dropping back into the bowl. Ideally, you want the frosting to linger on the spoon for 3 – 5 seconds before it drops off, back into the bowl.
Another test is the “peak test”. Yet another term I made up just now 🙂
Tap a spoon on top of the frosting and push down gently. Next, lift the spoon up vertically to create a perky peak on the frosting. If the peak bends over and flops down, your frosting is too runny.
If this test doesn’t create one, tall peak but rather a few shorter peaks in an oval arrangement, then your frosting is too stiff.
2. Perfectly Shaped Cupcakes
A “do” that we can’t ignore is that piping frosting perfectly becomes SO much easier when you’ve got perfect cupcakes!
Cupcakes with pointy tops are very difficult to pipe onto because the angle brings gravity into the mix as well, causing your frosting to sag down and ruining your beautiful frosting grooves.
Cupcakes with perfectly smooth and level tops make a world of difference! Fortunately I’ve written a super thorough post on How to Bake Perfect Cupcakes 🙂
3. Holding the Piping Bag
When you’ve filled your piping bag with frosting, twist the end a few times to prevent the frosting from escaping.
Wrap your dominant hand around the filled piping bag. Hold the twisted end securely in the gap between your thumb and index finger.
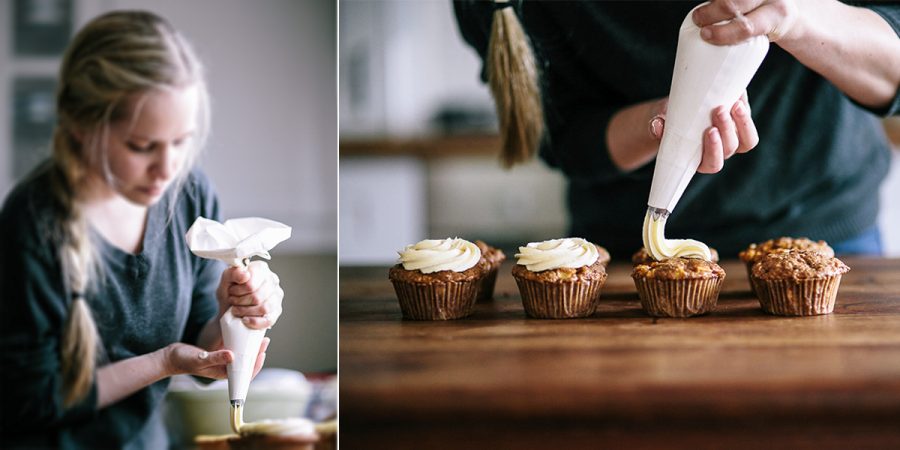
The frosting will be squeezed out with your dominant hand ONLY! Your other hand is merely there to guide the tip in the right direction. Never apply pressure with both hands.
When piping frosting, apply pressure using the outer part of your palm along with your pinky, ring finger and middle finger. You can also use your thumb’s palm to assist in applying pressure. Let your thumb and index finger focus on keeping the piping bag’s twist from unraveling.
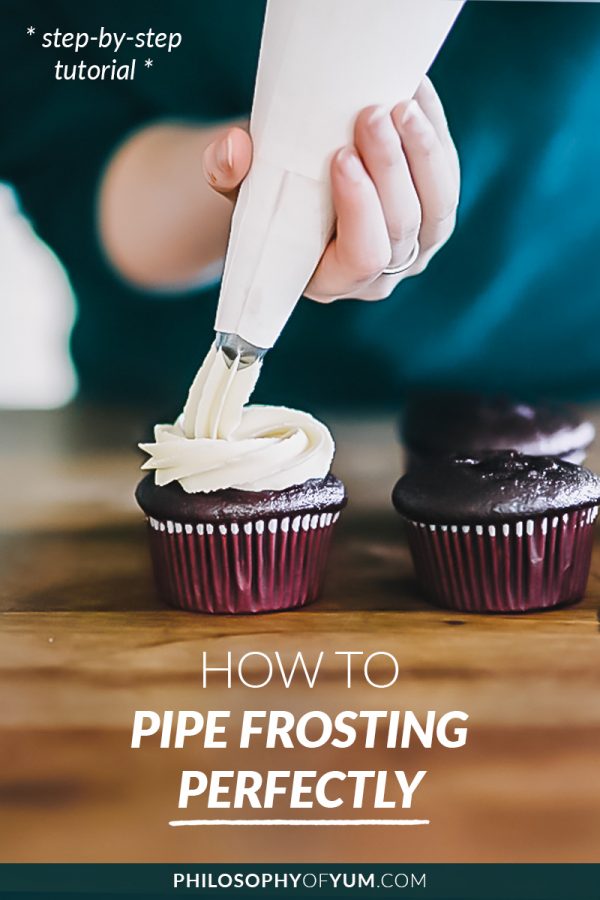
4. Piping Frosting – Basic Swirl
The biggest mistake I made as a beginner was to keep my eye on the frosting while I was piping. KEEP YOUR EYES ON THE CUPCAKE while piping frosting. The aim is to follow the shape of the cupcake – that is your constant reference/guide.
Before you start piping frosting, keep in mind that you are merely GUIDING the frosting into place and not “putting it on”.
Decide beforehand how big your border of exposed cupcake will be (more or less). Your frosting’s first contact point should be another 5 mm inside that border so that the frosting’s blunt starting point will be hidden at the end.
Hold the piping bag as perpendicular as possible to the cupcake’s surface.
Hold the piping nozzle’s end point a good half inch away from the surface of the cupcake. Apply careful, even pressure and make your first contact point.
While still applying consistent pressure, squeeze the frosting so that it gracefully leaves the piping bag and guide it into place. Keep your eye on the outer edge of the cupcake all the time!! That is your guide.
Go all the way around till you reach your starting point. Just before your starting point, curve in slightly, allow your second circle to overlap slightly with your first circle of frosting.

When you have spiraled to the center, push down slightly and then release. This last, slight push secures your last spiral of frosting in place so that it doesn’t lift off into a slim, awkward, angled peak when you remove your piping nozzle.
Also, when you lift off the nozzle at the end, don’t do it 100% straightly upwards. Try to incorporate a bit of the swirl’s direction as you end off.
5. Piping Frosting in a “Rose”
Before you start, keep in mind that you are GUIDING the frosting into place and not “putting it on”.
Decide beforehand how big your border of exposed cupcake will be (more or less).
Hold the piping bag as perpendicular as possible to the cupcake’s surface.
Start in the center of the cupcake.
Hold the piping nozzle’s end point a good half inch away from the surface of the cupcake. Apply careful, even pressure and make your first contact point. Hold your position for another second so that more frosting comes out. (The center of a rose always has more petals)
After this you can proceed to start piping frosting in a spiral, around the contact point.
While still applying consistent pressure, squeeze the frosting so that it gracefully leaves the piping bag and guide it into place.
Keep your eye on the outer edge of the cupcake all the time so that you get a symmetrical rose.
As you approach the end of your cupcake’s outer surface, gradually apply less pressure, till you seamlessly stop (while guiding the last bit of frosting to adhere to the frosting on the cupcake).

6. Piping Frosting – Tall Swirl
If you want your frosting a mile high on top of your cupcakes, I’m going to recommend something quite controversial.
Rather start with the rose technique and then go over directly into the basic swirl ON TOP of the rose. Doing this creates more frosting structure below your high swirl as well as some additional frosting support in the center.
That’s it my friend! Easy peasy frosting squeezy! 😉
The frosting in all my pics is my Ultimate Vanilla Frosting and Ultimate Chocolate Frosting. They are both SENSATIONALLY delicious!! They’ll turn you into a frosting snob… Seriously… you’ll shun buttercream forever after tasting them.
Chat soon
Aurelia


POPULAR BAKING TIPS


POPULAR BAKING BIZ TIPS


Got a question? Something to add? Let’s chat in the comments section down below! (I respond to every single comment)


