Freshly baked muffins always bring back nostalgic memories of my childhood. My mother has always loved baking for special occasions. She went through a lot of trouble to bake us a special birthday cake year after year! I’ll never forget the epic train she made me for my 5th birthday back in 1993…
There was one other day on which she would bake, muffins in particular, for us and that day was Youth Day. She always made us her famous (and super healthy, low GI) bran muffins. Probably because muffins are her favourite food – seriously!
She goes to Mugg & Bean every Wednesday morning for her giant Date & Nut muffin with a huge cappuccino. She never misses a week. To her it is just such a satisfying treat 🙂
So before Youth Day she always mixed the batter for her special bran muffins and then left it in the fridge overnight. This helped the batter thicken up and gave time for flavours to meld together and deepen.
We would wake up to the smell of freshly baked muffins every year on 16 June. Bliss!
My mother would set beautiful, individual trays for both my sister and myself, complete with a fresh flower from our garden and a wineglass of fruit juice. She is just so adorable and loving! With memories as grand as these it’s no wonder that I love muffins! To me, muffins they are the epitome of home, care and my mother.
Recipe Introduction:
I love this particular recipe so much because I have a thing for toasted pecans. They are one of my top 5 yum high inducing ingredients. Fact. The pecans toast throughout the baking process, so there is no need to toast them beforehand.
Dried dates are recommended. Feel free to use Medjool dates if you wish – they are amazing! I mostly use standard pitted dates for this recipe as Medjool dates are not as consistently available in South Africa.
Do try to find Granny Smith Apples for this recipe. They maintain their structure superbly during baking/cooking, have a distinct tartness and a strong apple flavour. It’s my go to apple for cooking and baking.
These Apple, Date & Pecan Muffins are packed with apple goodness and carry notes of spice and caramel. Absolutely delicious!
200 g Fresh Granny Smith Apple, skin and core removed
70 g Pecan Nuts
70 g Pitted Dates
1 Tbsp Smooth Apricot Jam
1 Tbsp Water
Instructions
Start by preparing the fruit. Chop the apples into approximately a 1,5cm dice (you may toss the apple in 1 teaspoon of lemon juice, diluted with 1 tablespoon of water, to stop it from browning.) Chop the pitted dates into approximately a ½ cm dice.
Preheat oven to 180ᵒC (355ᵒF).
Grease and line muffin tins with individual baking paper liners (remember the recipe makes 10 large muffins).
Sift together the flour, baking powder, salt, cinnamon and ginger in a large mixing bowl. Mix all dry ingredients together thoroughly and make a well in the center.
In a separate bowl, beat together the eggs, oil, buttermilk, sugar and vanilla until smooth. Leave the wet mixture to stand for 30 seconds so that the sugar can dissolve. Beat wet mixture again till smooth. Pour the wet mix into the well you created in the dry ingredients. Don’t mix just yet!
Add apple and dates into the well too and mix slowly with a metal spoon until just combined (over-mixing toughens the texture!). Scape down the sides of the bowl with a rubber spatula and lightly stir to combine.
Divide the batter evenly between the 10 lined muffin holes in the muffin tin. Top with the pecan pieces.
Bake on the lower rack of your oven for 15 minutes, turning after 10 minutes. Then bake on the higher rack for a further 15-20mins or until golden brown and a skewer comes out clean.
Place apricot jam and water in a cup and microwave for 30 seconds. Brush the glaze all over the top of the muffins. Enjoy!
Notes
These muffins keep about 2-3 days in a sealed container in the fridge. Alternatively they also freeze exceptionally well! Just leave them to thaw at room temperature for 2 hours and then pop them in the oven for 5-10 minutes to warm through and crisp up a bit.
3.5.3229
If you make these muffins, use #philosophyofyum because I would love to see!
Also check out my other muffin recipes that I have sold in thousands to Coffee Shops and Restaurants. Seriously AMAZING muffin recipes:
I help home bakers start and build calm, profitable Home Bakery businesses with repeat customers, not random orders. Here you’ll find business strategy for people who’d rather be baking.
Gluten Free Brownies were totally not a sales gimmick for me. Many of my clients thought I started baking gluten free brownies because gluten free eating became a trend a few years ago. Actually, that is not the case.
See, I married this incredible guy… Adriaan. When we were dating he ate all the wonderful things that any regular student eats. Pasta, pies and McDonalds. Problem is that these nutritious foods were often eaten at 3h00 in the morning.
Adriaan and I both studied architecture and all-nighters were as common as breathing. Obviously you get hungry and McD’s was the only 24 hour food provider.
Adriaan’s mother also has a highly sensitive stomach with a whole list of foods she cannot eat. Whether the poor quality of food, lifestyle or genes were to blame, about 6 months into our marriage we discovered that he is gluten intolerant. Thanks Murphy!
Wife becomes a baker, and 6 months later, husband becomes gluten intolerant.
You need to understand that my husband is my biggest fan. When I realized I want to rather be a baker and not an architect, he was so excited with me.
Even though we had nothing, were getting married, moving to a new city and had no jobs he could see the potential and my heart 🙂
One of my favourite ways to express love, gratitude or joy is through cooking and especially through baking. But now my whole baking repertoire was suddenly quite useless in our home. I had to regroup.
Adriaan had to have a baked thingy. It had to be gluten free. And I was going to make it for him.
Gluten Free Baking Begins
Gluten free brownies seemed like a good place to start 🙂 There is a wonderful chocolaterie here in Cape Town called CocoaFair! They are “Africa’s first bean to bar chocolate manufacturer founded on the principles of social entrepreneurship.”
I bought their chocolate once and I’ve never looked back. So yes, great quality chocolate is of the essence here as half the recipe is just melted chocolate!
If you don’t have a local chocolaterie, you could always order goods online. Just be sure to check the ingredients list. Commercial chocolate often contains gluten.
I adapted this recipe for gluten free brownies from a recipe by David Lebovitz. I’ve baked this recipe hundreds of times – editing and fine tuning for 3 years now. This really is my ultimate recipe for gluten free brownies. I hope you enjoy them as much as our family, friends and clients do!
This Gluten Free Brownie Recipe has earned me at least $5000 in brownie sales, so yep, I think it’s SAFE to say that they are amazing 😉
A non gluten free eater ate these brownies and commented: “This is the best brownie in the world… I want to go sit in a corner and cry now.” Lol!
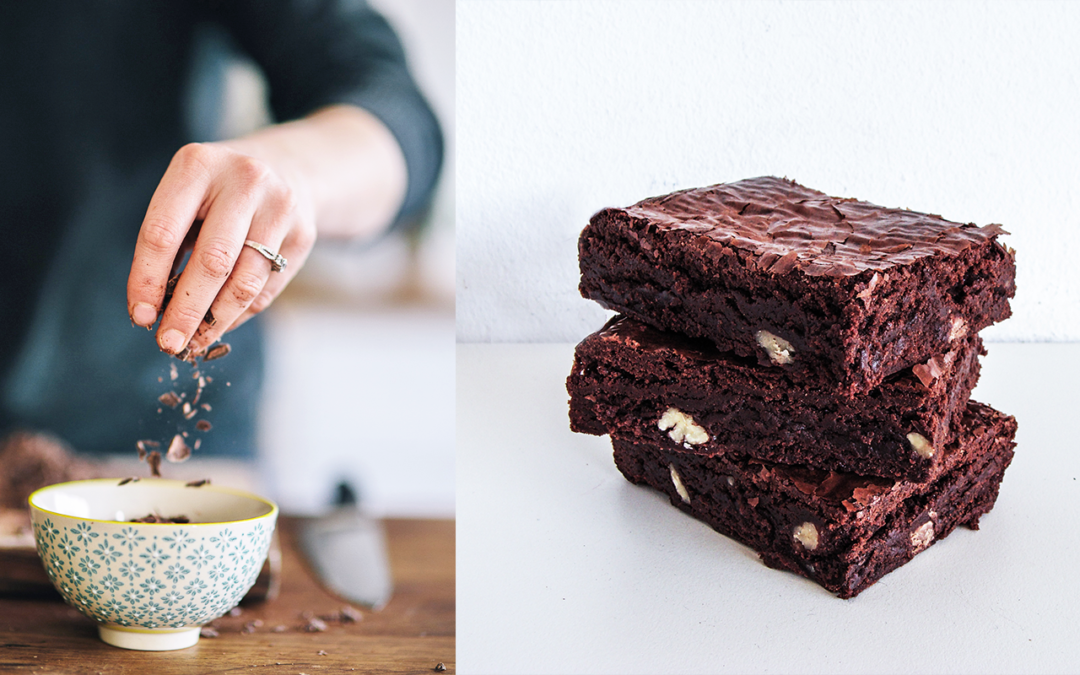
The texture is perfectly balanced between fudgy and chewy…
Spray the inside of a 17 x 27 x 3 cm (7 x 10,5 x 1 inch) brownie tin with non-tick cooking spray. Line the tin with baking parchment so that it goes up the sides and 3 cm over the rim. This makes the brownies easy to pull out once cooked and cooled. An 8 x 8 inch tin will also work just fine.
Preheat the oven to 180ºC/350ºF.
In a medium size pot, melt the butter over medium-low heat. As soon as the butter is melted and begins to simmer, add in the chopped dark chocolate and turn off the heat. Stir around thoroughly every 30 seconds until the chocolate is completely melted into the butter.
Keep the pot on the stove and stir in the sugar and salt. Leave to sit for 5 minutes and then stir very well. Remove the pot from the stove.
Beat in the vanilla and eggs.
Add the white rice flour, tapioca flour, and baking powder to the pot and then stir to combine into the chocolate mixture. Beat the batter on high speed for one minute. You’ll notice that the batter becomes silky smooth and a shade or two lighter in colour.
Scrape the batter into the prepared pan, making sure to spread out the batter into the corners of the pan. Distribute the nuts evenly over the mixture. Push the nuts down into the mixture with a spatula and then smooth the surface once more.
Sprinkle the chopped milk chocolate over the top of the brownie batter and allow the heat from the mixture to melt the chocolate. If your batter is too cool to melt the chocolate, use a hairdryer to melt it! Useful appliance! Smear the melted milk chocolate into the top layer of the batter, making sure to cover every inch of the surface. Don't leave any chocolate streaks - smear it in thoroughly. This creates the shiny crust on top.
Bake for 35-40 minutes, turning after 15 minutes. It is important that a skewer comes out completely clean when testing. Remove the brownies from the oven and let them cool completely before removing them from the tin. Slice them on the same day you make them. If you leave them standing overnight, they become very fudgy and stick to your knife terribly! Rather slice them just after they've cooled down. Enjoy!
3.5.3226
Have fun with this recipe! Bask in the chocolate ambiance…
Chat soon!
Aurelia 🙂
What info are you looking for?
Hey! I’m Aurelia (pronounced “oh-really-huh”) 😄
I help home bakers start and build calm, profitable Home Bakery businesses with repeat customers, not random orders. Here you’ll find business strategy for people who’d rather be baking.
I used to think that perfectly flat cake layers are only within the grasp of PRO bakers. When I started out baking, I loved baking cupcakes a whole lot more than baking layered cakes.
The simple reason behind this is that I wanted to avoid all the waste. You know how it goes… We need to trim off that ugly dome off our cake layers to make them level and then I obviously don’t throw the off-cuts away…
I hate wasting, so I eat all of it…
Shameless Aurelia.
Shameless.
As much as I enjoyed stuffing my face with cake, I couldn’t keep this up. Neither could my jeans!
Beyond the desire for perfectly level cake layers, there was another problem. The cake was moist in the center, but quite dry around the edges.
This had to be fixed. Cupcakes bake a lot quicker than large cake layers, so they aren’t in the oven for very long. Large cakes however, obviously need to spend a lot more time in the oven.
By the time the center is cooked, the outer edge has been cooked for the past 25 minutes and is now overcooked.
Credit is due:
I did some research and found a great post on the issue of baking level cake! A Cozy Kitchen wrote this amazing post on baking flat cake layers. It was tremendously helpful!
I’ve refined the technique quite a bit though, because as you know I do not believe all cake recipes can be baked the same way. If you don’t know what I mean, take a look at How to Bake Perfect Cupcakes – Advanced Tips.
Please note: This post has affiliate links. This means that if you purchase some of these products I get a tiny commission – but at NO extra cost to you.I’m super proud to recommend these resources to you because they’ve completely transformed my Home Bakery Business!
Before we get started:
So once again there is a basic technique for baking level cake layers (as with baking Perfect Cupakes), but it needs to be adapted according to your recipe. In my experience cake recipes can be divided into 3 different categories (due to how they respond in the oven). This definitely does not include cakes like Angel Food Cake which is a whole different ballgame.
Butter Based Recipes
Oil Based Recipes
Recipes containing fresh fruit/vegetables
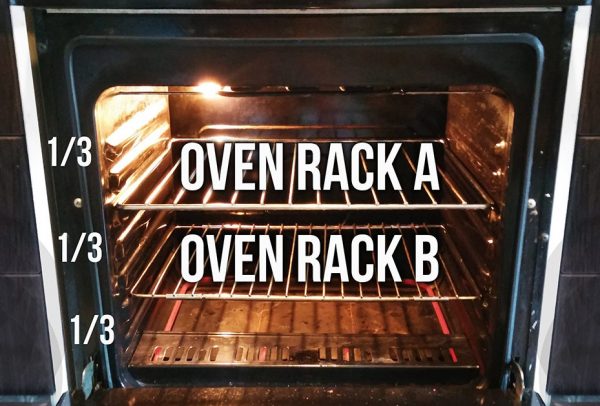
Here is a picture of how I divide my oven. You will need this later.
Greasing the tin:
I always line the bottom of my tin with high quality non-stick parchment/baking paper. It makes removing the cake a total breeze! Simply place the base of your cake tin on the paper, trace a circle and cut it out.
Lining the sides of the tin with parchment paper is just too tedious for me. I love using non-stick spray! Feel free to use butter or oil if you desire.
Basic technique for baking flat cake layers:
Adrianna from A Cozy Kitchen uses moist towel strips, fastened around the tin with safety pins. Her hypothesis is that “What’s happening here is that the moisture from towel is helping the cake bake more evenly, resulting in an even rise and a cake with a flat top.”
I think the moisture definitely plays a role, but in my opinion the damp towel keeps the sides of the tin cooler, so that the batter in direct contact with the sides of the tin doesn’t cook so fast. This gives the cake batter around the edge a bigger window of time to rise.
Of course you can also buy Wilton Bake-Even Strips online! They’re like a formal version of this wet-towel-strips-method and save you the drama of cutting up a towel (that your Mother may or may not have given you…)
Measure the height of your tin.
Get a clean, new-ish hand towel. Not a scrap one you used to clean the floor with.
Cut off strips of towel as wide as the height of your tin and long enough to wrap around your tin. It’s totally fine if the towel is going to end up overlapping around the tin. Rather don’t cut off the edges of the towel, this helps keep the strip intact.
Place the towel strips in some water and squeeze them about till they are evenly wet. Wring out the water.
Grease and line your cake tin.
Fasten the wet towel strips around the tin.
Pour in batter, level it out and bake.
My first change was to fasten the towel strips around the tin with paperclips instead of safety pins. It was very difficult to get the towel strips tightly wrapped around the tin. It was even more challenging to make them stay in position with safety pins as these allow room for movement.
The first time was a disaster! The towel kept sagging down on the sides of the tin, but I did see a slight improvement in the levelness of the cake. Second time around I used paperclips and I’ve never looked back.
Adapting the technique:
Butter based recipes:
Butter based cake recipes respond extremely well to this technique! Be sure to squeeze and wring out your towel strips as well as you possibly can. If they are too wet, the sides of your cakes can even rise higher than the middle! Be sure to level out your batter with a spatula before baking. There is no need to spread the batter higher up the sides or anything.
Bake the cake on oven rack A at 180˚C
Gently rotate your pans halfway through baking.
Oil based recipes:
The wetter, the better for this category. Lightly squeeze the towel strips so that they are just past dripping point. Grease and line the tin as usual and pour in your batter.
Swirl the pan around slowly so that the batter coats about 1 cm of the tin’s edge above the batter’s normal resting level.
Shake the pan a little bit so that the main batter returns to its neutral resting level. Do this just before you place the cakes in the oven.
To bake the cake, preheat your oven to 170˚C.
Place a clean, empty roasting tray on rack A.
Place your cake tins on rack B.
Pour about 1/2 cup water in the bottom of the oven.
Bake for about 10 minutes.
Rotate the pans and pour ½ cup water in the bottom of the oven. Continue to bake on rack B for a further 20 minutes.
Remove the roasting tray on rack A and move your cakes from rack B to rack A. Rotate your cakes again at this point as well.
Continue to bake until done.
Recipes containing Fresh Fruit/Vegetables:
Curiously these batters respond somewhere in between the butter and oil categories. The fresh fruit/vegetables naturally release a lot of moisture as they bake as well which helps in the level cake baking process.
Still, it does help to have a towel strips very wet (squeezed out just past dripping point) for this category as well.
Grease and line the tin as usual and fasten the wet towel strips around your tins. Pour in the cake batter. Swirl the pan around slowly so that the batter coats about 1 cm of the tin’s edge above the batter’s normal resting level.
Shake the pan a little bit so that the main batter returns to its neutral resting level. Do this just before you place the cakes in the oven.
To bake the cake, preheat your oven to 170˚C.
Place your cake tins on rack A.
Continue to bake on rack A until done, rotating the pans every 15 minutes.
Final Notes:
When baking 7 inch cakes and smaller, I’ve found that a hand towel’s absorption powers are too great. For small cakes I use DISH towel strips instead – they work perfectly! OR if you bake different sized cakes, it’s really worth it to get the Wilton Bake Even Strips Set for 6 inch, 8 inch, 10 inch and 12 inch tins.
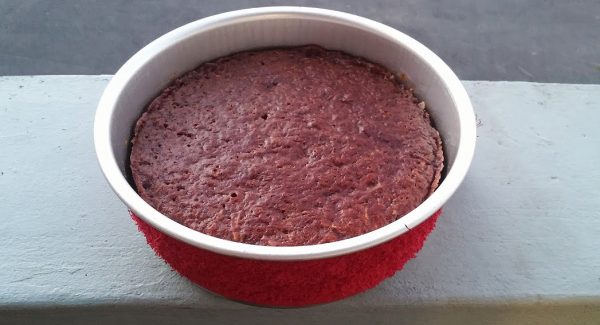
Although this hack is the most amazing game changer in baking a level cake, you’ll still need to trim off tiny bits here and there – but it’ll be minimal. Oil based cakes especially still rise with a slight dome, but they are about 80% more level than before!
And you also won’t need to trim the sides of your cake ever again. The wet towel strips ensure the oven stays moist and keeps the edges from baking too quickly. Your level cake layers will have a beautifully moist crumb from edge to center 🙂 Yay!
This technique has changed my life! Give it a try and let me know what your results are.
Chat soon!
Aurelia 🙂
What info are you looking for?
Hey! I’m Aurelia (pronounced “oh-really-huh”) 😄
I help home bakers start and build calm, profitable Home Bakery businesses with repeat customers, not random orders. Here you’ll find business strategy for people who’d rather be baking.
Perfect Cupcakes are a science! In my previous post I covered all the basic errors that often occur when baking cupcakes.
Some of these errors include pointy cupcakes, overflowing cupcakes, shrinking cupcakes, etc. If you want to know the science behind these occurrences, click here.
I’m particularly excited for today’s post! It will be the first time I’m disclosing my top secret tips for baking EXCEPTIONALLY PERFECT cupcakes!
Error-free cupcakes are already a massive achievement, but over time I’ve discovered methods (some normal and some quite unorthodox) that have significantly improved the texture and quality of my cupcakes.
So with a cheerful and excited heart I am sharing this information with you 🙂 May there be myriads of perfect cupcakes baked across the world through these cupcake baking tips!
Please also share your thoughts below, if something is not making sense.
All Cupcakes are NOT Created Equal
There are obviously many posts on “How to Bake Perfect Cupcakes”. I will definitely share those tips as well. Some tips do apply to all cupcakes and are good methods to implement across the board.
I have found, however, that all cupcakes cannot be approached in the same way.
Butter based recipes respond completely differently to oil based recipes. If you want to bake perfect cupcakes, it is important to take note of this.
Through nearly 4 years of full time home baking, I’ve come to understand that cupcake recipes can be divided into 3 separate categories.
Butter based Recipes
Oil Based Recipes
Recipes containing fresh fruit/vegetables
These 3 recipe categories respond vastly differently to the environment in an oven. They cannot all simply be baked in “the center of the oven”.
My Baking Equipment
Although I am a full time baker, I do not do the industrial oven thing. I bake from home in my own itty-bitty kitchen because I LOVE being at home!
Most people are shocked when they see the size of my oven and kitchen, but I am really just so happy and content baking here 🙂
I tried working in an industrial kitchen… ONCE. We went through a lot of effort to move everything into the new kitchen. Everything was all set up and ready to go.
The huge convection oven was there waiting for me in the corner of the large kitchen… The idea of baking 6 pans of brownies all in one go was overwhelmingly exciting!
3 hours later I was in tears. My cupcakes were pointy. My brownies had no shiny crust. I had come to hate that convection oven in just 20 minutes! Singlehandedly, I loaded the car (I’m very little and weak), drove back home and started all over again with my orders for the next day.
I don’t have a fancy mixer. I have an old Kenwood standing mixer I got from my dear mother-in-law. The model is from the 80’s I think, but it works brilliantly!
My oven is just a standard electric Defy Oven with a 4-plate stove on top (you will see a picture of it later).
The previous flat we lived in had a standard built in electric oven.
At one point we were living with my cousins, their oven was also just a standard electric oven.
As a student I baked at my boyfriend’s house in their standard built in electric oven.
These methods for perfect cupcakes worked in all 4 of these ovens!
Gas ovens are a bit tricky though. You will find that you might not be able to apply some of these methods. Take what you can use and comment below if there’s a particular struggle you experience with cupcake baking.
I’ve read through most articles online that cover the topic at hand. There are quite a few tips that appear on all of them.
Here’s a summary for Cupcake Baking Tips that do apply to all recipes (I’ve included my own as well). These tips do make a difference in the quality of your cupcakes.
1. Bring ingredients to Room Temperature:
This is a very important tip. Ingredients just combine better if they are all the same temperature.
Butter can take quite long to come to room temperature – especially in winter! I usually end up putting the butter in the microwave on the “defrost” setting for 15 seconds at a time if it is still not soft enough to cream.
Eggs should never be stored in the fridge in my opinion. Keep them away from direct sunlight, in a cool area. Buy smaller amounts of eggs at a time at more regular intervals. This ensures that your eggs will always be fresh and not need to be stored in the fridge.
If you do insist on keeping your eggs in the fridge, take them out the night before you plan to bake. This gives them ample time to come to room temperature.
Shortcut: put your eggs in a bowl of warm water for half an hour to bring them up to room temperature faster!
2. Use top quality ingredients:
What you put in, you will get out. Use free range eggs, real butter and good quality vanilla extract.
Image by nutritionsecrets.com
3. Don’t over-mix:
Some recipes require you to beat the batter for 2 minutes, others only until the ingredients are just combined. Just be sure to follow the instructions given in your recipe. Over-mixing directly damages the rise and texture of your cupcakes.
4. Oven Temperature:
Preheat your oven till the exact temperature before putting the cupcakes in the oven. Gas ovens tend to slip up on accuracy – hang an extra thermometer in your oven to be sure.
5. Consistent accuracy in filling cupcakes:
If you want to bake perfect cupcakes, you can’t just eye-ball when distributing the batter. Some insist that using an ice cream scoop full of batter in each liner will give you perfect cupcakes. This still leaves some room for error in my opinion.
It might be overkill, but weigh the batter you put in each case till your eyes can tell the difference. If it’s a more liquid batter, you can use a measuring cup as well.
Do yourself a favour and invest in a digital scale! They are affordable and so convenient! I have a small A5 size scale.
You can place your entire cupcake pan on top of the scale, “zero” it, and weigh each amount of batter that goes directly into each liner.
Images by bhg.com and rachelteodoro.com[/caption]
Here’s what I do:
I make sure to remember the weight of my mixing bowl (or write it down).
Then I weigh the mixing bowl with the batter.
Subtract the weight of the bowl plus an extra 5 g for the batter that sticks to the bowl and spoons.
Divide that amount by the amount of cupcakes your recipe makes.
Place the lined cupcake tin on the scale and weigh the batter out cup for cup.
Bit of a mission, but it gives me perfect cupcakes, so it’s actually a small sacrifice!
6. Proper greasing:
Even though I use cupcake liners, I also grease the top rim of each cupcake hole in the tin. This makes it easier to loosen the edges of the cupcake that did come into contact with the pan.
7. Don’t over-bake:
Don’t go shower and wash your hair while you are baking cupcakes! Give a peek through the glass every now and then to check on them. Once you can see there is no more shiny batter in the centre of each cupcake, wait for another minute and then test them.
You do want the testing pin to be clean, but do be careful not to leave the cupcakes in there for too long.
8. Turn or Burn?:
I do turn my cupcakes halfway through baking. Always. The odds of them deflating through doing this are really small. Obviously you shouldn’t do this with a soufflé! With cupcakes I think it is essential for an even bake.
All domestic ovens I have baked in tend to be hotter in the back left corner for some reason, so I insist on turning the cupcakes.
Rotate your cupcake pan with care. If you handle the pans gently, they will be just fine. Don’t bang it down on the counter; treat the pan like a sleeping infant.
9. Accurate measuring and weighing:
Weigh anything that is not liquid! This is my motto. I weigh my baking powder and baking soda while sifting the dry ingredients together.
Seriously 1 little gram does make a difference! Think about how dangerous measuring is. Some folks scoop out a compacted teaspoon of baking powder, while others pour it out of a refill pack. There is just too much room for error.
Write down on each recipe the exact weight of baking powder you use so that you will know for the next time you make that recipe and get consistent results. Also stick to one brand! All of them differ, even if it is just slightly.
I always WEIGH the amount of egg I use. Crack it in a cup, whisk it lightly with a fork and then weigh the exact amount of grams you put in.
If the cupcakes come out perfect, make a note on your recipe of the weight of egg you used, so that you’ll know how much to use when you make the recipe again.
If you feel the cake needed a bit more egg, make a note of that too. Weighing the amount of egg I use has made all the difference in my baking.
10. Fill, but don’t spill:
This may seem obvious, but I’m mentioning it anyway. Be patient when filling your cupcake liners with batter.
Rather scoop smaller amounts at a time (right into the center of each liner) to avoid spilling. Batter can easily end up between the liner and the tin. This will result in messy edges on your cupcakes! It can even let your cupcakes rise lopsided.
Advanced Tips for Baking Perfect Cupcakes:
As mentioned before, I have come to see that cupcake recipes can be divided into 3 separate categories.
1. Butter based Recipes
2. Oil based Recipes
3. Recipes containing fresh fruit/vegetables
These 3 recipe categories respond vastly differently to the environment in an oven. I will discuss each category separately.
Most importantly: I do not agree that all cupcakes should be baked in the center of your oven. In fact, I do not think ANY cupcakes besides Vanilla Cupcakes should be baked in the center of your oven.
Step one is to divide your oven cavity into 3 equal parts using 2 oven racks, like this.
Let’s number the upper oven rack as Oven Rack A and the lower one as Oven Rack B. This is the basis of everything I do. You will understand why a bit later. This arrangement is THE FRAME WITHIN WHICH ALL MY METHODS ARE APPLIED.
1. Butter Based Recipes:
I do prefer the creaming method, but I find that standing mixers incorporate a bit too much air. Light cupcakes are fantastic, but if they are too light, they are very difficult to handle and little edges often end up breaking off.
For this reason I prefer to use a hand-held electric whisk. When baking large cakes, a standing mixer is perfect for mixing a butter based batter.
Mixing Batter & Filling Cases:
Add dry ingredients to bowl as instructed. Beat on low speed for 10 seconds to get most of the ingredients combined. Stop the hand mixer.
Take care to scrape around the sides and bottom of the bowl with a rubber spatula to make sure all the butter gets incorporated into the batter. Resume beating on medium speed for a further max 10-12 seconds.
Remember, little lumps are not evil! They will disappear during baking. Your batter does not have to be smooth!
Obviously there shouldn’t be large lumps of flour. Squash a few of the lumps out with a spoon to check if they are solid dry flour or a harmless bit of batter that just appears lumpy.
After dividing the batter into the lined tin (aluminum preferably!), it is important to smooth out the batter before baking.
Smooth out the surface of the batter in each hole with a teaspoon. Push the batter up slightly against the edges of the wrapper. I find this helps the cupcakes get an even start in their rising process once in the oven.
Baking:
Butter based Cupcakes bake best on Oven Rack A (or in the center of your oven) at 180˚C.
The cupcakes deeper in the oven will rise faster than those in front. About 8 minutes in, you will need to rotate the cupcakes 180 degrees. Do not take the cupcakes out of the oven to do this. Gently rotate the pan in the oven.
Once you can see there is no more shiny batter in the center of each cupcake, wait for another minute and then test them. You do want the testing pin to be clean. Butter based cupcakes tend to sink if they are under-baked.
When they are done baking, there might be slight variations in size. To fix this is super easy, but it has to be done immediately when the cupcakes exit the oven. You only have a 1 minute window to do this before the cupcakes start firming up. Wipe a butter knife on some butter so it has a very light coating of butter to prevent the cupcake from sticking to the knife. Gently push in edges of the cupcakes that are not perfect according to your liking. Tada! Perfect Cupcakes!
Allow them to cool for about 7 minutes in the tin before transferring them to a rack to cool further.
2. Oil based recipes:
This is where it gets weird. When I started baking more seriously in 2012, I still baked 2 trays of cupcakes at the same time. This saves time and electricity of course!
When it came to the Red Velvet Cupcakes, the cupcakes from Oven Rack A turned out vastly different from Oven Rack B.
The cupcakes from Rack B were so beautifully smooth on top and had a very slight dome – perfect cupcakes! The cupcakes on rack A were a bit cracked, did not rise as well as the cupcakes on rack B, and were a little too pointy.
I realized that this phenomenon couldn’t have anything to do with the batter as the same batter was used for both cupcake trays. The secret HAD to be in the baking.
Baking:
Over time I developed this technique:
Even though your recipe may say “Bake in the center of your oven at 180˚C”, don’t do it. Try this baking method for your oil-based recipes like Red Velvet and Chocolate.
Preheat your oven to 170˚C.
Place a clean and empty roasting tray on rack A.
Place your cupcakes on rack B.
Pour about 1/2 cup water (boiling or not, doesn’t matter) in the bottom of the oven. Truthfully, I cannot even remember how I ended up doing this in the first place, but it really helps the cupcakes rise so much better and keeps them super moist! (DON’T TRY THIS with BUTTER BASED RECIPES. The cupcakes end up overflowing and come out too soft and fragile.)
Turn halfway through baking.
They are usually done baking when there is no shininess left in the center of the cupcakes – which you can see through the glass door.
Remove from the oven and leave to cool in tins for about 7 mins, then transfer to a cooling rack.
Once again, if there is an edge that didn’t come out perfectly round, don’t panic! You can push it in slightly, while the cupcakes are still hot and slightly malleable, with a butter-wiped-knife. Tada! Perfect Cupcakes!
Another handy tip (applies to Fresh Fruit/Vegetable Recipes as well): Just before you pop your cupcakes in the oven, drag the batter right up the sides of the liner all the way around. This not only gives your liner an even appearance on the outside, but also helps your cupcakes to rise evenly. Don’t do this too early or the batter on the sides will dry out and actually cause your cupcakes to rise poorly.
3. Recipes containing fresh fruit/vegetables:
This includes recipes like Carrot Cake, Zucchini Chocolate Cake and German Apple Cake. You probably know that these recipes end up releasing a lot more moisture during baking. The fresh fruit/vegetables release liquid as they bake.
Mixing Batter & Filling Cases:
The biggest tip for making perfect cupcakes from these batters is in the dividing of the batter between your cupcake cases – for 2 reasons:
1. These recipes contain lots of bits. Carrot Cake, for example, can contain grated carrot, raisins, nuts and crushed pineapple! If you fill your cupcakes fully from cupcake 1 down to cupcake 12, the last cupcake often ends up with 1 nut, 1 raisin and a whole lot of batter. The rise is also drastically affected. The last cupcake will rise beautifully, or even too much, while poor cupcake number 1 is an under risen lump of carrot and raisins.
2. Sugar and salt draw out liquid from fresh fruit & vegetables. The longer your batter stands, the more liquid it will become. If you fill your cupcakes fully from cupcake 1 down to cupcake 12, the last cupcake will get batter with a higher liquid content compared to cupcake 1.
To solve these problems, fill all your cupcakes halfway first, from cupcake 1 to cupcake 12. Make sure each one gets a helping of all the bits in the batter.
At this point it is important to give your batter a fold or two, just to distribute the additional fruit/vegetable liquid that has been released.
Then distribute the batter again, going from cupcake 12 to cupcake 1. This method gives me the most consistently perfect cupcakes.
Another handy tip: Just before you pop your cupcakes in the oven, drag the batter right up the sides of the liner all the way around. This not only gives your liner an even appearance on the outside, but also helps your cupcakes to rise evenly.
Don’t do this too early or the batter on the sides will dry out and actually cause your cupcakes to rise poorly. *See image above for this tip.
Baking:
I find Oven Rack A at 180˚C to be best for baking these recipes. No rocket science in the baking here.
Turn halfway through baking.
They are usually done baking when they have an even colour on top. If the center of the cupcake is lighter in colour, they are probably not done yet.
When done, remove from the oven and leave to cool in tins for about 7 mins, then transfer to a cooling rack.
Once again, if there is an edge that didn’t come out perfectly round, don’t panic! You can push it in slightly, while the cupcakes are still hot and slightly malleable, with a butter-wiped-knife.
A shout out to all these lovely posts on how to bake perfect cupcakes! These were the most helpful and accurate ones 🙂
Gosh, this post was quite intense!! I need a drink… dark hot chocolate… Made with cream… With a cinnamon doughnut on the side… yes please!
I really hope you find this helpful. These tips have transformed the quality of my cupcakes forever. I trust they’ll do the same for you!
Want Perfect Cupcake Recipes?
Today’s your lucky day because I’m giving you my Home Bakery’s 3 most popular, perfected Cupcake Recipes for FREE! I’ve spent 7 years perfecting these recipes and have baked and sold literally THOUSANDS of these cupcakes.
I help home bakers start and build calm, profitable Home Bakery businesses with repeat customers, not random orders. Here you’ll find business strategy for people who’d rather be baking.
How to Bake Perfect Cupcakes – Full Cupcake Troubleshooting
Cupcake Troubleshooting is a science – but it’s TOTALLY worth it to get stuck into the nitty-gritty details of baking perfect cupcakes!
Nothing is really quite as perfect as a perfect cupcake. Perfect cookies are cool… But there’s something about achieving perfection in something as delicate as a cupcake!
They tend to expose every shortcoming you may have in your baking skills… Which is why we end up covering them in too much frosting so that you cannot see the bad bake underneath.
Every home baker knows that chocolate, frosting, fresh berries and sprinkles cover a multitude of sins!
There are quite a few helpful articles on the internet, but it really came down to baking cupcakes 1000 times over to figure everything out.
Once again, supplying cupcakes to restaurants and coffee shops has given me ample opportunity to experiment! So grateful!
Here is a FULL cupcake troubleshooting guide that will help you to better understand your cupcake dramas.
Cupcake Troubleshooting (Common Cupcake Errors):
I have to start with a cupcake troubleshooting list before I share my extra methods. Oh gosh, the list is long and we all know how horribly disappointing these results are!
I’ll add some of my own thoughts on each point and provide my favourite links that discuss these topics in more detail.
In my NEXT POST I share my more Advanced, Secret Tips I use to make my cupcakes exceptional, not just error-free!
Cupcake Troubleshooting Problem A:
Cupcakes rise with a pointy top:
Image by The Cooks Academy Blog
1. Your Oven is too Hot
NEVER EVER bake your cupcakes on the thermofan or convection oven setting! EVER! The fan pushes hot air around in the oven, but makes the environment too intense for the batter to handle.
The outer edges of the cupcakes bake too fast, crisp up and stop rising very quickly while the center still keeps rising and ends up pushing through the top of your cupcakes – pointy!
The worst pointy cupcake episode I ever had was when I baked my cupcakes in a convection oven. I cried.
Consider buying an additional thermometer to hang inside your oven. Oven thermostats are not always accurate, but oven thermometers are! An additional thermometer is a MUST for gas ovens especially.
Another reason is over-beating your batter. Make sure you follow the instructions of your recipe. Make sure you added in all the ingredients as directed so that you don’t need to mix in an ingredient after the wet and dry ingredients have been combined.
Certain cake recipes do require extensive beating once all the ingredients have been combined. Just be sure to stick to the required beating time of your particular recipe.
Your cupcakes look perfect when they come out the oven (they seem slightly smaller, but that’s normal right?). Then, within the next 3 minutes, they shrink into puny little things and the texture is also way too dense. Why does this happen?!
It’s happened to me 7 times, for 6 different reasons:
2. The cupcakes were under baked:
Perfect cupcakes are obviously not over-baked, but it really is important for them to be baked properly. I’ve found that it’s quite ideal if one or 2 moist crumbs stick to the bottom of the skewer after testing. Then you have a perfect bake.
There should never be any traces of batter glued to the skewer. Also be sure to insert the skewer all the way to the bottom of the cupcakes, not just to the centre.
If the batter has not cooked and formed a proper structure, it will sag down (and in) once out of the oven.
3. Over-beating the batter:
Over-beating your batter overworks the gluten, making it tough and less likely to rise. Another analogy is that you are beating in too much air which will then escape once your cupcakes are out of the oven, causing them to shrink.
4. Self-raising flour fail / Old baking powder:
It is a handy ingredient yes, but not always so trustworthy in my experience. In summer I make the most amazing Passion Fruit & Raspberry cupcakes. They had come out perfectly every time before this one particular day.
I always bought the best Self-rising flour our country has to offer. This one day they shrunk into oblivion!
I made them again – same result. Then I made them yet again, but this time using flour and baking powder – perfect cupcakes!
Since that fateful day I’ve swapped self-rising flour for all-purpose flour and baking powder. Just use 2t baking powder per 160g (1 cup) Flour. Perfect!
5. Poor quality sugar:
I did not see this one coming. Sugar is sugar, right?
Turns out it’s not.
Our grocery store had this tower of sugar with bright red “sale” signs all over – of course I was going to buy it! It was a brand I had never seen or heard of before, but come on! It’s on SALE! I bought a few… Little did she know…
The poor cupcakes shrunk to about half their original size in just 2 minutes after exiting the oven. I made them again with a trusted brand of sugar – perfect cupcakes! We ended up using the poor quality sugar in our tea and coffee.
6. Too much sugar:
It was purely just a lack of focus that revealed this error. My mind was occupied with a lot of stuff…
Towards the end of mixing my batter I could not remember if I had added the sugar… It’s important to note that this recipe contained 3 different types of sugar. White, demerara and golden syrup, so I couldn’t just taste it and figure it out.
I wasn’t sure if I had added the white sugar. What to do?
So the cake would be a tad too sweet if I might be adding extra, big deal.
Shrinking cupcakes are a big deal though. And shrink they did. Be sure to focus, follow your recipe and don’t add extra sugar!
👉 Question: Do you want to SELL your home baked goods so you can make more income?
Eggs vary in sizes. I generally get quite upset when a recipe doesn’t specify what size egg you should use.
Too much egg WILL shrink your cupcakes.
Once I added about 1,5 times the amount of egg the batter specified because I didn’t want to waste half an egg. In the end I wasted a batch of cupcakes instead!
I always WEIGH the amount of egg I use.
Crack it in a cup, whisk it lightly with a fork and then weigh the exact amount of grams you put in. If the cupcakes come out perfect, make a note on your recipe of the weight of egg you used, so that you’ll know how much to use when you make the recipe again.
If you feel the cake needed a bit more egg, make a note of that too. Weighing the amount of egg I use has made all the difference in my baking.
If this bit of effort gives me perfect cupcakes, I’m more than happy to do it.
Are you willing to sacrifice one minute of extra effort for perfect cupcakes? If you think about it that way, it’s totally worth it 🙂
8. Important notes on liquidy batters:
If your batter has a high liquid content, shrinking will occur after baking. The liquid produces a lot of steam. This steam puffs up the cupcake, but will evaporate after baking and your cupcakes will shrink.
Most amazing chocolate cupcake recipes call for boiling water, which is totally fine. I always just add about 1/5 less water than the recipe states – just in case!
First you get excited because you can see your cupcakes are rising so well in the oven. How delightful! “These are going to be my most perfect cupcakes ever!” you think out loud.
Then they continue to rise… upwards and then outwards! Wait, Stop! Nooo!
So, what causes this?
9. Too much Leavening Agent:
More often than not, the reason is too much baking powder or bicarbonate of soda. Especially with bicarbonate of soda. “Soda spreads, powder puffs” Kitchen Conundrums always says.
I always weigh my baking powder and baking soda while sifting the dry ingredients together. Seriously 1 little gram does make a difference!
Think about how dangerous measuring is. Some folks scoop out a compacted teaspoon of baking powder, while others pour it out of a refill pack. There is just too much room for error.
Write down on each recipe the exact weight of baking powder you use so that you will know for the next time you make that recipe and get consistent results. Also stick to one brand! All of them differ, even if it is just slightly.
10. Overfilling your cupcakes:
If you see there is a bit too much batter, rather bake half a cupcake extra. Rather have one little manky one (which serves as your sneaky treat anyway) and 11 perfect cupcakes as opposed to 11 overflown cupcakes.
11. Oven temperature is too low:
Preheat your oven till the exact temperature before putting the cupcakes in the oven. If the temperature is too low, the outer batter will take longer to cook, extending the cupcakes’ rising phase beyond normal.
Consider buying an additional thermometer to hang inside your oven. Oven thermostats are not always accurate, but oven thermometers are! An additional thermometer is a MUST for gas ovens, especially.
12. Too much acidity:
I once tried out a lemon cupcake recipe which called for lemon juice in the batter. I made a batch with lemon juice and one without. The batch with lemon juice completely overflowed.
Acidity can also act as a rising agent. Think of traditional Red Velvet Cake. The vinegar, along with the bicarbonate of soda, makes the cake rise.
Cupcakes bake out in weird little overflowing limbs:
Image by maisoncupcake.com[/caption]
1. Oven temperature is too hot:
If your oven temperature is too hot, the outer layer of batter will bake and harden too quickly. The centre of the cupcake will still be liquid batter that needs to expand and go somewhere!
It will find the weakest spot on the cupcake and force itself out in that direction.
Consider buying an additional thermometer to hang inside your oven. Oven thermostats are not always accurate, but oven thermometers are! An additional thermometer is a MUST for gas ovens especially.
13. Unevenly mixed batter:
Always be careful of unevenly mixed cake batter when using a stand mixer. In fact, this can also occur when using a handheld electric beater.
Gently go around the bowl with a rubber spatula to loosen any butter and sugar that might still be stuck from the creaming phase.
Be sure to do this on the bottom of the bowl as well. Gently keep folding the batter with a rubber spatula till there are no streaks of butter left.
8. Too much leavening agent:
This can cause total overflowing (as discussed above) or sporadic overflowing in selected areas around the edges.
Cupcake peels away from the wrapper all by itself:
Image by Jessica Harris Cake Design
This tends to happen when I bake gluten free cupcakes. I assume it is because gluten free goods contain less binding agents. In that case it makes sense that there is less binding between the cupcake and its wrapper as well.
The way I solve this is to use average quality cupcake wrappers. They have a poor non-stick ability, so they stick very well to cupcakes. With regular cupcakes this can be annoying, but with gluten free cupcakes it works perfectly!
14. Under baking your cupcakes:
With regular cupcakes it is usually due to under baking your cupcakes. When the cupcakes cool, they then shrink inwards and leave the wrapper behind.
15. Fancy Cupcake Liners:
This problem also occurs with fancy cupcake wrappers. All cupcakes will shrink at least a little bit after baking. If your wrapper is a rigid one, the shape of the cupcake will change post baking, but the wrapper will remain the same.
This isn’t really a make or break cupcake issue. It’s just annoying when you handle your cooled cupcakes and then bits of them stick to your fingers!
Here’s why this happens. The sugar in your cupcakes is reacting with the moisture in the air.
A great way to explain this is to think of a piece of hard piece of candy (which is almost made of just sugar). What happens when you leave a piece of candy, unwrapped, on your counter overnight? The next morning it will be sticky at the very least! If it’s your rainy season, there might be a sticky puddle underneath the candy.
And it’s all because the moisture in the air kind of mixes with and “dissolves” the sugar. The result is moist, dissolved sugar.
Sadly, there’s no way to prevent your cupcakes from having sticky tops. Even if you store them in an airtight container overnight, the moisture in that small amount of trapped air will already be enough to make your cupcake tops sticky.
Don’t fret though! Sticky cupcakes are totally okay! You’re going to add frosting on top anyway, so don’t worry about it 😊
This concludes my FULL Cupcake Troubleshooting! Thanks for reading! If you have had any other cupcake struggles which are not discussed in this post, please share them. I’ll answer them to the best of my ability or direct you to someone who can.
Want Perfect Cupcake Recipes?
Today’s your lucky day because I’m giving you my 3 most popular, perfected Cupcake Recipes for FREE! I’ve spent 7 years perfecting these recipes and have baked and sold literally THOUSANDS of these cupcakes.
I help home bakers start and build calm, profitable Home Bakery businesses with repeat customers, not random orders. Here you’ll find business strategy for people who’d rather be baking.
I help home bakers start and build calm, profitable Home Bakery businesses with repeat customers, not random orders. Here you’ll find business strategy for people who’d rather be baking.
Hey! Wanna start a Home/Micro Bakery, but overwhelmed with where to start? My free Masterclass can help →save your seat here
This website uses cookies to ensure that we give you the best experience on our website.AcceptRejectRead More
Privacy & Cookies Policy
Privacy Overview
This website uses cookies to improve your experience while you navigate through the website. Out of these, the cookies that are categorized as necessary are stored on your browser as they are essential for the working of basic functionalities of the website. We also use third-party cookies that help us analyze and understand how you use this website. These cookies will be stored in your browser only with your consent. You also have the option to opt-out of these cookies. But opting out of some of these cookies may affect your browsing experience.
Necessary cookies are absolutely essential for the website to function properly. This category only includes cookies that ensures basic functionalities and security features of the website. These cookies do not store any personal information.
Any cookies that may not be particularly necessary for the website to function and is used specifically to collect user personal data via analytics, ads, other embedded contents are termed as non-necessary cookies. It is mandatory to procure user consent prior to running these cookies on your website.
















 ! They are affordable and so convenient! I have a small A5 size scale.
 Images by bhg.com and rachelteodoro.com[/caption]


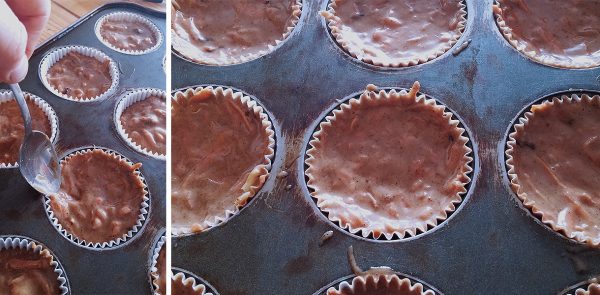


 Image by The Cooks Academy Blog


 Image by maisoncupcake.com[/caption]
 which expand and contract with the cupcake.