Gluten Free Flour is just as essential in my kitchen as regular Cake Flour. If you’ve been following my blog for a while, you will know that my husband, Adriaan, is gluten intolerant. The news was such a downer initially…
We both kept thinking of all the foods he could no longer eat; bread, pies, pasta, pizza, cookies, CAKE!!
The list just felt so long and heavy.
One of the main ways I communicate my love and support is through cooking and baking. It’s my “thang”, you know. Over months of researching and trying out dozens of recipes, I had to face the hard truth that gluten free baked goods simply aren’t as delicious as normal baked goods.
I mean, for a poor gluten free soul they are better than nothing, but come on, I wanted Adriaan to leap in the air over the yumminess!
There had to be a solution to gluten free baking that would produce goods SO YUMMY that they actually make him dance with joy…
The Cravings
The main thing Adriaan was craving was just an ordinary yellow cake. Nothing fancy – just pure and honest cake. Thing is, the simplest bakes are the ones that leave ingredients nowhere to hide!
Making a chocolate cake is so much easier in that sense, because if your gluten free flour blend has a slightly funny flavour, it will be masked by the chocolate flavour (gluten free bakers nodding in agreement here).
Another impossible craving he had, was for pie! Flaky, buttery pastry. What more does a man need? Except a wife to make it of course.
Adriaan used to eat tons of pies. In South Africa they are everywhere. From every grocery store to the smallest take away shop in a run-down neighbourhood. I often made a butternut, spinach and feta pie for us at home as well.
Making gluten free cake is one thing, but pastry is a whole other colossal monster.
Why so complex?
As I’ve said before, I have done hours and days of research online. MOST gluten free flour/cake recipes were severely annoying.
They called for these crazy ingredients which I’ve never seen before in my life and could not find in any supermarket or health food store in my area.
Things like Ultratex, Expandex and Whey Protein Isolate… What?! Or should I say “Gezuntheid”?
I was on a mission to find something that could be made with ingredients that are available to me and can easily be mixed with no special equipment or effort.
Breakthrough
One fine day I was searching for gluten free flour/cake recipes yet again and I came across Yammie’s Gluten Freedom. Her recipe for White cake looked fantastic.
I wasn’t too keen on making it though as the recipe called for coconut flour as well (which is too expensive) and if I can avoid doing the egg white thing, I prefer to do so. BUT, Yammie gave a link to Jeanne’s gluten free flour recipe on Art of Gluten Free Baking.
I tried out the flour blend and it was really really good!
Refining the Recipe
This gluten free flour blend was a great breakthrough and made cupcakes that improved Adriaan’s quality of life significantly.
I also started using this gluten free flour in my own bakery for all gluten free cakes. After a few months however, I realized that there is a slightly grainy residue in your mouth when the crumb breaks down. Not severe, but it was still there.
When I made a gluten free cake about a year later, I had run out of glutinous/sweet rice flour. Such a bummer.
Going to a Asian supermarket was not an option on this particular day, so there had to be a plan B! Art of Gluten Free Baking suggested Potato Flour as a substitute for Sweet Rice Flour.
The result was just so much better! Such a soft and tender crumb! In the meantime I’ve also increased the amount of Xanthan Gum and Brown Rice Flour as well. I’m so extremely happy with the recipe as it is now!
And I love that I can find ALL of these ingredients in my closest health store/supermarket!
This gluten free flour can be substituted gram for gram in ANY cake recipe! I also use it to make shortcrust pastry, rough puff pastry and even in homemade pasta! Pasta that can be rolled into sheets with a hand operated pasta machine – I kid you not!
I mix 1 kg of flour in a little sealed bucket and keep it in my cupboard to whip out whenever I need it.
You’re welcome to halve or quarter the recipe if you need to.
I go by grams because the accuracy is just better when it comes to dry ingredients. Now go bake yourself some perfect gluten free cake with your favourite normal cake recipe!
Important note: This flour recipe is not ideal for making bread, cookies or brownies, but I do have an Ultimate Gluten Free Brownie Recipe 🙂
230 g Potato Flour (not starch, different ingredient)
175 g Tapioca Flour (or starch, same thing in this case)
65 g Chickpea Flour
14 g Xanthan Gum
Instructions
Weigh ingredients into a bowl or tub with at least a 2,5 kg capacity. Some of the flours are quite fine and will form dust as you mix them.
Using a metal spoon, VERY gently fold the flours together. Be sure to dig all the way down and scoop the flour up in the process. Get into all the corners as well. Do this for about 1 minute.
Next stir the mixture gently again, but this time using a handheld balloon whisk. Keep stirring for 1 minute. Be thorough.
Put your gluten free flour in a sealed container. It will last as long as the actual ingredients – a couple of months.
3.5.3226
I’m pretty sure you will enjoy my Ultimate Gluten Free Brownies Recipe… I’ve literally sold like over 8000+ of them. They are AMAZING!!
Thanks so much for reading! Let me know if you like my gluten free flour blend as much as we do.
Chat soon!
Aurelia
What info are you looking for?
Hi! I’m Aurelia 🙂
Since 2018 I’ve helped home bakers learn the business side of baking and build lasting businesses that fit their lives.
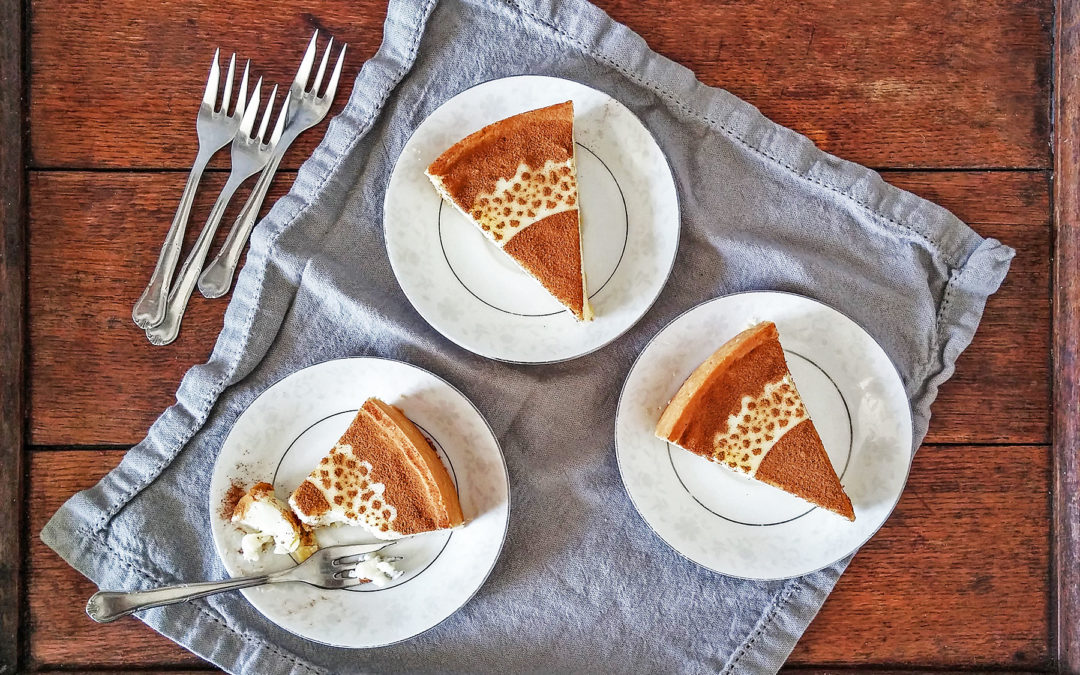
Milk Tart is just the most delicious South African dessert EVER. It is a staple in every single South African grocery store, coffee shop, bakery, café etc.
Having a barbeque at a friend’s house? You buy meat, drinks and a Milk Tart.
Hosting a family dinner at your house? You buy the ingredients to make a Milk Tart.
Having tea at your Gran’s? You buy nothing, because she’s probably already baked a Milk Tart!
I was so obsessed with Milk Tart as a kid that it was my birthday cake of choice for quite a few years (And I had a phase where I loved wearing my dad’s shirts! I’m the one with the white headband).
My gran was also an avid baker! We would go visit her very often in our childhood years.
My sister and I were HUUUGE fans of her baking. My sister’s favourite tart was Lemon Tart and mine was, of course, Milk Tart so we would have to take turns choosing the “tart of the weekend”… Apparently we couldn’t have both… Something about overeating.
There was also an incident in the small town of Tulbagh where our health conscious little family of four finished off a Milk Tart the size of a pizza in one go. Fun times.
Milk Tart is essentially a custard tart (with cinnamon) inside a pastry base which can be eaten warm or cold. It was derived from a recipe brought over by the Dutch settlers in the 1600’s. The Cape Malay folks (creators of Bobotie) adapted the recipe and added some spices. More on the history of Milk Tart.
Milk Tart has come a long way since the 1600’s and we now even have a National Milk Tart Day every year! 27 February is still some time away, but I thought I’d share my recipe for Milk Tart NOW so that you can be prepared and make a delicious one of your own for the 27th 🙂
Different Milk Tart Techniques:
As with other custard tarts there are a few different approaches to making Milk Tart. Some folks prefer a flaky puff pastry base. Others prefer a crunchy shortcrust pastry.
Some even take a shortcut and use crushed cookies for the base. There are instructions for this in the recipe as well. When you use crushed biscuits for a base you can whip up this Milk Tart in 30 minutes!
The custard itself also has different approaches. It can either be baked in the oven or cooked on stove-top and poured into a pre-baked base.
Personally, I do not like puff pastry with this dessert. The crisp, buttery-ness of shortcrust pastry just works SO much better with the smooth custard filling.
I also prefer the stove-top Milk Tart custard over the baked custard. The stove-top custard is just smoother and silkier – yum! Some of the custard methods can be super tedious – whipping egg whites and folding them in, then baking the tart after the custard had been on the stove as well!
Too much unnecessary effort. If you can get amazingly silky smooth milk tart with less effort, I don’t see the point in making it laborious.
Some recipes also call for condensed milk inside the custard. Although this approach also yield a lovely texture, the overall flavour becomes too sweet. For this reason I really prefer using regular white granulated sugar. It dissolves completely without you even needing to think about it.
I also really prefer to eat Milk Tart at room temperature – not hot or cold. Goldilocks had a point.
Milk Tart Recipe Introduction:
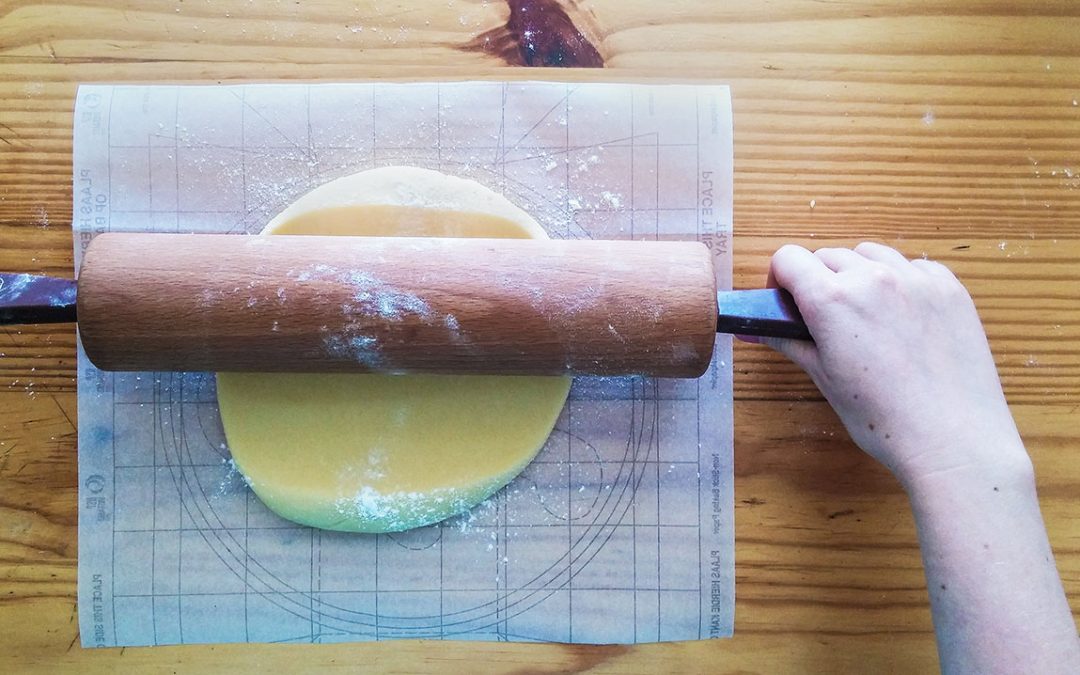
Shortcrust pastry is a breeze to make in a food processor. However, if you do not have a food processor you can make the pastry by hand as well. I particularly love this pastry recipe because it doesn’t require heaps of resting, but delivers incredible results.
Custard requires your full attention. Do not leave the stove. It’s a super easy custard, but be fully present while you make it so that it doesn’t catch and burn or turn out lumpy.
Ultimate Milk Tart Recipe
INGREDIENTS:
FOR THE PASTRY: 170 g Flour 40 g Icing Sugar 110 g Salted Butter 1 Tbsp Ice Cold water
EASY ALTERNATIVE BASE (if you don’t have time to make pastry): 200 g Digestive Biscuits (Graham Crackers), crushed 80 g Unsalted Butter, melted
FOR THE FILLING: 800 g Milk (4-5% fat) 100 g Cream (around 35% fat) 2 eggs (110 g) 120 g Granulated White Sugar 40 g All Purpose Flour 40 g Corn Starch Pinch of Salt 2 Tbsp Salted Butter 1 tsp Vanilla Extract 1/2 Tbsp Ground Cinnamon
INSTRUCTIONS:
FOR THE BASE: 1. Visit my post on Shortcrust Pastry for the pastry method. 2. Make the sides of the base about 3,5 cm high. 3. The quick & easy route: Swap the pastry for 200 g crushed Digestive Biscuits (Graham Crackers) mixed with 80 g Melted Unsalted Butter. Stir together thoroughly and press the mixture firmly into a 25 cm (10 inch) pie/tart dish OR a 25 cm x 17 cm (10 x 7 inch) rectangular dish. Refrigerate while you make the filling.
FOR THE FILLING: 1. Preheat your oven to 70˚C (158˚F). You’re not going to bake the filling, you’re just going to leave the tart in a warm-ish oven while it starts setting so it doesn’t crack. 2. If you’re using an electric stove to make the filling, preheat one stove plate on medium heat. No need to do this if you’ve got a gas stove. 3. Place the milk & cream in a large microwavable bowl. Microwave until hot – about 4 minutes, but watch it so it doesn’t boil over! 4. In the meantime, place the eggs, flour, sugar and salt in a medium heatproof mixing bowl. Stir with a whisk until combined and smooth. Do not whip the mixture. We do not want to incorporate air. 5. Now the egg mixture needs to be tempered before it can be added to the pot. Scoop half a cup of the hot milk out and very gradually and vigorously whisk it into the egg mixture. Continue gradually whisking in half a cup at a time until about half the hot milk has been whisked into the egg mixture. 6. Pour the remaining milk into a large pot. Pour the egg mixture into the warm milk in the pot as well, whisking the milk all the while. Be sure to scrape in each last bit with a spatula. 7. Place the pot on your stove on medium heat. Whisk constantly – it can catch and burn on the bottom of the pot. The custard will thicken and very large bubbles will start to break to the surface. Keep cooking and whisking the custard for another minute to ensure all the flour is cooked through. 8. Remove from the heat and whisk the butter and vanilla in thoroughly. 9. Transfer to your pre-baked pastry OR crushed biscuit base immediately. Smooth out the surface. Be sure to push the custard against the sides of the pastry so that the two adhere to each other. Failure to do so will result in the custard pulling away from the pastry as it cools. 10. Turn off your oven and place your milk tart inside it – leave the door slightly open. Letting the milk tart set inside a warmer environment initially, helps it not to crack on the surface. 11. After 1 hour, remove the tart from the oven and put in your fridge till completely cool and fully set – about 3 hours. 12. If you used pastry for a base, remove the tart from the tin. The pastry is very stable, so you can push the whole tart onto a flat serving plate or cake stand if you wish. I recommend pushing onto a cake board first and then placing it on your serving dish. 13. Dust the tart with ground cinnamon. You can just dump it on, but I like to use the rim of a doily as a stencil. It creates quite a pretty finish. I use a little tea sieve to dust on the cinnamon – it gives a finer dusting. 14. Milk Tart is delicious served cold, but I prefer room temperature. Let it stand at room temperature about 30 minutes before serving. Enjoy!
Thanks for reading! If you give this Milk Tart a go, tag me on Facebook, twitter or Instagram @philosophyofyum because I would LOVE to see!
Chat soon!
Aurelia 🙂
What info are you looking for?
Hi! I’m Aurelia 🙂
Since 2018 I’ve helped home bakers learn the business side of baking and build lasting businesses that fit their lives.
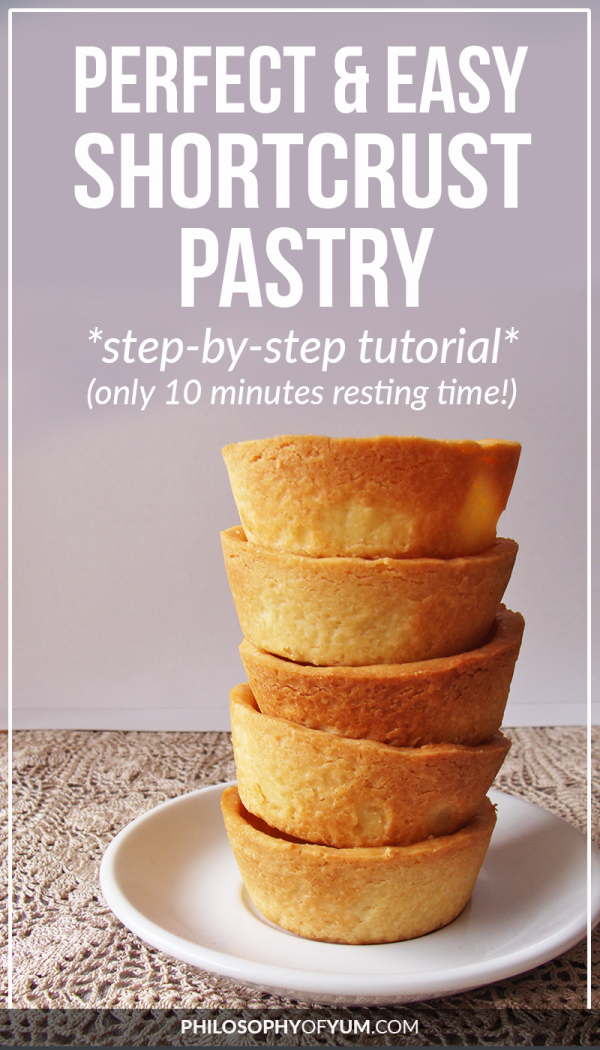
Shortcrust pastry used to SCARE me. I saw it as this shrinking, complicated fragile nemesis only to be conquered by professional chefs. In reality it’s so incredibly easy! It is really even easier to make than any cake.
It’s super quick and in a few moments you have a crisp, golden, buttery piece of heaven! Not to mention all the possibilities for fillings and flavours!
Egg or No Egg:
I’ve tried a few different recipes over the years; some with egg, some without, some with only egg yolks. I prefer not to involve eggs because they can diminish the buttery flavour of pastry and make the pastry less short.
I think eggs work extremely well in cheesecake pastry because you need that extra structure to carry the weight of the heavy cheesecake. I only use eggs inside pastry for practical purposes and when absolutely necessary.
Blind Baking:
I used to dismiss recipes as soon as I read the words “blind bake”. BUT it’s not a big deal at all! It’s so easy and straight forward.
We need to blind bake pastry to keep it in the shape we want it. ALL shortcrust pastry WILL shrink during baking when water evaporates from the dough. All shortcrust pastry WILL change shape while baking, but we can minimize this with blind baking the RIGHT way.
Important notes on blind baking that make it a breeze:
Use heavy weight foil, NOT baking parchment. It yields the best results and can handle the weight of baking beans etc. Remember to place the dull side of the foil (and spray it with non-stick spray) on the pastry as it has non-stick properties. Always cut a generous piece of foil so there’s enough to wrap around the upper edges of the tin – otherwise the exposed pastry will cook faster than all the rest under the foil. When you’ve frozen your pastry solid, press the greased foil directly onto the pastry in the tin. Don’t leave any air gaps between the pasty and the foil!
Use lentils or rice for “baking beans”. Lentils are smaller, so they get into those edges a lot better than large baking beans can.
When you’ve finished blind baking the shortcrust pastry, remove the lentils/rice by scooping them out into a bowl. If you try to lift everything out in one go, the foil will tear.
Once you’ve removed your blind baking geat, brush the inside of your pastry thinly with egg white. Return to the oven and bake till golden. The egg white seals your pastry so that a wet filling won’t make the pastry soggy.
Shortcrust Pastry Recipe Introduction:
This is my go-to recipe for shortcrust pastry. There’s no “rest for 2 hours or overnight” thing going on. You merely chill it for 10 minutes, roll it out (no resting in between), freeze it for 5 minutes, smooth it out, freeze it for 10 minutes and then bake it!
I’ve also included step by step photos of the method I use to painlessly transfer the pastry to a tin.
You’ll need a 9″ loose bottom cake tin. I like to use a cake tin because I like a straight, smooth finish on my tarts, but you are welcome to use a fluted tart tin as well.
I love using Salted Butter in pastry. Most people prefer to use unsalted butter so that you can control the amount of salt that goes into your bakes. This makes a lot of sense and I actually agree, but with pastry, salted butter is just incredible.
If you insist on using unsalted butter, then add 1/2 tsp salt to the recipe.
You can find the instructions for MINI TART SHELLS after the main recipe!
Place flour in a food processor. Cut the butter into a 1 cm dice and add to the food processor. Try to distribute the cubes of butter evenly in the flour so that they don’t stick together.
Process on high speed until resembling fine bread crumbs.
Add icing sugar and process for about 10 seconds on high speed.
Add the water and process on high speed for about 15 seconds. The pastry will not form a ball inside the processor.
Pour the crumbly mixture onto a work surface – do not add any extra liquid! Press all the crumbs together and work the pastry till smooth and silky. This should take only about 3 minutes. Form the pastry into a ball and squash it flat to a 2 cm thickness.
Wrap the pastry in cling wrap and refrigerate it for 10 minutes.
Cut a 30 cm x 30 cm square of non-stick parchment paper. Place the chilled pastry directly on the paper. Flour only your rolling pin and roll out to a 3 mm thickness roughly in a circular shape by turning your pastry 90 degrees after every second roll or so. The parchment paper makes it super easy to turn the pastry when rolling!
Spray/butter the inside of a 9 inch tin. Place the loose bottom face side down onto the pastry. Cut around the sides of the tin’s bottom and also at 12, 3, 6 and 9 o’clock to divide the excess pastry into 4 strips.
Remove the strips one by one and place to one side. Press down on the tin’s bottom so that the pastry squishes out slightly underneath. I find this little lip of pastry helps to combine the pastry on the sides with the pastry on the bottom.
Flip the parchment paper and tin’s bottom. Peel away the paper.
Drop your tin’s bottom back into your tin and fill in the sides of the tin with your pastry strips using your fingers. I make the edges about 1 inch high. You will use all the pastry. Do not worry about a smooth finish just yet.
Preheat your oven to 180ᵒC/350ᵒF.
Place your tin in the freezer for 5 minutes. Remove from freezer and smooth the edges and bottom with a metal spoon. Return to freezer for a further 10 minutes or until frozen solid.
Line the entire tin with heavy weight foil (enough to go up over the sides. Leave no pastry exposed). Grease the dull side of your foil with non-stick spray and smooth the foil onto the pastry. Don't leave any air gaps between the foil and the pastry. Fill the cavity with baking beans (I prefer lentils because they sink into the nooks and crannies extremely well).
Bake in the center of your oven for 30 minutes, turning after 15 minutes. Remove from the oven and leave to stand for 5 minutes. If you are planning to bake a filling inside the pastry, blind bake for 20 minutes, turning after 10 minutes.
Remove the baking beans and then the foil. Prick the bottom of the pastry with a fork. Egg-wash the inside of the pastry with egg white only. This creates a nice seal on the pastry so that it doesn’t go soggy when holding a wet filling.
Return to the oven and bake for a further 10 - 15 minutes, turning after 6 minutes. The pastry should be very lightly golden.If you are planning to bake a filling inside the pastry, bake for 8 minutes, turning after 4 minutes. It won't be golden.
Leave to cool completely and transfer to a cake board or special plate/stand if you wish – the pastry is stable enough to handle the transfer.
3.5.3229
Mini Tart Shells
You can also use this recipe to make 10 perfect little tart shells in a regular muffin tin!
Divide the pastry evenly between 10 holes. About 34 g of pastry each.
Press it out evenly in each hole. Chill in the freezer for 5 minutes.
Carefully smooth out the top and inner edges with a teaspoon. Freeze for 10 minutes till the pastry is hard.
Line each pastry shell with heavy weight foil and fill the cavity in the foil with rice. Make sure your pastry is rock solid before you do this!
Bake one notch below the middle of your oven for 8 minutes. Rotate the pan 180 degrees and bake for another 8 minutes.
Remove from the oven. Remove blind baking gear. Lightly brush the inside of each tart shell with egg white to create a seal. Return to oven for another 8 minutes, rotating halfway through.
When they reach an even golden brown colour, they are done! Allow to cool completely before removing from the muffin tin.
Thanks for reading! I’m quite confident that this shortcrust pastry recipe will become your go-to recipe as well.
Lemon Meringue Pie is HEAVENLY, but it can be a VERY tricky dessert to make…
The 3 different components (pastry, filling and meringue) require perfect execution.
One of the biggest challenges, for me, was developing a recipe that isn’t so blindingly sweet! Sheesh.
After eating a slice of lemon meringue pie you often hear that heroic phrase booming in your head “I’m NEVER eating anything sweet again!” Ha. Well, at least that’s the sentiment for the next 30 minutes post-dessert.
So, what makes the perfect Lemon Meringue Pie?
I want the slice to hold, have a zingy and buttery flavour with smooth, soft and crunchy textures going on.
No weepy liquids anywhere. Definitely no runny filling, but also not a borderline yellow rubber experience either. Crispy, buttery pastry is an absolute must!
My Journey with Lemon Meringue Pie
I avoided making Lemon Meringue for YEARS!
Someone would try to order it, but I would always find a way to unfortunately be “out of town” or “fully booked” on those days.
Truth is, I was petrified of making Lemon Meringue pie! This fear stemmed from watching The Great Australian Bake Off Season 1.
Every week the bakers had a technical challenge and in week 2 it was the humble Lemon Meringue Pie. One contestant n particular was super excited about the challenge – Bliss. She baked these pies for her Mom all the time!
On this day however, her pie was a total disaster…
My husband and I were watching the show together and we were just cringing all the way through the episode!
Thing is, MOST of the contestants were having so much drama with this challenge! I think only a quarter of them didn’t have a runny filling.
Needless to say, Lemon Meringue Pie climbed to the top of my chart of “Most difficult things to bake.”
I do believe that Bliss has baked a ton of successful Lemon Meringue Pies for her Mom, but in GABO technical challenges you have to bake the recipe they give you. You may know by now that method matters to me more than anything else when it comes to baking.
I realized however, that the success of your Lemon Meringue pie does ride completely on the quality of your recipe.
I set out on a mission.
For about 1 year I watched EVERY SINGLE Youtube video on Lemon Meringue Pie.
There had to be a recipe that doesn’t waste 8 egg whites or (on the flip side) waste 8 egg yolks.
A recipe that doesn’t require bizarre, temperamental gelatin setting excursions. In short, there had to be a recipe that is user friendly and yields perfect results!
Technical Insights
The Base:
Honestly, the base is really up to you. Some people prefer crushed cookies with melted butter which is really delicious.
I prefer pastry, because I love the crunchier result it gives you. It is also just more buttery and doesn’t crumble apart when you lift out a slice.
Another reason I love this pastry recipe is because it is firm enough to slide the entire pie onto a cake board or another serving platter!
The Lemon Filling:
I tried out all the different recipes I could find for lemon fillings and I must say that cooked lemon fillings are definitely a lot less sweet than uncooked ones. I’ve also found that uncooked filings often do not hold their shape.
So what are the options?
Baking a lemon filling in the oven is too tricky. It can so easily over bake and curdle. NOT user friendly at all. Stove top Fillings are the answer – really!
There are a few different approaches to Stove top Lemon Fillings as well. Some folks have a pure lemon curd approach (Kitchen Conundrums and Gemma Strafford), but I find the flavour is just way too intense and sweet instead of balanced.
These lemon curd fillings contain very little eggs and the only liquid comes from lemon juice which explains why the flavour is just too intense.
A BIG downer with these recipes was also that you had to strain the curd at the end… It is really thick and takes up to 40 minutes of serious elbow grease to force it through a sieve. Absolutely terrible for little, lightweight people like me.
For a while I made a lemon filling that sets with gelatin by Bruno Albouze. While the flavour was quite nice, the filling always started melting when you took the pie out of the fridge for a while! Not cool. There had to be a filling that was not so sensitive to temperature.
Stephanie Jaworski makes the most wonderful Lemon Filling that uses lemon juice as well as water which makes for a balanced, yet tart lemon filling.
There are no weird or tedious methods, so all in all the whole experience is very user friendly. I do add a bit more lemon juice and lemon zest than she does, but her recipe is brilliant as well.
This lemon filling has NEVER flopped or come out on the runny side and it is so easy to make!
Another reason I love Stephanie’s video on lemon meringue pie is that she speaks about another technical issue to help the meringue adhere to the filling. The filling should be warm when you add the meringue on top. This also prevents weeping. So cool!
The Meringue:
The first video I watched on the meringue part of Lemon Meringue Pie was by Kitchen Conundrums. Fantastic video! Thomas Joseph makes all 3 of the different meringue types (French, Swiss and Italian) and tests them on top of Lemon Meringue Pie.
You can see clearly that French Meringue will end up weeping and slide around on top of your lemon filling. This is because the egg whites have not been cooked properly. I find that even when French meringue has been broiled in the oven, it will still weep.
I LOVE Italian Meringue. Some folks prefer Swiss, but my standing mixer doesn’t have a heat proof bowl so I had to revert to Italian meringue. It is such a soft and super smooth meringue – oh my!
To me it is also the least labour intensive meringue because the standing mixer and stove do ALL the work. The only way this meringue can cause weeping is if you over whip the egg whites before the sugar is added.
In Swiss and Italian Meringue the egg whites are already cooked, so you don’t need to return the pie to the oven. I use a little blowtorch to brown my meringue, but you are also welcome to broil it in the oven if you don’t have a blowtorch.
So here we go – this is my recipe for Perfect, Fail-Proof Lemon Meringue Pie 🙂
82 g (5) Large Egg Yolks, room temperature (reserve the whites)
240 g White Sugar
½ tsp Salt
70 g Corn Starch
390 ml Boiling Water
35 g Unsalted Butter
160 ml freshly squeezed lemon juice, strained to remove seeds and pulp
2 Tbsp Lemon Zest
Italian Meringue:
250 g White Sugar
80 g Boiling Water
4 egg whites
Pinch of Salt
¼ tsp Cream of Tartar
1 tsp Vanilla Extract
Instructions
Pastry:
Place flour in a food processor. Add the diced butter and jiggle it around a bit so that all the butter is covered in flour and not sticking together.
Process the flour and butter together on medium speed until resembling bread crumbs.
Add the icing sugar and process for another 15 seconds.
Add the ice cold water and turn the processor on for another 15 seconds or until the mixture starts clumping in the machine. Do not keep processing until all the dough comes together! It is a firm dough, so it is not as wet.
Dump all the contents (there will be many dry crumbs, don’t panic) onto a work surface and knead the dough until smooth – about 2 minutes. Do not add more water.
Flatten your pastry out slightly until it is about ½ inch thick. Wrap it tightly in plastic wrap and chill in the refrigerator for 10 minutes.
In the meantime prepare your tin. I use a 9 inch loose bottom cake tin. Spray or lightly butter the inside of your tin, making sure to only grease about 2 inches up the sides if you are using a deeper cake tin.
Remove pastry from the fridge and roll out on a large piece of baking parchment to about 3 mm thick. Rotate the parchment every few seconds so that your pastry is rolled out more or less into a circle.
Place the base of your tin face side down on top of the pastry and cut around the sides of it. Trim off the excess pastry around the base and keep to one side. Place one hand under the parchment paper and one side on top of the base. Flip the pastry in one swift motion.
Fit the pastry covered base back into the tin and fill in the sides with pastry using your thumbs. If you are using a cake tin, only take the pastry about 3,5 cm up the sides.
Freeze the pastry for 5 minutes. Remove from freezer and smooth the surface and edges with a spoon if desired. Return to the freezer for an extra 15 minutes.
Preheat your oven to 180˚C (350˚F). Blind bake the pastry for 20 minutes using foil. Remove the baking beans and foil. Brush the inside of the pastry with beaten egg white and prick holes in the base with a fork.
Return the pastry to the oven until lightly golden brown.
Leave to cool inside the tin.
Lemon Filling:
Place a damp washcloth on your work surface to keep things from sliding around. Add all the egg yolks to a medium mixing bowl and place on top of washcloth.
Place the white sugar and corn starch in a medium sized pot and stir to combine. Gradually pour in the boiling water while whisking with your other hand.
Transfer pot to a medium heat. Keep stirring with a whisk. The mixture takes a while to heat up, but then it thickens very quickly. Let the mixture come to a low boil. Large steam bubbles will begin to form and the mixture will start to become translucent. Keep the mixture on a low boil for another 2 minutes, whisking all the while.
Remove the pot from the heat. Next you need to temper the egg yolks. Dip the whisk into the translucent goo and then whisk it into the egg yolks. Tap your whisk on the side of the mixing bowl to shake off any egg yolk. Dip it into the goo again and whisk into the yolks. Keep going until about half the goo is mixed into the yolks.
Transfer the tempered egg yolk mixture back into the pot with the rest of the goo and whisk thoroughly.
Return the pot to a medium heat once more and bring to a low boil while whisking – same as before. You need to be sure the egg yolks are cooked through, so keep the mixture on a low boil for another 2 minutes, whisking all the while.
Remove the pot from heat. Add the butter, salt, lemon zest, and lemon juice to the pot all at once and whisk to combine.
Transfer the lemon filling to a clean mixing bowl. Immediately place plastic wrap directly onto the surface of the filling to prevent a skin from forming. Start with the meringue immediately after you made the filling. Remember, we want the filling to still be warm when we place the meringue on top.
Italian Meringue:
Place boiling water and sugar into a small, heavy based saucepan and whisk over low heat till the sugar is dissolved.
Bring mixture to a simmer on medium heat. Swirl the saucepan now and then, but DO NOT STIR. If sugar crystalizes around the edges of the saucepan, brush a little bit of water (with a pastry brush) just above the crystallization. The water will run down the sides, bubble into the syrup and the steam will help break down the crystalized sugar.
In the meantime, place the egg whites, salt and cream of tartar in a super clean mixing bowl of a standing mixture. Add the whisk attachment to your mixer. Do not beat together just yet.
Once all the sugar is dissolved, turn the heat up high and insert a candy thermometer in the syrup.
When sugar syrup reaches 100˚C (212˚F), start whipping the egg whites on medium speed till soft peak stage.
When syrup reaches 118˚C (245˚F), remove from heat. Increase mixer speed to high and pour syrup in gradually, in a thin stream, into the egg whites.
Reduce speed to medium and continue beating till the bowl is cool and the meringue is stiff.
Keep mixer running and add in the Vanilla Extract.
Assembly of Lemon Meringue Pie:
Lift out the base of your tin and transfer to your desired serving plate. The pastry can be loosened and transferred easily without any breakage.
Remove the plastic wrap from your lemon filling. Transfer all the filling into your pre-baked pastry and smooth out the surface.
Working from the outside in, dollop a dessert spoonful of meringue at a time on top of the lemon filling. Be sure to cover the top all the way to the edges.
Using the tip of your spoon to dig into the meringue slightly and swirl outward and upward to create beautiful peaks. Do not use the back of your spoon.
Brown the meringue to your liking with a blowtorch.
Leave the completed Lemon Meringue Pie to stand at room temperature for at least 2 hours before slicing and serving.
3.5.3229
I hope you give this epic Lemon Meringue Pie a try! If you have any questions or issues, please comment below because I would love to help.
Thanks for reading!Aurelia 🙂
What info are you looking for?
Hi! I’m Aurelia 🙂
Since 2018 I’ve helped home bakers learn the business side of baking and build lasting businesses that fit their lives.
Banana cupcakes can very easily taste and look like muffins…
Let’s just say it; a cupcake is NOT a muffin with frosting. It is so much more than that!
Muffins typically contain half the sugar that cupcakes do. And brownies contain double the sugar that cupcakes do. I purely say this to prove a scientific point and not to make us all feel bad about ourselves 😉 I mean if you eat 2 brownies instead of 4 cupcakes, no harm is done, right? But a great cupcake is hard to beat.
I love the flavour combination of Banana and Chocolate. The first time I tried this flavour combo I was about 12. My sister and I heard about this fancy new restaurant that opened in town – Chez Vincent. “Oh wow, it has a French name!” We were just so excited!
In our little hometown of Nelspruit, we very rarely got to experience something foreign. In fact, here is a hilarious South African add to illustrate the point. Foreign = exotic!
My parents took us out for supper once a month (lovely little tradition) and this time we just HAD to go to Chez Vincent. It was so beautiful! It was an old house that had been renovated, so there were different rooms which created smaller, more intimate spaces.
We sat outside under the pergola with creeping vines and soft lighting – the substance of fairy tales. Apart from the dessert I cannot remember what the food tasted like… Clearly I am in the right line of work.
The dessert was just ice cream with fruit, but it was spectacular. The bananas had been slightly caramelized and instead of generic chocolate sauce, there was chocolate ganache! In my mind the combination of chocolate and banana seemed like a terrible idea, but the taste was just magical.
I remember being astounded at how delicious this marriage of flavours was. I just wanted to keep eating it and eating it and eating it. So YUMMY.
Recipe Introduction
Naturally, this experience had to be translated into a cupcake. All the recipes for “banana cupcakes” I tried really lacked a banana flavour though. But if you added more bananas the cupcakes ended up tasting like banana bread or banana muffins.
I also really wanted to capture the caramelized banana flavour in the cake. One day it dawned on me – just caramelize them! I tried roasting the bananas in the oven, but they just had a “baked banana” flavour and not a “caramelized banana” flavour.
When in doubt, use butter… Frying and caramelizing the fresh bananas in salted butter was the answer! It intensified the flavour drastically.
Plus it ended up being a great bonus to get rid of some of that extra moisture the banana adds. The banana cupcakes are still fluffy, but they have more substance. They are even a little bit sticky – which I love!
It is VERY important to thoroughly caramelise the bananas in the salted butter. Spray your saucepan with non-stick spray. Medium heat. Be patient. Let them sit and caramelise in 30 second intervals before stirring and scraping the yummy bits off the bottom of the saucepan (don’t eat them, incorporate them into the rest of the bananas).
The bananas break down completely, which is perfect. Keep caramelising until you literally can’t anymore. The mixture will start coming together into one mass. You will notice that most of the liquid has evaporated and there will be caramelised bits throughout the squishy banana “paste”.
The chocolate ganache center was a given and the frosting had to be my EPIClow sugar chocolate frosting. Since the cupcake is quite intense, I had to opt for a lighter frosting… and yes, I do hate buttercream.
Start by frying the bananas. Spray a small saucepan with non-stick cooking spray. Slice the fresh bananas into 2 cm thick slices. Add the 25g salted butter to the pan and place of medium heat. Leave the bananas to caramelize, stirring only about every 30 seconds. When you stir, take care to scrape the chewy bits off the bottom of the pan and incorporate it into the rest of the banana mixture. Keep caramelizing until you literally can’t anymore. You will notice that most of the liquid has evaporated and there will be caramelized bits throughout the banana “goo”. Set aside to cool.
Preheat your oven to 180˚C/350˚F.
To make the banana cupcakes, sift together the flour, baking powder, salt & cinnamon. Set aside.
Cream butter and sugar together for 4 minutes with the whish attachment or with a hand mixer.
Add in the egg, beat for 10 seconds. Add the egg yolk and beat for an additional 50 seconds.
Add the vanilla extract and caramelized banana goo to the butter and egg mixture. Beat well until fully combined.
Add flour and milk and beat on lowest speed for 10 seconds. Scrape down the sides and bottom of the mixing bowl and continue to mix on lowest speed another 10 seconds – a few lumps are okay.
With a metal spoon, fold the mixture over a few times to make sure all the butter and banana is distributed evenly.
Line a 12 hole cupcake tin with paper cases.
Distribute the batter evenly – keep in mind these cupcakes do rise a little bit less than normal yellow/vanilla cake due to the added bananas. I fill my cases ¾ of the way.
Bake on oven rack A (if you don’t know what I mean, read my post on Baking Perfect Cupcakes) for 15 – 20 minutes, turning after 8 minutes for an even bake. The banana cupcakes are done when a skewer tests clean.
Finishing the cupcakes:
While the cupcakes are cooling, make the chocolate ganache.
Chop all of the chocolate and place it a glass bowl along with the salt.
Heat the cream to boiling point and pour over the chocolate. Allow to stand for 30 seconds, then stir till smooth. Set aside to cool.
Once your cupcakes are cool, make a hole in the center of each one. I use the handle of a wooden spoon and wiggle it around a bit. An apple corer does not work well with these particular banana cupcakes as the cake is so soft and slightly sticky.
Fill the center of each cupcake with chocolate ganache. A plastic sandwich bag (with a tip cut off) works perfectly.
Freshly baked muffins always bring back nostalgic memories of my childhood. My mother has always loved baking for special occasions. She went through a lot of trouble to bake us a special birthday cake year after year! I’ll never forget the epic train she made me for my 5th birthday back in 1993…
There was one other day on which she would bake, muffins in particular, for us and that day was Youth Day. She always made us her famous (and super healthy, low GI) bran muffins. Probably because muffins are her favourite food – seriously!
She goes to Mugg & Bean every Wednesday morning for her giant Date & Nut muffin with a huge cappuccino. She never misses a week. To her it is just such a satisfying treat 🙂
So before Youth Day she always mixed the batter for her special bran muffins and then left it in the fridge overnight. This helped the batter thicken up and gave time for flavours to meld together and deepen.
We would wake up to the smell of freshly baked muffins every year on 16 June. Bliss!
My mother would set beautiful, individual trays for both my sister and myself, complete with a fresh flower from our garden and a wineglass of fruit juice. She is just so adorable and loving! With memories as grand as these it’s no wonder that I love muffins! To me, muffins they are the epitome of home, care and my mother.
Recipe Introduction:
I love this particular recipe so much because I have a thing for toasted pecans. They are one of my top 5 yum high inducing ingredients. Fact. The pecans toast throughout the baking process, so there is no need to toast them beforehand.
Dried dates are recommended. Feel free to use Medjool dates if you wish – they are amazing! I mostly use standard pitted dates for this recipe as Medjool dates are not as consistently available in South Africa.
Do try to find Granny Smith Apples for this recipe. They maintain their structure superbly during baking/cooking, have a distinct tartness and a strong apple flavour. It’s my go to apple for cooking and baking.
These Apple, Date & Pecan Muffins are packed with apple goodness and carry notes of spice and caramel. Absolutely delicious!
200 g Fresh Granny Smith Apple, skin and core removed
70 g Pecan Nuts
70 g Pitted Dates
1 Tbsp Smooth Apricot Jam
1 Tbsp Water
Instructions
Start by preparing the fruit. Chop the apples into approximately a 1,5cm dice (you may toss the apple in 1 teaspoon of lemon juice, diluted with 1 tablespoon of water, to stop it from browning.) Chop the pitted dates into approximately a ½ cm dice.
Preheat oven to 180ᵒC (355ᵒF).
Grease and line muffin tins with individual baking paper liners (remember the recipe makes 10 large muffins).
Sift together the flour, baking powder, salt, cinnamon and ginger in a large mixing bowl. Mix all dry ingredients together thoroughly and make a well in the center.
In a separate bowl, beat together the eggs, oil, buttermilk, sugar and vanilla until smooth. Leave the wet mixture to stand for 30 seconds so that the sugar can dissolve. Beat wet mixture again till smooth. Pour the wet mix into the well you created in the dry ingredients. Don’t mix just yet!
Add apple and dates into the well too and mix slowly with a metal spoon until just combined (over-mixing toughens the texture!). Scape down the sides of the bowl with a rubber spatula and lightly stir to combine.
Divide the batter evenly between the 10 lined muffin holes in the muffin tin. Top with the pecan pieces.
Bake on the lower rack of your oven for 15 minutes, turning after 10 minutes. Then bake on the higher rack for a further 15-20mins or until golden brown and a skewer comes out clean.
Place apricot jam and water in a cup and microwave for 30 seconds. Brush the glaze all over the top of the muffins. Enjoy!
Notes
These muffins keep about 2-3 days in a sealed container in the fridge. Alternatively they also freeze exceptionally well! Just leave them to thaw at room temperature for 2 hours and then pop them in the oven for 5-10 minutes to warm through and crisp up a bit.
3.5.3229
If you make these muffins, use #philosophyofyum because I would love to see!
Also check out my other muffin recipes that I have sold in thousands to Coffee Shops and Restaurants. Seriously AMAZING muffin recipes:
Gluten Free Brownies were totally not a sales gimmick for me. Many of my clients thought I started baking gluten free brownies because gluten free eating became a trend a few years ago. Actually, that is not the case.
See, I married this incredible guy… Adriaan. When we were dating he ate all the wonderful things that any regular student eats. Pasta, pies and McDonalds. Problem is that these nutritious foods were often eaten at 3h00 in the morning.
Adriaan and I both studied architecture and all-nighters were as common as breathing. Obviously you get hungry and McD’s was the only 24 hour food provider.
Adriaan’s mother also has a highly sensitive stomach with a whole list of foods she cannot eat. Whether the poor quality of food, lifestyle or genes were to blame, about 6 months into our marriage we discovered that he is gluten intolerant. Thanks Murphy!
Wife becomes a baker, and 6 months later, husband becomes gluten intolerant.
You need to understand that my husband is my biggest fan. When I realized I want to rather be a baker and not an architect, he was so excited with me.
Even though we had nothing, were getting married, moving to a new city and had no jobs he could see the potential and my heart 🙂
One of my favourite ways to express love, gratitude or joy is through cooking and especially through baking. But now my whole baking repertoire was suddenly quite useless in our home. I had to regroup.
Adriaan had to have a baked thingy. It had to be gluten free. And I was going to make it for him.
Gluten Free Baking Begins
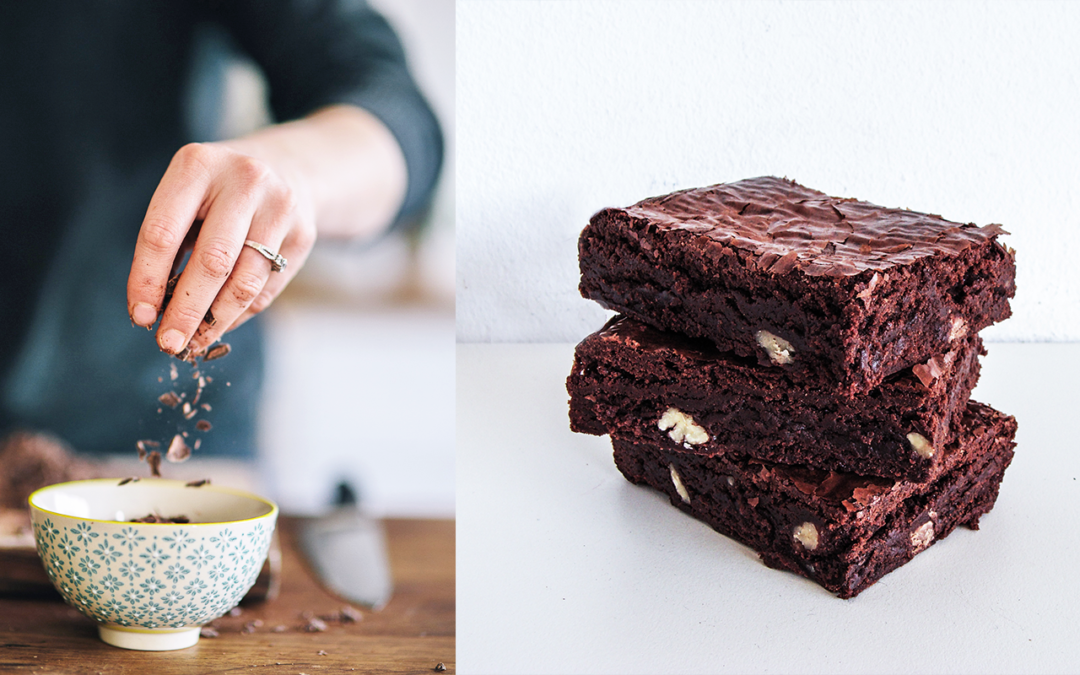
Gluten free brownies seemed like a good place to start 🙂 There is a wonderful chocolaterie here in Cape Town called CocoaFair! They are “Africa’s first bean to bar chocolate manufacturer founded on the principles of social entrepreneurship.”
I bought their chocolate once and I’ve never looked back. So yes, great quality chocolate is of the essence here as half the recipe is just melted chocolate!
If you don’t have a local chocolaterie, you could always order goods online. Just be sure to check the ingredients list. Commercial chocolate often contains gluten.
I adapted this recipe for gluten free brownies from a recipe by David Lebovitz. I’ve baked this recipe hundreds of times – editing and fine tuning for 3 years now. This really is my ultimate recipe for gluten free brownies. I hope you enjoy them as much as our family, friends and clients do!
This Gluten Free Brownie Recipe has earned me at least $5000 in brownie sales, so yep, I think it’s SAFE to say that they are amazing 😉
A non gluten free eater ate these brownies and commented: “This is the best brownie in the world… I want to go sit in a corner and cry now.” Lol!
The texture is perfectly balanced between fudgy and chewy…
Spray the inside of a 17 x 27 x 3 cm (7 x 10,5 x 1 inch) brownie tin with non-tick cooking spray. Line the tin with baking parchment so that it goes up the sides and 3 cm over the rim. This makes the brownies easy to pull out once cooked and cooled. An 8 x 8 inch tin will also work just fine.
Preheat the oven to 180ºC/350ºF.
In a medium size pot, melt the butter over medium-low heat. As soon as the butter is melted and begins to simmer, add in the chopped dark chocolate and turn off the heat. Stir around thoroughly every 30 seconds until the chocolate is completely melted into the butter.
Keep the pot on the stove and stir in the sugar and salt. Leave to sit for 5 minutes and then stir very well. Remove the pot from the stove.
Beat in the vanilla and eggs.
Add the white rice flour, tapioca flour, and baking powder to the pot and then stir to combine into the chocolate mixture. Beat the batter on high speed for one minute. You’ll notice that the batter becomes silky smooth and a shade or two lighter in colour.
Scrape the batter into the prepared pan, making sure to spread out the batter into the corners of the pan. Distribute the nuts evenly over the mixture. Push the nuts down into the mixture with a spatula and then smooth the surface once more.
Sprinkle the chopped milk chocolate over the top of the brownie batter and allow the heat from the mixture to melt the chocolate. If your batter is too cool to melt the chocolate, use a hairdryer to melt it! Useful appliance! Smear the melted milk chocolate into the top layer of the batter, making sure to cover every inch of the surface. Don't leave any chocolate streaks - smear it in thoroughly. This creates the shiny crust on top.
Bake for 35-40 minutes, turning after 15 minutes. It is important that a skewer comes out completely clean when testing. Remove the brownies from the oven and let them cool completely before removing them from the tin. Slice them on the same day you make them. If you leave them standing overnight, they become very fudgy and stick to your knife terribly! Rather slice them just after they've cooled down. Enjoy!
3.5.3226
Have fun with this recipe! Bask in the chocolate ambiance…
Chat soon!
Aurelia 🙂
What info are you looking for?
Hi! I’m Aurelia 🙂
Since 2018 I’ve helped home bakers learn the business side of baking and build lasting businesses that fit their lives.
I have a thing for Brownies. They have changed my life. I guess it’s just the gooey chewiness that gets to me on an emotional level. Then came the Blondie…
Some like to view it as a White Chocolate Brownie, which I suppose is correct, but there is more potential than that. I like to view it as a Vanilla version of a Brownie. A blank canvas receptive to an endless avenue of flavour possibilities!
Realizing that almost ANY cake flavour can be turned into blondies, has been a real game changer.
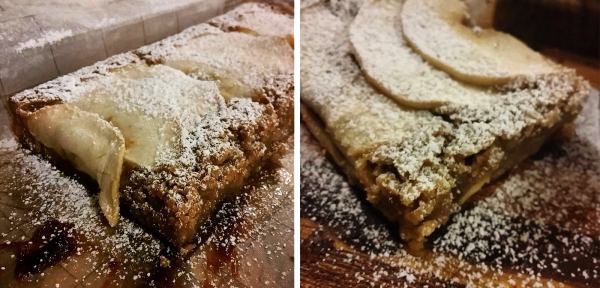
Brownies and Blondies basically just contain double the fat and double the sugar. Explains why they taste so incredible. I’ve developed a myriad of blondie flavours; Carrot Cake, Earl Grey & Salted Caramel and Red Velvet Brownies to name a few. But my absolute favourite blondies to date are the Salted Caramel Apple Blondies…
They taste like a slow-roasted Apple Pie (if there ever was such a thing)… Like an Apple Pie Brisket if you will. The Salted Caramel takes these Apples to a whole new level. Ground Cinnamon rounds off the flavour perfectly.
They bake for quite a long time, but as I’ve said before – my recipes require a lot of effort, but the result is totally worth it!
Important Notes:
In order to make this recipe, you will need some Salted Caramel.Click here to view the Salted Caramel recipe I posted last week.
Granny Smith Apples really work best for this recipe. You need an apple that keeps its shape during baking. The sharp, slightly sour flavour is also just perfect for this recipe. Other apple varieties, like Golden delicious, are a bit sad in flavour next to the salted caramel and cinnamon.
This might disappoint you, but I find that using a combination of baking Margarine and Butter really works well in Brownies and Blondies… I’m not an ingredient snob. Yumminess is the goal.
If you want to use only butter, go right ahead, but the flavour and texture are so much better when using some margarine. That’s my opinion anyway.
1 Huge Granny Smith Apple (strictly Granny Smith – it keeps its shape very well and has a potent Apple Flavour)
220 g Cake Flour
½ Tbsp Ground Cinnamon
5 g Salt
100 g Unsalted Butter
100 g Baking Margarine
80 g Dulce de Leche
120 g White Sugar
100 g Demerara Sugar
½ Tbsp Vanilla Extract
⅛ tsp Caramel Extract
2 Jumbo Eggs (135g)
1 Tbsp Salted Butter, Melted
Instructions
Preheat oven to 170˚C/340˚F.
Grease and line an 18cm x 27cm (7 inch x 10,5 inch) brownie pan with top quality non-stick baking paper (Wax Paper will not suffice). Not all brownie pans are exactly the same size - an 8 x 8 inch brownie tin will also work just fine.
Melt the salted caramel in the microwave for 20 seconds till it reaches a pouring consistency.
Pour the salted caramel into the greased and lined Pan. Spread it out evenly, so that the bottom of the pan has an even layer of caramel. Set aside.
Sift flour, cinnamon and salt in a large bowl, set aside.
Melt butter and margarine in mixing bowl in the microwave for 3.5mins. It must boil before you continue.
Mix in sugars and dulce de leche on low speed with paddle attachment for about 30 seconds. Return to the microwave for 40 seconds. Mix again on low speed for 30 seconds. The sugars should stick to the paddle slightly when you lift it out of the mixture. This means the sugar has dissolved slightly.
In a medium sized bowl, lightly whisk together the eggs, vanilla extract and caramel extract. Add to butter and sugar mixture and mix for 10 seconds to combine slightly.
Add dry ingredients to the wet ingredients.
Beat on low speed for about 30 seconds until the mix starts coming together into one batter. Stop mixer and scrape down the sides of the bowl with a spatula.
Resume beating on medium speed for 3 minutes.
Transfer the batter to the prepared pan with Caramel. Spread mixture evenly into all the corners of the pan.
Prepare the apples last – this way you don’t have to coat them with lemon juice to prevent browning. Peel and core the apples. Cut the apple through length-ways. Turn each half onto its flat side and cut thin slices of about 2 mm.
Pack the apple slices on top of the Blondie Batter, each slice overlapping the previous one. Brush the apple slices with melted salted butter.
Bake the Blondies at 170ᵒC for 45-55 minutes, turning after 20 minutes. When a skewer tests clean, they are done.
Allow to cool completely before removing from the tin. Slice and dust with icing sugar to serve.
Notes
These guys go extremely well with a scoop of Vanilla Ice Cream – Yummmmyyyyyy!
3.5.3229
If you give this recipe a go, tag me on facebook, twitter or instagram #philosophyofyum because I would LOVE to see!
What is YOUR favourite Apple Dessert/Bake? Comment below!
Hey! Wanna start a Home/Micro Bakery, but overwhelmed with where to start? My free Masterclass can help →save your seat here
This website uses cookies to ensure that we give you the best experience on our website.AcceptRejectRead More
Privacy & Cookies Policy
Privacy Overview
This website uses cookies to improve your experience while you navigate through the website. Out of these, the cookies that are categorized as necessary are stored on your browser as they are essential for the working of basic functionalities of the website. We also use third-party cookies that help us analyze and understand how you use this website. These cookies will be stored in your browser only with your consent. You also have the option to opt-out of these cookies. But opting out of some of these cookies may affect your browsing experience.
Necessary cookies are absolutely essential for the website to function properly. This category only includes cookies that ensures basic functionalities and security features of the website. These cookies do not store any personal information.
Any cookies that may not be particularly necessary for the website to function and is used specifically to collect user personal data via analytics, ads, other embedded contents are termed as non-necessary cookies. It is mandatory to procure user consent prior to running these cookies on your website.


 If you are planning to bake a filling inside the pastry, bake for 8 minutes, turning after 4 minutes. It won't be golden.


