
Shiny Brownie Crust – Foolproof and Perfect!
Shiny Brownie Crust – Foolproof and Perfect!
I’ve finally cracked it! Here’s EVERYTHING you need to know to give you a shiny crust (shiny brownie skin/tops)!
I LOVE baking science and LOVE geeking out on it, but if you just want to skip the science-y stuff and jump straight to the step-by-step method, then click this button…
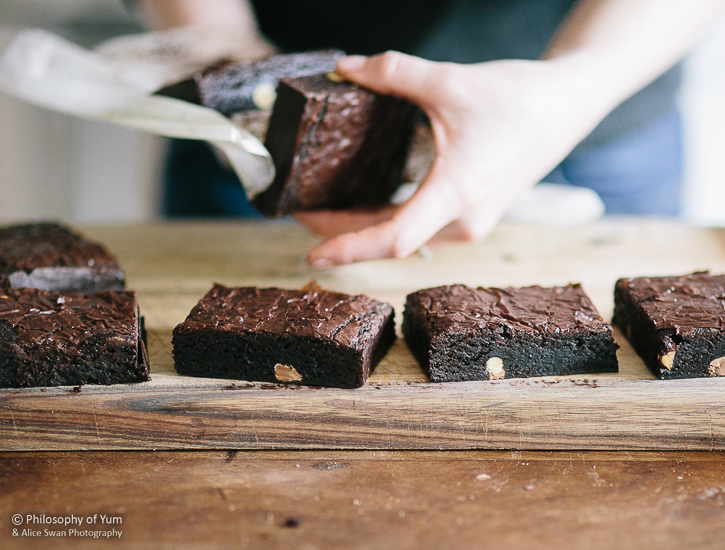
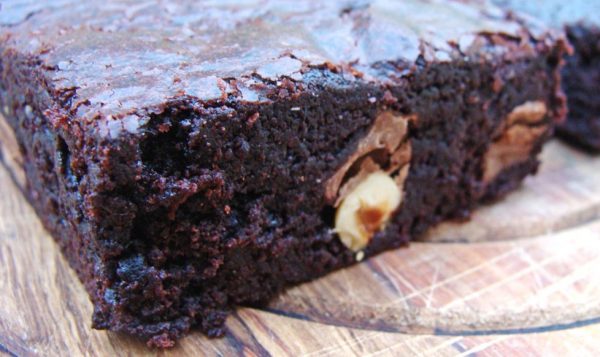
A BROWNIE IS NOT FULLY DRESSED WITHOUT ITS SHINY CRUST.
The texture of the brownie can be perfect, nuts can be waiting for you in every bite and the best quality chocolate can radiate its aroma, but without the thin, crackly, SHINY crust… the experience just isn’t the same 😕
Please note: This is a long post. It has been a VERY complicated and long journey to crack the science behind the Shiny Brownie Crust.
There are a myriad of my Brownie recipes that can get away with not having a crust; like my EPIC Red Velvet Brownies, but for good old classic Chocolate Brownies or The Best Ever Gluten Free Brownies, there is no where to hide!

My relationship with the humble brownie crust has been a love-hate one for sure. My husband and I can recall at least 5 different instances where I’ve shouted “I’ve finally figured out the shiny brownie crust!!”.
And then 10 more where I said very soberly “No, this time I’ve REALLY figured it out! I know I’ve said this so many times before, but this time it’s really true.”
As you may have guessed I then figured out, again, for the fifteenth time, that I hadn’t REALLY figured it out yet.
I was onto it, but I just didn’t get it yet…
So here is my 3 1/2 year long brownie journey condensed into one blog post. I’ve done this so that you will not suffer the same frustration, but get to experience all of the joy of a perfect shiny brownie crust!
How did I crack the Shiny Brownie Crust Phenomenon?
Having supplied coffee shops here in Cape Town for 5 years (Field Office, Salisburys and Eat with Emma) has given me a very generous opportunity to experiment with baking methods.
My goal is always to get each baked thingy as good as it can possibly be.
How many brownies have I baked? This is where Microsoft Excel comes in handy! And the answer is 28748 BROWNIES. Yep. That’s about 5750 brownies per year.
For a solo baker that is quite a lot I suppose. I’m sharing the numbers because I want you to see that it sometimes takes a lot of patience and perseverance to crack a baking secret.
Trial and error, trial and error (repeat).
What is amazing is that quite often you’ll discover other secrets along the way that you didn’t even bother to think about! I’ll be sharing these secret discoveries as well.
Which Brownie Recipe Should You Use?
The beauty of this Shiny Brownie Crust Hack is that it applies to ALL classic brownie recipes (not vegan or sugar free though) – Whether it uses cocoa powder or chocolate or both! Happy days! So, you can really just use your favourite brownie recipe.
This hack unfortunately does not work for Vegan brownies, but here is a vegan brownie recipe that does turn out with a shiny brownie crust.
I personally prefer chocolate only for gluten free brownies, but for normal brownies I love a recipe that uses both cocoa powder and chocolate in the batter itself as I find the chocolate flavour to be more intense and the texture perfectly chewy!
I LOVE CHEWY BROWNIES. I love adding chocolate chunks as well.
There are many blogs on INGREDIENT properties such as different sugars, flours, chocolate etc. This blog will not cover those topics. Click here for a useful guide on ingredient properties.
Breakthrough #1: Butter
Let’s pause. It is beautiful.
Moving on…
The main factor here is HEAT.
I’ve done a fair bit of internet research on how to crack the darn brownie crust and here is what some had to say about the butter:
“Melt the butter over simmering water OR in the microwave in 30 second bursts. Do not boil!”
FALSE. You want this mixture to be as warm as possible. You need the heat for a very specific reason which will be explained later. Bring the butter to boiling point in your microwave in a mixing bowl and from here on work as quick as you can.
When the butter it HOT, it dissolves the sugar much faster. And for the shiny brownie crust hack to work, you need your brownie batter to be a bit warm – preferably.
Be sure to have all your dry ingredients already sifted together, chocolate already chopped, room temperature eggs standing by.
Go ahead and melt the butter in the microwave for 3 minutes until it boils. It is not necessary to do it in 30 second bursts.
The heat of the butter made a huge difference, BUT to my frustration this did not work 100% of the time. In winter especially, the shiny brownie crust would take a vacation.
This new discovery was great, but I was still missing something.
Breakthrough #2: Ratio of Ingredients
My ratio is:
| Butter | Sugar | Dry ingredients | Eggs |
| 400g | 600g | 400g | 4 Jumbo eggs (240g without shell) |
| 1 | 1.5 | 1 | 1 |
This ratio is more for the purpose of optimal texture AKA fudgy, gooey, chewy perfection! I use a combination of Treacle sugar and white sugar. The treacle sugar adds a lovely earthy note and also chewiness – yum!
Breakthrough #3: Whipping/Beating
I found this information from Brownie Chronicles:
“Whether brownies have a crust on top depends on how much you beat the batter after the eggs are added. The more you beat, the more crust you get. If you beat vigorously with a mixer, you can get a dramatic crust.
Depending on how much you beat, this crust can be barely noticeable or a crisp, shiny crust that is totally puffed, and separated above the cake or brownie. It is also usually lighter in color. The color and shine are especially noticeable on brownies.
“This is a meringue-like crust and is actually caused by a “meringue.” Your beating of the batter after the eggs are added creates it. This seems not to be widely known even among chocolate experts.”
I tried this. It didn’t work. No shiny brownie crust. I was depressed.
Brownie chronicles should have the answer right? I did however find that beating the batter improves the brownie texture massively!
From then on I have always beaten my batter with the paddle attachment on medium – low speed for 3 minutes. You’d think it makes the brownies tough, but it seriously doesn’t! It just adds a glorious chewiness – you’ve got to try it at least once!
Beating by hand plays no role. Unless you want impressive guns. Beating the eggs and sugar separately for 3-5 minutes before folding in the remaining ingredients (http://www.handletheheat.com/ultimate-brownie-guide/) creates a “crust”, but it is not always shiny.
Very often it is dull, but just a lighter colour than the rest of the brownie below the surface.
Some recipes with beating the eggs and sugar separately, do deliver a shiny crust, BUT the texture is NOT chewy… I want both if that’s possible. Shiny brownie crust AND chewiness.
I do not beat the eggs and sugar separately, but I beat the mixture right at the end when all the ingredients are in the bowl. This does not deliver a shiny crust at all, but I do it because it improves the texture of my brownies.
Breakthrough #4: Eggs
The crust is definitely influenced by the amount and type of egg in the recipe.
You can achieve a brownie crust with a normal amount of eggs – you don’t need to add more or less eggs. The amount of eggs I use is mainly for the optimum texture.
Although, I’ve noticed that it helps the crust along if my total egg in the recipe contains more EGG WHITE.
Let’s say my recipe uses 130 g of egg; then I’ll use about 100 g of whole egg and top up the remaining 30 g with egg white. Not beaten or anything, just plain egg white out of the shell.
Too much egg will result in a very spongy brownie. Too little and the brownie is too dense and solid.
Another myth is that you have to add them in one by one. Not necessary. I add them all in one go and mix on low speed for 10 seconds until they are roughly incorporated.

Breakthrough #5: Sugar
Here’s where things get interesting.
According to Hackaday’s shiny brownies post, the shiny crust is determined by how well you dissolve the sugar in your brownies AND how much sugar you use.
This is definitely true.
But the problem comes in if you DON’T want a brownie that’s SUPER sweet. Personally it’s a bit disappointing to me that I HAVE to use loads of sugar to get a shiny brownie crust.
Don’t get me wrong, I think sugar is wonderful. But I want the overall flavour of my brownies to be CHOCOLATY, not overwhelming sweetness.
So, with my method you get to create a shiny brownie crust without compromising the flavour of your brownies.
Of course, in ALL baking it’s good to dissolve your sugar – although it doesn’t need to be dissolved completely with my method.
Just dunk all your sugar into your melted butter in one go. Then mix on low speed for about 1 minute – the sugar should be sticky and glue-y when you lift up the paddle.
But if your recipe specifies to beat the eggs and sugar together for 5 minutes, then please do that.
Breakthrough #6: Chocolate vs. Cocoa Powder
When I first started making brownies as a side-hustle in university, I used a recipe with mounds of chocolate.
Problem is that I had a horrible oven (university dorm kitchens!), an even worse stove and no understanding of chocolate seizing.
They were still amazing though! I sold them during my years as architecture student to raise money for the university’s charity program – Jool/Rag. This recipe used the eggs & sugar whipping technique. A shiny brownie crust did appear from time to time.
I thought it might be worth a go to try a recipe that uses cocoa powder. I took the first one I found in a magazine which happened to be a yummy one! I decided to make it my new “go to” recipe as the chewiness of the brownies was just amazing!
I’ve modified the recipe drastically over the years. One addition to the recipe was Milk Chocolate chunks and hazelnuts. I loved the idea of chocolate chunks (dark and milk separately) and hazelnuts that provide flavour as well as more exciting textures!
What puzzled me was that sometimes there was this ridiculously awesome shiny brownie crust on top and other times not even a trace of it! I did not understand. I made an effort to mix it EXACTLY the same way as I did before, but different results came forth with very inconsistent frequency.
I also did not believe that it could be Chocolate that makes the big difference because my gluten free brownies have ONLY DARK CHOCOLATE and also didn’t develop a shiny brownie crust.
Breakthrough #7: MILK Chocolate
So it happened one fine day in the second month of 2015 that someone ordered brownies without any nuts due to an allergy.
This meant my dear hazelnut milk chocolate had to be left out this time and so did other chocolate because most of them are “manufactured in a factory that uses nuts”.
Now up until this point I had believed that the whipping caused the shiny brownie crust (even though the success rate was 70/30, which was the most consistent theory I had found anyway).
Even Kitchen Conundrums said this too and I really have a high regard for everything they say! Their lemon meringue video is amazing!!
I did everything the way I always do it… Melt the butter to boiling point in the microwave. Quickly add the white sugar and treacle sugar. Mix in the eggs all at once. Add the dry ingredients. Mix on low speed till incorporated. Scrape down the sides. Beat on medium speed for exactly 3.5 minutes. Bake at 180°C for exactly 37 minutes, turning after 15. And then…
NO crust.
This time, however, my inward fit of frustration only lasted 10 seconds as I had realized what has been happening all along…
The reason why it often worked when the butter was boiling hot, was because there was heat. The fully mixed batter had enough heat to melt something that is sensitive to temperature…
The reason why it often worked to let the moody brownies rest before baking, was because there was more time available for something specific to happen.
The reason why the crust took a vacation in winter, was not because it fancied the Bahamas. The drastic drop in temperature hindered a scientific reaction.
Milk chocolate. MELTED milk chocolate. In the nut free version, there was no milk chocolate present. The heat of the batter couldn’t melt it no matter how long it stood “resting” because well, it wasn’t there. I had left out the Hazelnut Milk Chocolate due to allergies.
I had another experiment.
This time I chopped as little as 20g of milk chocolate. I sprinkled it on top of the batter, left it for a minute and spread the slightly melted chocolate into the top layer of brownie batter…

Eureka. HELLO SHINY BROWNIE CRUST!!

Now there happens to be a lovely trick you can apply during winter months… the hairdryer! Tada! Sprinkle finely chopped milk chocolate over the surface, apply heat until chocolate is melted, spread into the top of the batter.
PERFECT SHINY BROWNIE CRUST. EVERY. TIME.

Try it out and let me know if you are pleased with the results!
I’ve tried this with my gluten free brownies as well which don’t contain any cocoa powder. I’ve had the same successful shiny brownie crust for 6 glorious months now on ANY brownie recipe!
WE’VE FOUND NEMO!!
I’ve been tempted to stop here, but the journey is not yet fully complete. Continue to read if you are a scientist like me! I still wanted to understand and know what specific ingredient name I had to frame in my home!
WHAT ingredient is it that causes the shiny brownie crust for Pete’s sake?!
So my experiment took me a little further. I approached my favourite chocolaterie, CocoaFair (Cape Town, South Africa) and asked for their expertise on Milk Chocolate.
There are 2 ingredients that feature in Milk Chocolate, but not in Dark Chocolate.

Milk powder (Milk solids) and Soy Lecithin. I obtained some Soy Lecithin and Milk Powder from my dear chocolate friends at CocoaFair!
This week I made 3 last batches to settle the argument of the shiny brownie crust once and for all.
- Normal brownie batter + milk powder.
- Normal brownie batter + soy lecithin.
- Normal brownie batter + milk powder + soy lecithin.

Thus, it is the COMBINATION OF SOY LECITHIN AND MILK SOLIDS that creates the shiny brownie crust. Wow! I dissolved the soy lecithin granules and milk powder in water (left it standing for one hour).

I thought it might be a good idea to smear at least part of the surface with a spatula so that the structure of the top layer had been realigned – another one of my theories. It turned out to be another key to a shiny brownie crust!
To Clarify The Shiny Brownie Crust Method:
- Make your favourite brownie recipe as usual, but make sure the melted butter is boiling hot. Add the sugar and mix it for at least 1 minute so it dissolves a bit . It should be sticky, glue-y and cling to your spoon or paddle beater.
- Mix in the eggs and dry ingredients. Move quickly so your batter stays WARM. If your batter gets cold, your crust will be compromised. Pour the batter into the tin and level it out with a spatula.
- Chop about 20 g of MILK chocolate finely (don’t use anything higher than 38% Milk Chocolate. Dark chocolate doesn’t work! You need the dairy & sugar in the milk chocolate. If you’re making blondies, use white chocolate). Sprinkle on the surface of your brownie batter in the tin.
- Apply heat to the top to melt the milk chocolate. In summertime you can leave it in the sun for 40 seconds – 1 minute. In winter, use a hairdryer to melt the finely chopped chocolate on the surface.
- Using a rubber spatula, smear the melted milk chocolate into the top of the brownie batter in even, long strokes. Be sure to smear all of it in and not leave any chocolate streaks!
- Bake in the top third of your oven for the time your recipe states. (Don’t add anything else to the oven while the brownies are baking. Moisture in the oven will stop the shiny crust from forming.)
- Voila! Perfect Shiny Brownie Crust! Enjoy!
Well, it’s been frustrating, enlightening, educational and (mostly) fun! SO grateful that I can sleep at night now – at last!!
Chat soon!
Aurelia 🙂


POPULAR BAKING TIPS


POPULAR BAKING BIZ TIPS


Got a question? Something to add? Let’s chat in the comments section down below! (I respond to every single comment)
