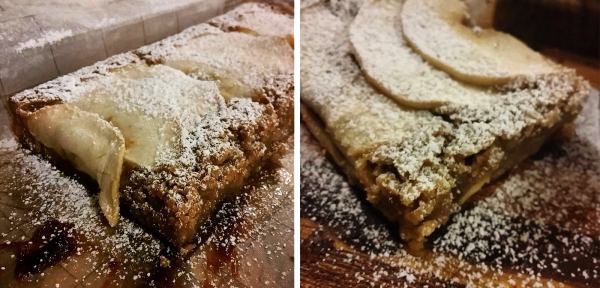
Caramel Apple Pie Blondies
Salted Caramel Apple Blondies
Philosophy of Yum and Brownies:
I have a thing for Brownies. They have changed my life. I guess it’s just the gooey chewiness that gets to me on an emotional level. Then came the Blondie…
Some like to view it as a White Chocolate Brownie, which I suppose is correct, but there is more potential than that. I like to view it as a Vanilla version of a Brownie. A blank canvas receptive to an endless avenue of flavour possibilities!
Realizing that almost ANY cake flavour can be turned into blondies, has been a real game changer.

Brownies and Blondies basically just contain double the fat and double the sugar. Explains why they taste so incredible. I’ve developed a myriad of blondie flavours; Carrot Cake, Earl Grey & Salted Caramel and Red Velvet Brownies to name a few. But my absolute favourite blondies to date are the Salted Caramel Apple Blondies…
They taste like a slow-roasted Apple Pie (if there ever was such a thing)… Like an Apple Pie Brisket if you will. The Salted Caramel takes these Apples to a whole new level. Ground Cinnamon rounds off the flavour perfectly.
They bake for quite a long time, but as I’ve said before – my recipes require a lot of effort, but the result is totally worth it!
Important Notes:
In order to make this recipe, you will need some Salted Caramel. Click here to view the Salted Caramel recipe I posted last week.
Granny Smith Apples really work best for this recipe. You need an apple that keeps its shape during baking. The sharp, slightly sour flavour is also just perfect for this recipe. Other apple varieties, like Golden delicious, are a bit sad in flavour next to the salted caramel and cinnamon.
This might disappoint you, but I find that using a combination of baking Margarine and Butter really works well in Brownies and Blondies… I’m not an ingredient snob. Yumminess is the goal.
If you want to use only butter, go right ahead, but the flavour and texture are so much better when using some margarine. That’s my opinion anyway.

- 80 g Salted Caramel
- 1 Huge Granny Smith Apple (strictly Granny Smith – it keeps its shape very well and has a potent Apple Flavour)
- 220 g Cake Flour
- ½ Tbsp Ground Cinnamon
- 5 g Salt
- 100 g Unsalted Butter
- 100 g Baking Margarine
- 80 g Dulce de Leche
- 120 g White Sugar
- 100 g Demerara Sugar
- ½ Tbsp Vanilla Extract
- ⅛ tsp Caramel Extract
- 2 Jumbo Eggs (135g)
- 1 Tbsp Salted Butter, Melted
- Preheat oven to 170˚C/340˚F.
- Grease and line an 18cm x 27cm (7 inch x 10,5 inch) brownie pan with top quality non-stick baking paper (Wax Paper will not suffice). Not all brownie pans are exactly the same size - an 8 x 8 inch brownie tin will also work just fine.
- Melt the salted caramel in the microwave for 20 seconds till it reaches a pouring consistency.
- Pour the salted caramel into the greased and lined Pan. Spread it out evenly, so that the bottom of the pan has an even layer of caramel. Set aside.
- Sift flour, cinnamon and salt in a large bowl, set aside.
- Melt butter and margarine in mixing bowl in the microwave for 3.5mins. It must boil before you continue.
- Mix in sugars and dulce de leche on low speed with paddle attachment for about 30 seconds. Return to the microwave for 40 seconds. Mix again on low speed for 30 seconds. The sugars should stick to the paddle slightly when you lift it out of the mixture. This means the sugar has dissolved slightly.
- In a medium sized bowl, lightly whisk together the eggs, vanilla extract and caramel extract. Add to butter and sugar mixture and mix for 10 seconds to combine slightly.
- Add dry ingredients to the wet ingredients.
- Beat on low speed for about 30 seconds until the mix starts coming together into one batter. Stop mixer and scrape down the sides of the bowl with a spatula.
- Resume beating on medium speed for 3 minutes.
- Transfer the batter to the prepared pan with Caramel. Spread mixture evenly into all the corners of the pan.
- Prepare the apples last – this way you don’t have to coat them with lemon juice to prevent browning. Peel and core the apples. Cut the apple through length-ways. Turn each half onto its flat side and cut thin slices of about 2 mm.
- Pack the apple slices on top of the Blondie Batter, each slice overlapping the previous one. Brush the apple slices with melted salted butter.
- Bake the Blondies at 170ᵒC for 45-55 minutes, turning after 20 minutes. When a skewer tests clean, they are done.
- Allow to cool completely before removing from the tin. Slice and dust with icing sugar to serve.
If you give this recipe a go, tag me on facebook, twitter or instagram #philosophyofyum because I would LOVE to see!
What is YOUR favourite Apple Dessert/Bake? Comment below!
Chat Soon!
Aurelia 🙂