How to Make Beautiful Swirls in Your Brownies

How to Make Beautiful Swirls in Your Brownies

How to Make Beautiful Swirls in Your Brownies

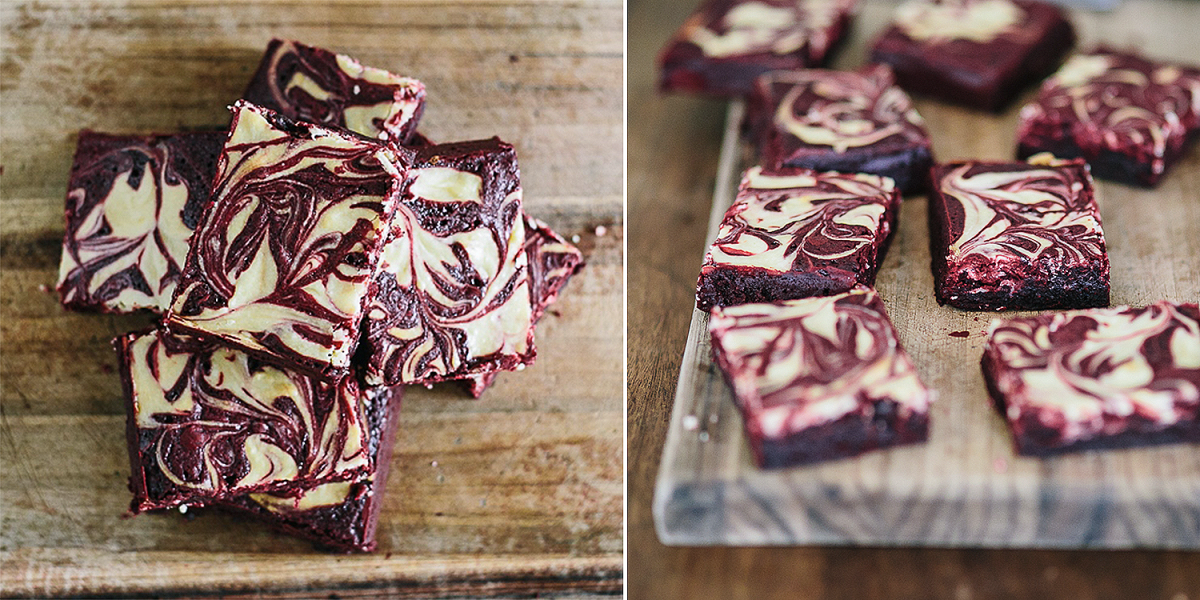
Swirl brownies are so striking and beautiful! Defined, voluptuous swirls take any dessert to the next level.

Problem is, the swirl part can VERY easily become a murky MESS.

I’ve been making Cheesecake Swirl Brownies and Red Velvet Brownies for a few years now. In the process I’ve discovered some wonderful tips and tricks to give you perfect, defined swirls in brownies every time!

Since so many folks have been asking me to share my technique, I’ve also made a little video (below) so that you can see exactly what I do 🙂


Essential Basics of Swirl Brownies:

1. Consistency of Cheesecake Batter:

This is the most important point, truly.

The cheesecake batter you make an actual cheesecake with can be quite runny. Cheesecake batter used for swirl brownies is an entirely different batter altogether. Cheesecake batter for swirl brownies HAS to be thicker, but should still drop off a spoon in 2 seconds. If you follow your recipe to the T and it turns out runny, make it thicker.

You can do this in 2 different ways:

a] Make sure your ingredients are ice cold (not room temp) and beat the batter for 30 seconds – 1 minute. This usually works to thicken up the cheesecake batter.

b] Only try this after you’ve applied option 1 above. Beat some cold cream cheese in a separate bowl to remove any lumps (about 30 seconds). Beat the smooth cream cheese into your cheesecake mixture. This will definitely thicken it up.

If your cheesecake batter gets too thick, you can thin it out by stirring in 1 tablespoon of water at a time.

Another important note – always use NON-aerated cream cheese!
I also prefer using only egg white in the batter as it gives you a whiter cheesecake swirl.


2. Consistency of Brownie Batter:

What you are aiming for is to get the brownie batter and cheesecake batter more or less at the same consistency. This is absolutely crucial when making swirl brownies.

Brownie batter can often be quite warm and runny. You will need to firm it up a tad before attempting to swirl in the cheesecake mixture.

It’s super easy to do – just pop it in the fridge for 5 minutes. It should still move down slowly if you tilt the brownie tin, but you don’t want it to be completely chilled and stationary either.

If you accidentally chilled the batter too much, pop it in the oven for 1 minute at 350ºF/180ºC. This will soften the brownie batter again.

3. The Swirling:

For practical purposes I’m just typing out everything I mention in the video.

  1. Place blobs of your cheesecake mixture over your brownie batter. Be sure to place blobs in the corners as corners can often look skimpy.
  2. Flatten out each blob with the back of a metal spoon. Spread the cheesecake onto the sides of the tin – super important! During baking the cheesecake naturally moves a bit to the middle of the tin. Spreading the cheesecake onto the sides of the tin anchors your entire pattern.
  3. Use a chopstick – NOT a butter knife – to swirl the mixture.
  4. Drag the chopstick, in SMALL circular movements, through the cheesecake and into the “blank” brownie spaces.
  5. Once a swirl has been made, leave it be. Going over it again will make it cloudy and messy.
  6. Always keep a little bit of cheesecake batter aside to fill in gaps. Swirl these extra dollops again in separated, once off, swirl motions.

Here is a video I made earlier this week so that you can see the technique for yourself 🙂 A big thanks to my husband for holding the camera!

Have you had any Swirl Brownies Issues? Please comment below because I would love to help!

Chat soon!

Aurelia 🙂


Got a question? Something to add? Let’s chat in the comments section down below! (I respond to every single comment)

Red Velvet Brownies

Red Velvet Brownies

Red Velvet Brownies (with Cheesecake Swirl)

Red Velvet Brownies are, to me, the BEST and yummiest Red Velvet interpretation. Better than Red Velvet Cake, red velvet pancakes, red velvet cookies or ANY other Red Velvet thing you’ve ever had.

What makes Red Velvet Brownies so brilliant is their chewy, fudgy texture – not to mention the chocolatey, tangy flavour!

Recipe Introduction

As you may know, Red Velvet Cake originated in the South of the USA during the Great Depression. The history is actually quite fascinating! You can read it here.

One of my favourite elements of Red Velvet Cake is the tanginess you get from the buttermilk and vinegar. I just had to retain that element in my Red Velvet Brownie recipe. I have done it by adding white spirit vinegar to the batter. Works like a charm.


Another key element is, of course, Cream Cheese Frosting. Now I’m not a huge fan of frosting brownies… It’s overkill in my opinion. Frosting is also incredibly sweet and since brownies already contain a fair bit of sugar, I don’t think it adds to the flavour.

The best option had to be to add the cream cheese (in some form) to the brownie batter before it gets baked.

It was a good move – the result is just incredible! You essentially make a small amount of cheesecake batter and swirl it into the brownies. The cheesecake batter also keeps the Red Velvet Brownies very moist. Total win-win!

Red Velvet Brownies | Red Velvet Brownies from scratch | red velvet cheesecake brownies


This tried and tested recipe for Red Velvet Brownies has been one of the biggest successes in my bakery. My clients LOVE them and so do I!


Red Velvet Brownies
 
Author:
Serves: 8
Ingredients
FOR CHEESECAKE SWIRL:
  • 160 g cream cheese (medium fat 25%, non-aerated)
  • 25 g Granulated Sugar
  • 25 g Egg White
  • 1 tsp Vanilla Extract
FOR RED VELVET BROWNIES:
  • 180 g Flour
  • 35 g Cocoa Powder
  • 5 g Salt
  • 210 g Unsalted Butter / Baking Margarine
  • 40 g 70% Dark Chocolate, finely chopped
  • 160 g White Sugar
  • 105 g Demerara Sugar
  • 2 tsp Vanilla Extract
  • 140 g Eggs (2 + left over egg from cheesecake mix)
  • 2 tsp Red Food Colouring (liquid)
  • 1 tsp White Spirit Vinegar
Instructions
  1. Spray the inside of a 17 x 27 x 3 cm (7 x 10,5 x 1 inch) brownie tin with non-tick cooking spray. Line the tin with baking parchment so that it goes up the sides and 3 cm over the rim. This makes the brownies easy to pull out once cooked and cooled. If you don’t have this specific size tin, an 8 x 8 inch tin will also work just fine.
  2. Start by making the cheesecake swirl. Place egg white and cream cheese in a small bowl. Beat together with a hand mixer till smooth and thickened – about 30 seconds. Beat in the sugar and vanilla for 10 seconds.
  3. At this point the sugar won’t dissolve yet, so place the bowl in the fridge for now. We’ll get back to it later.
  4. Next make the Red Velvet Brownies. Sift flour, Cocoa powder and salt in a large bowl, set aside.
  5. Melt the margarine/butter in a mixing bowl in the microwave for 2 mins. Swirl so that solid bits get distributed. Microwave for another 30 sec. It must boil before you continue.
  6. Transfer the melted butter to the bowl of your standing mixer (you can also continue by hand if you wish). Mix in the dark chocolate, granulated sugar and demerara sugar on medium speed with paddle attachment for 15 seconds. Leave to stand for 1 minute so that the sugars and chocolate can melt a bit.
  7. While you are waiting, combine the eggs, vanilla, vinegar and food colouring in a separate bowl. Don’t beat the ingredients. Just stir them till they are more or less combined. Set aside.
  8. Return to your stand mixer with the melted butter and sugar. Beat again for 15 seconds. The sugar should stick to the paddle when you lift it up. Add the egg mixture to the butter mixture. Beat on lowest speed for 10 seconds.
  9. Add dry ingredients to the bowl in one go. Beat on low speed till roughly combined. Scrape down the paddle and sides of the bowl. Beat on high speed for 30 seconds till the batter comes together and sticks to the sides of the bowl. Reduce speed to medium-low and continue beating for another 2 minutes.
  10. Preheat your oven to 170ºC/338ºF on the REGULAR BAKE SETTING (not convection/thermofan).
  11. Pour the Red Velvet Brownie Batter into your prepared tin. Place the pan in the fridge for 5 – 10 minutes, till the batter is cool and firms up a bit.
  12. In the meantime beat the cheesecake mix again. The sugar will now dissolve easily. Beat until smooth and moderately thick (about 30 seconds).
  13. Drop dollops of the cream cheese mix into the brownie batter. Swirl with a chopstick - see full post and video on technique! 
  14. Bake at 170ᵒC/338ºF for 33-37 minutes, turning after 15 minutes. You don’t want to over bake these Red Velvet Brownies, so keep a close eye on them. They are done when the cheesecake is set, but not browned. Also, a skewer should test clean, but barely so.
  15. Slice them up into however many squares you wish. Enjoy!
Notes
Store your Red Velvet Brownies in an airtight container at room temperature. They will last for 3 - 5 days.


If you give this recipe a go, tag me on facebook, twitter or instagram #philosophyofyum because I would LOVE to see!

Chat Soon!

Aurelia 🙂


Got a question? Something to add? Let’s chat in the comments section down below! (I respond to every single comment)