How to Make Beautiful Swirls in Your Brownies

How to Make Beautiful Swirls in Your Brownies

How to Make Beautiful Swirls in Your Brownies

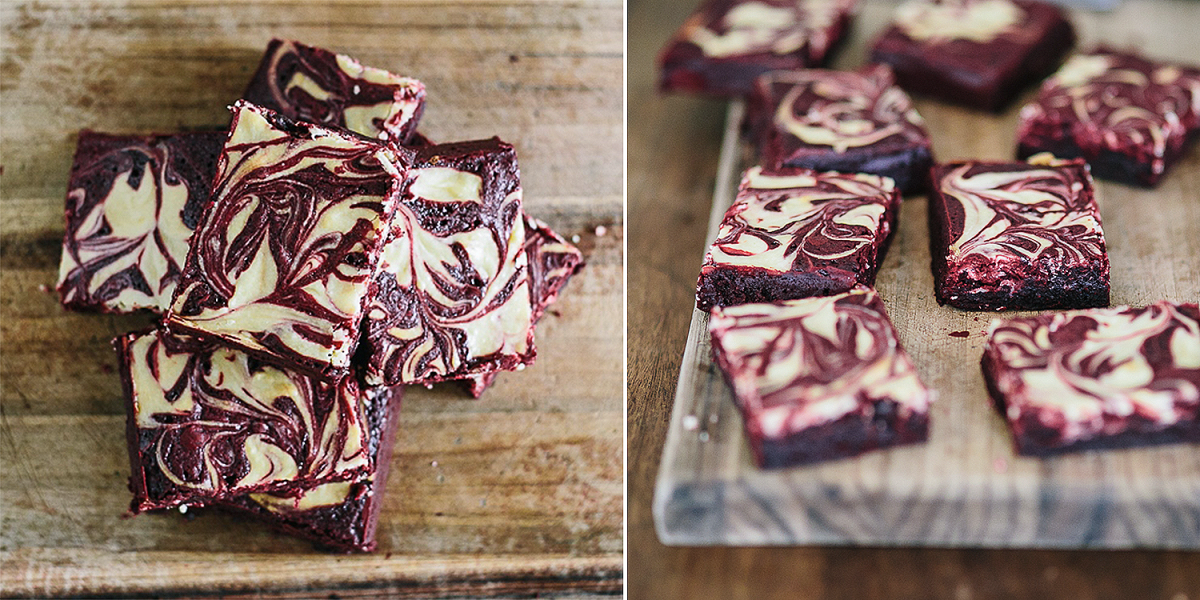
Swirl brownies are so striking and beautiful! Defined, voluptuous swirls take any dessert to the next level.

Problem is, the swirl part can VERY easily become a murky MESS.

I’ve been making Cheesecake Swirl Brownies and Red Velvet Brownies for a few years now. In the process I’ve discovered some wonderful tips and tricks to give you perfect, defined swirls in brownies every time!

Since so many folks have been asking me to share my technique, I’ve also made a little video (below) so that you can see exactly what I do 🙂


Essential Basics of Swirl Brownies:

1. Consistency of Cheesecake Batter:

This is the most important point, truly.

The cheesecake batter you make an actual cheesecake with can be quite runny. Cheesecake batter used for swirl brownies is an entirely different batter altogether. Cheesecake batter for swirl brownies HAS to be thicker, but should still drop off a spoon in 2 seconds. If you follow your recipe to the T and it turns out runny, make it thicker.

You can do this in 2 different ways:

a] Make sure your ingredients are ice cold (not room temp) and beat the batter for 30 seconds – 1 minute. This usually works to thicken up the cheesecake batter.

b] Only try this after you’ve applied option 1 above. Beat some cold cream cheese in a separate bowl to remove any lumps (about 30 seconds). Beat the smooth cream cheese into your cheesecake mixture. This will definitely thicken it up.

If your cheesecake batter gets too thick, you can thin it out by stirring in 1 tablespoon of water at a time.

Another important note – always use NON-aerated cream cheese!
I also prefer using only egg white in the batter as it gives you a whiter cheesecake swirl.


2. Consistency of Brownie Batter:

What you are aiming for is to get the brownie batter and cheesecake batter more or less at the same consistency. This is absolutely crucial when making swirl brownies.

Brownie batter can often be quite warm and runny. You will need to firm it up a tad before attempting to swirl in the cheesecake mixture.

It’s super easy to do – just pop it in the fridge for 5 minutes. It should still move down slowly if you tilt the brownie tin, but you don’t want it to be completely chilled and stationary either.

If you accidentally chilled the batter too much, pop it in the oven for 1 minute at 350ºF/180ºC. This will soften the brownie batter again.

3. The Swirling:

For practical purposes I’m just typing out everything I mention in the video.

  1. Place blobs of your cheesecake mixture over your brownie batter. Be sure to place blobs in the corners as corners can often look skimpy.
  2. Flatten out each blob with the back of a metal spoon. Spread the cheesecake onto the sides of the tin – super important! During baking the cheesecake naturally moves a bit to the middle of the tin. Spreading the cheesecake onto the sides of the tin anchors your entire pattern.
  3. Use a chopstick – NOT a butter knife – to swirl the mixture.
  4. Drag the chopstick, in SMALL circular movements, through the cheesecake and into the “blank” brownie spaces.
  5. Once a swirl has been made, leave it be. Going over it again will make it cloudy and messy.
  6. Always keep a little bit of cheesecake batter aside to fill in gaps. Swirl these extra dollops again in separated, once off, swirl motions.

Here is a video I made earlier this week so that you can see the technique for yourself 🙂 A big thanks to my husband for holding the camera!

Have you had any Swirl Brownies Issues? Please comment below because I would love to help!

Chat soon!

Aurelia 🙂

 

Plan your Home/Micro Bakery in 1 afternoon. Download this free Home/Micro Bakery Business Plan template to start turning your passion for baking into an income.

Got a question? Something to add? Let’s chat in the comments section down below! (I respond to every single comment)

18 Shares
Red Velvet Brownies

Red Velvet Brownies

Red Velvet Brownies (with Cheesecake Swirl)

Red Velvet Brownies are, to me, the BEST and yummiest Red Velvet interpretation. Better than Red Velvet Cake, red velvet pancakes, red velvet cookies or ANY other Red Velvet thing you’ve ever had.

What makes Red Velvet Brownies so brilliant is their chewy, fudgy texture – not to mention the chocolatey, tangy flavour!

Recipe Introduction

As you may know, Red Velvet Cake originated in the South of the USA during the Great Depression. The history is actually quite fascinating! You can read it here.

One of my favourite elements of Red Velvet Cake is the tanginess you get from the buttermilk and vinegar. I just had to retain that element in my Red Velvet Brownie recipe. I have done it by adding white spirit vinegar to the batter. Works like a charm.


Another key element is, of course, Cream Cheese Frosting. Now I’m not a huge fan of frosting brownies… It’s overkill in my opinion. Frosting is also incredibly sweet and since brownies already contain a fair bit of sugar, I don’t think it adds to the flavour.

The best option had to be to add the cream cheese (in some form) to the brownie batter before it gets baked.

It was a good move – the result is just incredible! You essentially make a small amount of cheesecake batter and swirl it into the brownies. The cheesecake batter also keeps the Red Velvet Brownies very moist. Total win-win!

Red Velvet Brownies | Red Velvet Brownies from scratch | red velvet cheesecake brownies


This tried and tested recipe for Red Velvet Brownies has been one of the biggest successes in my bakery. My clients LOVE them and so do I!


Red Velvet Brownies
 
Author:
Serves: 8
Ingredients
FOR CHEESECAKE SWIRL:
  • 160 g cream cheese (medium fat 25%, non-aerated)
  • 25 g Granulated Sugar
  • 25 g Egg White
  • 1 tsp Vanilla Extract
FOR RED VELVET BROWNIES:
  • 180 g Flour
  • 35 g Cocoa Powder
  • 5 g Salt
  • 210 g Unsalted Butter / Baking Margarine
  • 40 g 70% Dark Chocolate, finely chopped
  • 160 g White Sugar
  • 105 g Demerara Sugar
  • 2 tsp Vanilla Extract
  • 140 g Eggs (2 + left over egg from cheesecake mix)
  • 2 tsp Red Food Colouring (liquid)
  • 1 tsp White Spirit Vinegar
Instructions
  1. Spray the inside of a 17 x 27 x 3 cm (7 x 10,5 x 1 inch) brownie tin with non-tick cooking spray. Line the tin with baking parchment so that it goes up the sides and 3 cm over the rim. This makes the brownies easy to pull out once cooked and cooled. If you don’t have this specific size tin, an 8 x 8 inch tin will also work just fine.
  2. Start by making the cheesecake swirl. Place egg white and cream cheese in a small bowl. Beat together with a hand mixer till smooth and thickened – about 30 seconds. Beat in the sugar and vanilla for 10 seconds.
  3. At this point the sugar won’t dissolve yet, so place the bowl in the fridge for now. We’ll get back to it later.
  4. Next make the Red Velvet Brownies. Sift flour, Cocoa powder and salt in a large bowl, set aside.
  5. Melt the margarine/butter in a mixing bowl in the microwave for 2 mins. Swirl so that solid bits get distributed. Microwave for another 30 sec. It must boil before you continue.
  6. Transfer the melted butter to the bowl of your standing mixer (you can also continue by hand if you wish). Mix in the dark chocolate, granulated sugar and demerara sugar on medium speed with paddle attachment for 15 seconds. Leave to stand for 1 minute so that the sugars and chocolate can melt a bit.
  7. While you are waiting, combine the eggs, vanilla, vinegar and food colouring in a separate bowl. Don’t beat the ingredients. Just stir them till they are more or less combined. Set aside.
  8. Return to your stand mixer with the melted butter and sugar. Beat again for 15 seconds. The sugar should stick to the paddle when you lift it up. Add the egg mixture to the butter mixture. Beat on lowest speed for 10 seconds.
  9. Add dry ingredients to the bowl in one go. Beat on low speed till roughly combined. Scrape down the paddle and sides of the bowl. Beat on high speed for 30 seconds till the batter comes together and sticks to the sides of the bowl. Reduce speed to medium-low and continue beating for another 2 minutes.
  10. Preheat your oven to 170ºC/338ºF on the REGULAR BAKE SETTING (not convection/thermofan).
  11. Pour the Red Velvet Brownie Batter into your prepared tin. Place the pan in the fridge for 5 – 10 minutes, till the batter is cool and firms up a bit.
  12. In the meantime beat the cheesecake mix again. The sugar will now dissolve easily. Beat until smooth and moderately thick (about 30 seconds).
  13. Drop dollops of the cream cheese mix into the brownie batter. Swirl with a chopstick - see full post and video on technique! 
  14. Bake at 170ᵒC/338ºF for 33-37 minutes, turning after 15 minutes. You don’t want to over bake these Red Velvet Brownies, so keep a close eye on them. They are done when the cheesecake is set, but not browned. Also, a skewer should test clean, but barely so.
  15. Slice them up into however many squares you wish. Enjoy!
Notes
Store your Red Velvet Brownies in an airtight container at room temperature. They will last for 3 - 5 days.


If you give this recipe a go, tag me on facebook, twitter or instagram #philosophyofyum because I would LOVE to see!

Chat Soon!

Aurelia 🙂


Plan your Home/Micro Bakery in 1 afternoon. Download this free Home/Micro Bakery Business Plan template to start turning your passion for baking into an income.

Got a question? Something to add? Let’s chat in the comments section down below! (I respond to every single comment)

28 Shares
DIY Cupcake Liners – Quick and easy!

DIY Cupcake Liners – Quick and easy!

DIY Cupcake Liners

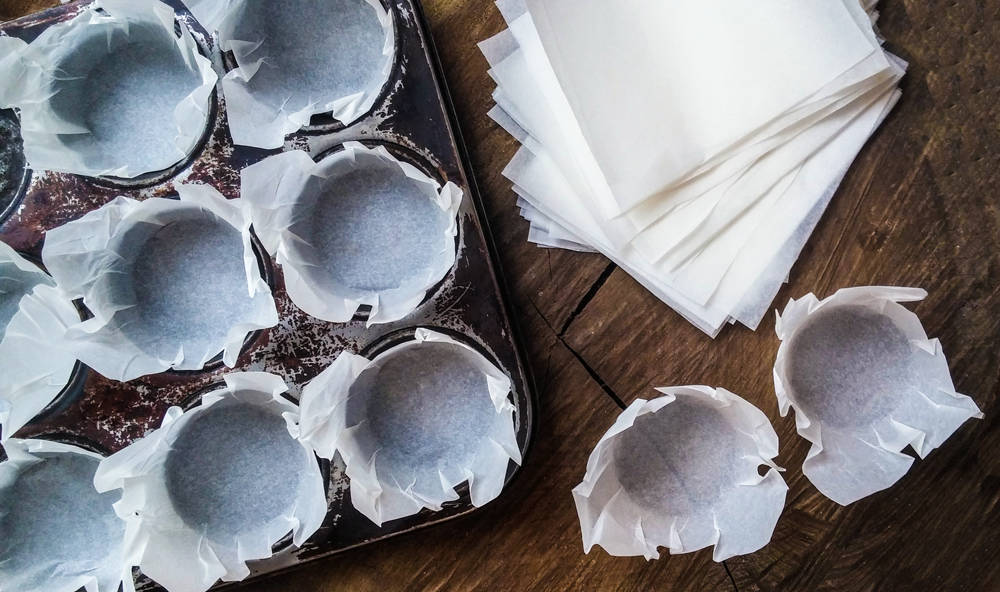
DIY cupcake liners are so simple to make!

I love using them for muffins as well because they give the muffin a fuller and more homemade appearance. It’s also WAY cheaper to make your own cupcake liners.

Marie-Anne Duarte asked me how I make my perfect DIY cupcake liners a few weeks ago, so this one is for you!

I can’t tell you how many times I have baked cupcakes and/or muffins and then, as you get to scooping out the last bit of batter, you realize you are 2 liners short!

This hack takes about 2 minutes from start to finish. In no time at all you will have your very own perfect DIY cupcake liners 🙂


Which Paper Works for Cupcake Liners?

Wax Paper does NOT work for this. It is too thin and a nightmare to get off the actual baked product. You end up peeling it away in shards.

Some of it you can’t even get off at all. Save yourself the hassle and just don’t even attempt to do this with wax paper.

Top quality baking/parchment paper, like GLAD, does not work either. It is TOO non-stick. It is brilliant for lining brownie and cake pans, but not for making DIY cupcake liners. The paper comes right off the cupcake.

What we need is a paper that sticks to the baked product just enough so that it only peels off when you actually peel it off.

In grocery stores and baking stores you will find medium quality baking/parchment paper that is typically brown or white in colour. Brands like Unsgaard and Sylko.

In baking stores, their baking paper is often not even from a particular brand. They buy it in bulk in giant rolls and make their own smaller rolls from it to sell to their clients.

This baking/parchment paper is often non-stick on just one side or not even really non-stick at all. THIS is the paper you need.

Want to add a rustic look to your cupcakes or muffins? Or maybe you've just run out of cupcake liners! Either way, these homemade DIY cupcake liners/cases are exactly what you need. They're quick & easy to make - and super cheap too! Click through to get the full step-by-step tutorial... #cupcakeliners #cupcakecases #cupcakes #homebaking #bakingtips


2 Sides of the Parchment Paper

As I said, some baking/parchment paper has one non-stick side. Make sure that this non-stick side does NOT touch the muffin or cupcake. Otherwise it will slip right off. Make sure the dull side ends up on the inside of your DIY cupcake liners.


1. Cutting Your DIY Cupcake Liners

If you buy your baking/parchment paper in a roll, it makes life super easy. These rolls are generally about 45 cm in width.

  • Place the roll horizontally before you on a counter top. With your ruler placed vertically, measure 13 cm and mark it with a pencil.
  • Fold the paper over. Make sure the sides line up 100%. Look out for your mark.
  • Press down with your one hand, on the mark, and hold it there.
  • Let your other hand slide and press along the paper to create an even fold all the way to the other side. Slide over the fold with your nail again to secure it. You have now folded one long strip that will be turned into 4 DIY cupcake liners.
  • You can fold over the paper again multiple times like an accordion if you need to make lots of liners.
  • Cut the paper along the folds so that you end up with long strips of 13 cm x 45 cm.
  • Place 2 strips precisely on top of each other. Fold them over in half. Press down and secure the fold with your nail. Cut along the closed end so that you have 4 strips of 13 cm x 22,5 cm.

  • Place 4 strips precisely on top of each other. Fold them over in half. Press down and secure the fold with your nail. Cut along the closed end so that you have 8 liners of 13 cm x 11,25 cm.


2. Folding Your Cupcake Cases

You’ll need a muffin/cupcake tin and a cup, measuring cup or ANYTHING that fits snugly into the holes of your tin. For me it is a large bottle of Cerebos Salt. Whatever you are going to use, let’s call it a “squeezer”.

  • Place a single piece of paper over a hole – as centralized as possible. Remember at this point to have the one non-stick side facing DOWN (if you are using a paper with one non-stick side). The non-stick side should not be in contact with the cupcake/muffin.
  • Press down with your squeezer over the paper, into the hole.
  • Roll around the squeezer to force the paper into the bottom of the hole.

  • The “ears” of your DIY cupcake liners will be a bit uneven and random. Use your thumb and index finger to grab each one and flatten it out. Especially the base of each ear. Do this with all 4 ears. You can twist you squeezer to access all the ears. You don’t need to turn the pan every time.
  • Press each ear tightly up against your squeezer.

  • Firmly roll around your squeezer again to really imprint that hole’s shape in the paper.


3. How to Spoon Batter into the Homemade Liners

Now you will notice that the ears of the DIY cupcake liners are facing up. This will give you cupcakes that bake with North, South, East and West points, instead of nice and round. Here’s how you fix that.

  • Spoon your batter into your liners. You need the weight of the batter to keep the liner down.
  • Press down and open up the 4 ears (see image above right).
  • Bake as normal!


Additional Notes

If you used the right paper it will not peel away from the cupcake/muffin by itself. You can lift the baked goods out of the tin by holding onto the ears of the liner – don’t be scared, it won’t pull away.

If you have any questions, please comment below because I would love to help!


Obsessed with Baking PERFECT Cupcakes?

I thought so! Here are 2 blog posts that’ll help you to bake flawless cupcakes every single time:

>> Full Cupcake Troubleshooting – 15 Mistakes and Solutions for Baking PERFECT Cupcakes
>> Advanced Tips for Baking PERFECT Cupcakes Every Time.

Chat soon!

Aurelia 🙂

Plan your Home/Micro Bakery in 1 afternoon. Download this free Home/Micro Bakery Business Plan template to start turning your passion for baking into an income.

Got a question? Something to add? Let’s chat in the comments section down below! (I respond to every single comment)

495 Shares

Pumpkin & Cream Cheese Muffins

Pumpkin & Cream Cheese Muffins

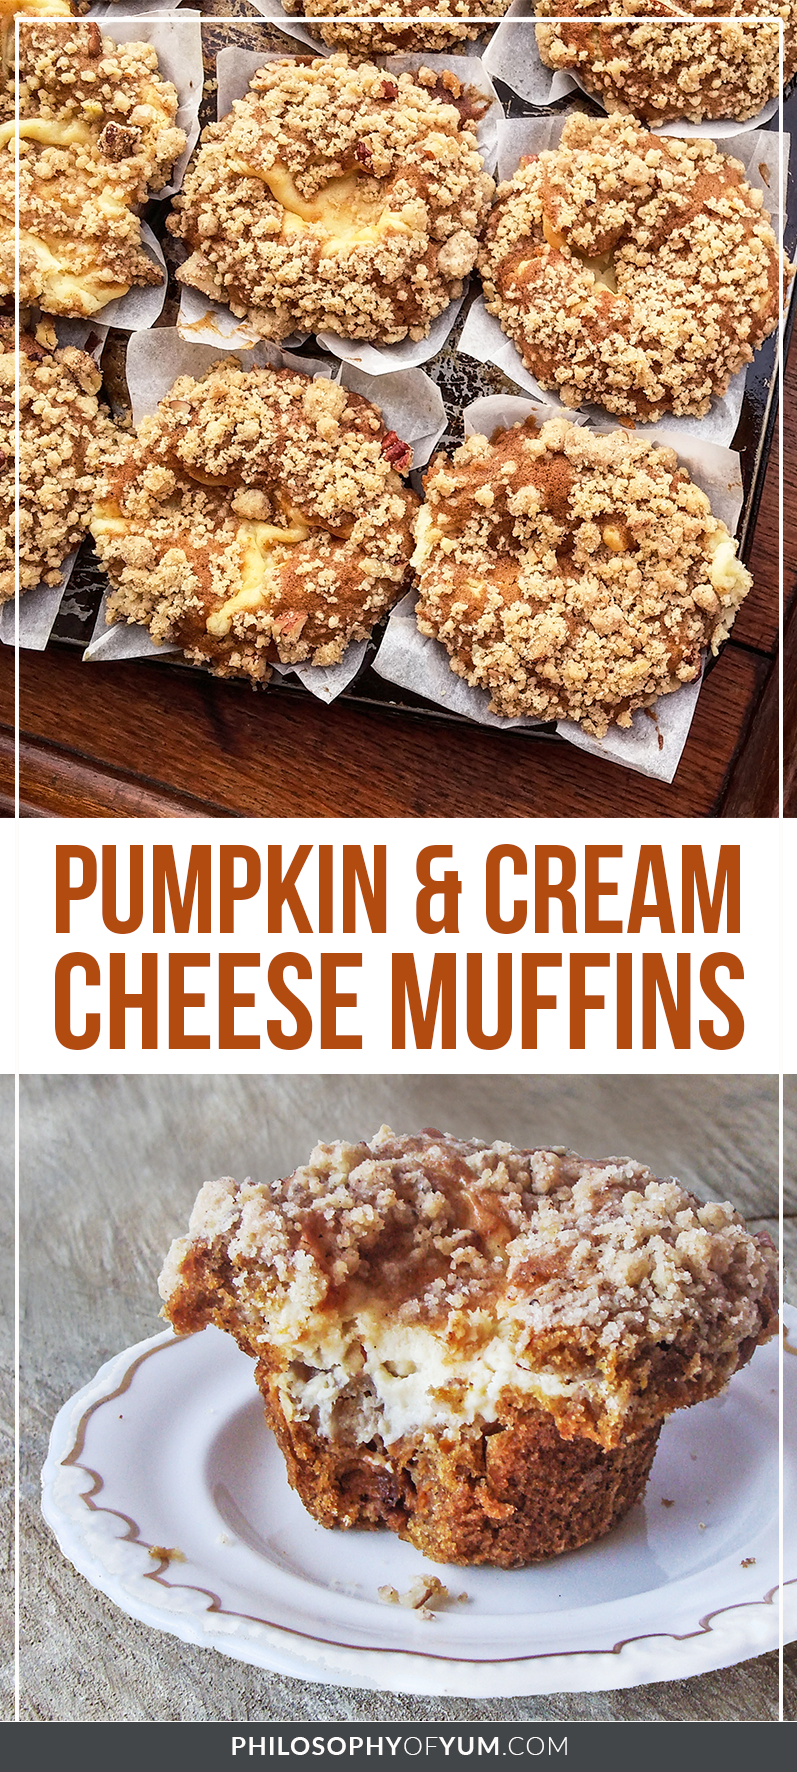
Pumpkin and Cream Cheese Muffins are really my all-time favourite muffins – BY FAR! They are absolutely sensational.

No really, you don’t understand… they are sensational!

Since you guys have been enjoying all my muffin recipes (Pear, Apple & Blueberry, Ultimate Bran, Cranberry & Coconut) so much, I thought I should share this one as well 🙂

The Story:

If you’ve read my About page, you will know that I have a thing for Butternut Squash. I would live on it alone if I could. Apparently our bodies need protein as well. Bummer. One of my favourite flavour combos with butternut, is cheese! Feta, cream cheese, mozzarella, you name it.

I guess it’s the salty combined with the sweet, but it’s also so much more than that… They are just made for each other.

Back when I first started out baking for Coffee Shops, I baked for a place called Field Office. The manager and I were constantly strategizing and bouncing flavour ideas back and forth for different muffins and cupcakes. I started searching online for more ideas and found a post on “Top 20 muffin flavours” or something like that.

Most of them looked quite nice, but nothing grabbed me… Until the words “Pumpkin” and “Cream Cheese” graced my screen. I made my own version of this recipe using butternut squash (obviously) and changing the cream cheese filling, so that it resembles cheesecake.

The crunchy, salted butter pecan crumble is the ultimate crown, providing a buttery, nutty crunch to the whole experience!

pumpkin muffins | fall muffin recipe | crumble muffins | pumpkin cream cheese muffins

These Pumpkin & Cream Cheese muffins were flying off the shelves at Field Office. Everyone loved them! The manager & I were so elated that we had found the Nemo of the muffin world!

Recipe Introduction:

How you cook the butternut will completely determine the quality of your muffins. You don’t want to boil it to death. Make sure you keep it on a medium heat and once it is soft, remove it from the heat.

The butternut also shouldn’t be submerged in water. Simply pour about 5 mm of water in the bottom of the pot so that you are essentially steaming it. If you prefer steaming it altogether, that is also fine. I don’t have a steamer, so I prefer using a small pot on a stove. Also add 1/2 tsp salt when cooking the butternut.

The Cream Cheese filling does need to be made in advance and frozen for at least 4 hours. Using it straight away encourages the batter to mix with it which leaves the amazing cream cheese center a bit sparse and not so amazing.

Most bakers insist on using unsalted butter in their cakes and I totally get that. This is a muffin though and salted butter makes the crumble topping ridiculously good!

A moist, tender, warmly spiced pumpkin muffin with a slightly caramelized cream cheese center and a crown of pecan crumble on top – it is the PERFECT incentive to wake up in the morning!

5.0 from 1 reviews
Pumpkin & Cream Cheese Muffins
 
Prep time
Cook time
Total time
 
Author:
Serves: 10
Ingredients
FOR THE FILLING:
  • 60 g Whipping Cream
  • 140 g Cream Cheese
  • 30 g Granulated Sugar
  • 1 tsp Vanilla Extract
FOR THE CRUMBLE:
  • 55 g Cake Flour
  • 35 g Granulated Sugar
  • 15 g Pecans, roughly chopped
  • ⅓ tsp Ground Cinnamon
  • 30 g Salted Butter
FOR THE MUFFINS:
  • 205 g Cake Flour
  • 6 g Baking Powder
  • ⅓ tsp Bicarbonate of Soda
  • ½ tsp Ground Cinnamon
  • ½ Tbsp Pumpkin Pie Spice (1 teaspoon ground cinnamon, ¼ teaspoon ground nutmeg, ¼ teaspoon ground ginger, ⅛ teaspoon ground cloves)
  • 1 tsp Salt
  • 80 g Eggs
  • 130 g Granulated Sugar
  • 230 g Cooked/Steamed Butternut (250 g raw), mashed up. Cook the butternut as described in the Recipe Introduction.
  • ¼ cup Water, room temperature
  • ½ cup Canola Oil
  • ½ Tbsp Vanilla Extract
Instructions
FOR THE FILLING:
  1. Make the Cream Cheese Filling at least 4 hours before you plan on making the actual muffins. It will need time to freeze solid. This can be done up to 2 weeks in advance if desired.
  2. Whip cream to stiff peaks. Beat in the cream cheese till smooth. Beat in the sugar and vanilla. Allow to stand for 5 minutes so that the sugar can melt. Beat again till smooth. Place in freezer for at least 4 hours.
FOR THE CRUMBLE:
  1. To make the pecan crumble, melt the butter in a heat proof bowl.
  2. Add in the flour, sugar and cinnamon. Stir with a fork to combine thoroughly. There will be some clumps - this is exactly what you want. Stir in the pecans.
  3. Preheat oven to 180˚C/350˚F. Line a standard muffin tin with 10 paper liners; set aside.
  4. Sift together the flour, baking powder, bicarbonate of soda, spices and salt in a large bowl. Set aside. At this point also remove your frozen cream cheese mixture from the freezer – this will make it easier to scoop out when the time comes.
FOR THE MUFFINS:
  1. Beat together the eggs and sugar in a large bowl for 1 minute, till pale and fluffy. Add in the vanilla, water, butternut and oil. Whisk to combine. From here on work with a handheld balloon whisk.
  2. Add the dry ingredients into the wet ingredients and whisk to combine well.
  3. Fill your liners about halfway full and keep the rest of the batter for later.
  4. Using a sturdy spoon or ice cream scoop, scoop 23 g of the cream cheese mixture into each case. 23 g is really the ideal amount. More will make it spill over into the oven and less is too sad.
  5. Divide the rest of your batter between the 10 muffins. Be sure to cover all the cream cheese poking out.
  6. Spoon the pecan crumble on top of each muffin. Use all of it. Be sure to spread it out so that all the batter is covered.
  7. Bake at 180˚C/350˚F in the center of your oven for 40 minutes on the regular bake setting. Do not use the convection or thermo-fan setting. TURN THE TIN EVERY 10 MINUTES for a perfectly even bake. Place a large roasting tray underneath the muffins just in case any drippings of cream cheese cook out.
  8. Allow these boys (because they are definitely not girls) to cool for at least 40 minutes before eating. The cream cheese filling gets piping hot in the cooking process.
  9. Eat and enjoy!

These sublime Pumpkin and Cream Cheese Muffins age exceptionally well… They actually get better, believe it or not. I prefer not to eat them straight out of the oven.

It’s like the spices need time to develop or something? Like a curry. Now this is totally up to you, but I make my muffins the day before and then just pop them in the oven for 5-10 minutes to warm through again before serving.

Funky Fact: These muffins pair SUPER well with beer!!

Thanks for reading! If you give this recipe a go, tag me on facebook, twitter or instagram #philosophyofyum because I would LOVE to see!

Chat soon!

Aurelia 🙂

Plan your Home/Micro Bakery in 1 afternoon. Download this free Home/Micro Bakery Business Plan template to start turning your passion for baking into an income.

Got a question? Something to add? Let’s chat in the comments section down below! (I respond to every single comment)
30 Shares
Gluten Free Cake Flour

Gluten Free Cake Flour

Gluten Free Cake Flour Recipe

Gluten Free Flour is just as essential in my kitchen as regular Cake Flour. If you’ve been following my blog for a while, you will know that my husband, Adriaan, is gluten intolerant. The news was such a downer initially…

We both kept thinking of all the foods he could no longer eat; bread, pies, pasta, pizza, cookies, CAKE!!

The list just felt so long and heavy.

One of the main ways I communicate my love and support is through cooking and baking. It’s my “thang”, you know. Over months of researching and trying out dozens of recipes, I had to face the hard truth that gluten free baked goods simply aren’t as delicious as normal baked goods.

I mean, for a poor gluten free soul they are better than nothing, but come on, I wanted Adriaan to leap in the air over the yumminess!

There had to be a solution to gluten free baking that would produce goods SO YUMMY that they actually make him dance with joy…


The Cravings

The main thing Adriaan was craving was just an ordinary yellow cake. Nothing fancy – just pure and honest cake. Thing is, the simplest bakes are the ones that leave ingredients nowhere to hide!

Making a chocolate cake is so much easier in that sense, because if your gluten free flour blend has a slightly funny flavour, it will be masked by the chocolate flavour (gluten free bakers nodding in agreement here).

Another impossible craving he had, was for pie! Flaky, buttery pastry. What more does a man need? Except a wife to make it of course.

Adriaan used to eat tons of pies. In South Africa they are everywhere. From every grocery store to the smallest take away shop in a run-down neighbourhood. I often made a butternut, spinach and feta pie for us at home as well.

Making gluten free cake is one thing, but pastry is a whole other colossal monster.

Why so complex?

As I’ve said before, I have done hours and days of research online. MOST gluten free flour/cake recipes were severely annoying.

They called for these crazy ingredients which I’ve never seen before in my life and could not find in any supermarket or health food store in my area.

Things like Ultratex, Expandex and Whey Protein Isolate… What?! Or should I say “Gezuntheid”?

I was on a mission to find something that could be made with ingredients that are available to me and can easily be mixed with no special equipment or effort.

Breakthrough

One fine day I was searching for gluten free flour/cake recipes yet again and I came across Yammie’s Gluten Freedom. Her recipe for White cake looked fantastic.

I wasn’t too keen on making it though as the recipe called for coconut flour as well (which is too expensive) and if I can avoid doing the egg white thing, I prefer to do so. BUT, Yammie gave a link to Jeanne’s gluten free flour recipe on Art of Gluten Free Baking.

I tried out the flour blend and it was really really good!

Gluten Free Cake Flour with no crazy ingredients and super easy to make! This gluten free flour can be substituted gram for gram in ANY cake recipe! I also use it to make shortcrust pastry, rough puff pastry and even in homemade gluten free pasta - as in gluten free pasta that can be rolled into sheets with a hand operated pasta machine – I kid you not! #glutenfreebaking #glutenfreecake #glutenfreeflour #homebaking


Refining the Recipe

This gluten free flour blend was a great breakthrough and made cupcakes that improved Adriaan’s quality of life significantly.

I also started using this gluten free flour in my own bakery for all gluten free cakes. After a few months however, I realized that there is a slightly grainy residue in your mouth when the crumb breaks down. Not severe, but it was still there.

When I made a gluten free cake about a year later, I had run out of glutinous/sweet rice flour. Such a bummer.

Going to a Asian supermarket was not an option on this particular day, so there had to be a plan B! Art of Gluten Free Baking suggested Potato Flour as a substitute for Sweet Rice Flour.

The result was just so much better! Such a soft and tender crumb! In the meantime I’ve also increased the amount of Xanthan Gum and Brown Rice Flour as well. I’m so extremely happy with the recipe as it is now!

And I love that I can find ALL of these ingredients in my closest health store/supermarket!

This gluten free flour can be substituted gram for gram in ANY cake recipe! I also use it to make shortcrust pastry, rough puff pastry and even in homemade pasta! Pasta that can be rolled into sheets with a hand operated pasta machine – I kid you not!

I mix 1 kg of flour in a little sealed bucket and keep it in my cupboard to whip out whenever I need it.

You’re welcome to halve or quarter the recipe if you need to.

I go by grams because the accuracy is just better when it comes to dry ingredients. Now go bake yourself some perfect gluten free cake with your favourite normal cake recipe!

Important note: This flour recipe is not ideal for making bread, cookies or brownies, but I do have an Ultimate Gluten Free Brownie Recipe 🙂


5.0 from 1 reviews
Gluten Free Flour
 
Author:
Serves: 1 kg
Ingredients
  • 435 g White Rice Flour
  • 145 g Brown Rice Flour
  • 230 g Potato Flour (not starch, different ingredient)
  • 175 g Tapioca Flour (or starch, same thing in this case)
  • 65 g Chickpea Flour
  • 14 g Xanthan Gum
Instructions
  1. Weigh ingredients into a bowl or tub with at least a 2,5 kg capacity. Some of the flours are quite fine and will form dust as you mix them.
  2. Using a metal spoon, VERY gently fold the flours together. Be sure to dig all the way down and scoop the flour up in the process. Get into all the corners as well. Do this for about 1 minute.
  3. Next stir the mixture gently again, but this time using a handheld balloon whisk. Keep stirring for 1 minute. Be thorough.
  4. Put your gluten free flour in a sealed container. It will last as long as the actual ingredients – a couple of months.

I’m pretty sure you will enjoy my Ultimate Gluten Free Brownies Recipe… I’ve literally sold like over 8000+ of them. They are AMAZING!!

Thanks so much for reading! Let me know if you like my gluten free flour blend as much as we do.

Chat soon!

Aurelia

Plan your Home/Micro Bakery in 1 afternoon. Download this free Home/Micro Bakery Business Plan template to start turning your passion for baking into an income.

Got a question? Something to add? Let’s chat in the comments section down below! (I respond to every single comment)

1K Shares

X