Home Bakery Time Management – 6 Tips to Get Your Baking Done Faster

Home Bakery Time Management – 6 Tips to Get Your Baking Done Faster

Home Bakery Time Management – 6 Tips to Get Your Baking Done Faster

The BEST ways to get more things done in your Home Bakery is not a bigger oven or a better mixer (although those tools can help).

I’m talking about tips that go way beyond any piece of equipment.

Resourcefulness can accomplish a whole lot more than resources my friend.

This post is also definitely not about just “working harder”! That’s not productivity, but actually just “slaving away”, so we’re not going there!

Today’s tips are more about practical advice on mindsets, planning, and time management. If you manage your thoughts and time effectively, I promise you’ll get your baking done so much faster than you imagined was possible.

And to help you plan better and be more efficient, I’ve created a free Weekly Planner for you to download and use in your own business! Here’s how to get it:

1. Join my free Resource Library for Home Bakers,
2. download the planner and
3. print it out 😀 Simple.

Do you want to be more organized & efficient with your time in your Home Bakery Business? Or maybe you want to ditch the regular burn-out for a more consistent, sustainable approach to your home baking? In this post, I interview a whole bunch of home bakers - ranging from single to married to Moms with kids - to get their best tips for time management! It IS possible to bake for profit AND have time for family. Here's how to do it... #baking #homebaking #bakingbusiness #homebakery #timemanagement

Please note: This post contains affiliate links, meaning I get a small commission if you end up buying one of these products – but it’s at no extra cost to you. I’m proud to recommend these products to you because I know they’ll increase your productivity at the most affordable rate possible.

Here are my 6 tips for getting your baking done faster and managing your time well in your Home Bakery Business.

And read till the end to get a BONUS TIP!


1. Start the day in “Creating Mode”, not in “Comparison Mode”

This is a tip I recently learned from Angie Lee on The Influencer podcast by Julie Solomon.

Every morning you wake up; your mindset and thought patterns seriously determine the rest of your day.

Those thought patterns will literally call the shots on your work speed, accuracy and efficiency.

Going on Instagram first thing in the morning to look at the feed of your heroes and idols is one sure way to put a rain-cloud on your productivity for the day.

Here’s what happens when you look at all that spectacular feed, deeply inhaling the coveting fumes and singing “I wanna be like you-ou-ou!”…

Your mind is forming a sub-conscious conclusion that you are not good enough and that you’ll probably never be enough and you should actually be more like “them” and less like you. Comparison drains life out of you and clouds your mind. And a clouded mind KILLS productivity.

Comparison thoughts that have the power to torment you the rest of the day. And this all happens when you’ve opened yourself up to all of that comparison and negative thoughts.

All of those thoughts are RUBBBBBBISSHHHHHHHH.

baking tips, baking business, home bakery

So instead of going on Instagram first thing in the morning and providing fertile soil and a greenhouse for those thought patterns, just don’t even open that box my friend!

Wake up in CREATING mode instead! This means that you wake up with the intention to CREATE beautiful, delicious things today.

Your goal is to make something, to add something to the world by brightening up someone’s day with a yummy treat made just for them! Engage your thoughts in that glorious mission and your baking day will be so much more productive!


2. Master your Evening Routine

A productive baking day starts the NIGHT BEFORE. If you feel lethargic and meh on your work day, you may need to get honest with yourself about your evening routine.

Yep, I’m talking to you Netflix-er!

Watching movies and series can be a good way to unwind and laugh at the end of a rough day, but you absolutely need to keep an eye on the clock.

If you want your mind and body to function optimally the next day, make it your mission to sleep enough and give your body all the rest it needs.

And here comes the difficult part… Stay away from ANY screens for at least half an hour before you go to bed. Digital screens have a very particular kind of light that stimulates our brains and keeps them awake.

So, switch your phone to airplane mode half an hour before you plan to sleep and don’t look at it again. Rather take this time to listen to music, or read a bit or colour in (it works wonders for relaxation!!).

Planning your evening routine instead of letting it just “happen”, will give your body the rest it needs which will make you more productive the next day.

Also take time in the evening to write out your schedule for the next day. Be practical and write out for yourself WHEN you’re going to do which tasks. This way you won’t feel flooded by a wave of overwhelm the next day. You’ll feel more in control of your day, instead of putting out fires all day long.


3. Divide Your Day into Phases

I just rubbed my hand over my face as I read this heading, because I realized that I keep forgetting to apply this tip!

Life is busy. Life is hard. Unless you look at it in part.

By this I mean that it’s not a good idea to look at EVERYTHING you need to do today AT THE SAME TIME. This will lead to severe overwhelm.

Overwhelm overloads your mind and emotions with expectations. A list of 20 expectations will absolutely shut you down, weigh you down and prevent you from functioning productively.

Breaking the day up into separate tasks does not help me either – because the amount of tasks is still overwhelming!

All Home Bakers want to get their baking done faster, because higher productivity means higher profit margins! Not to mention MORE time with family! The mistake we often make is to think that hard work = productivity, which is a recipe for burnout! Learn how to boost your Home Bakery Business's productivity by working SMARTER, not harder. #homebakery #bakingbusiness #homebaking #baking


What I like to do is divide my day up into phases.

Defining the different phases of my day helps me to focus clearly on a handful of tasks that all fall under the same type of category.

By focusing on 1 phase at a time, I don’t clutter my thoughts with too many tasks or wonder “WHEN am I going to get that thing done?!”.

I know when I’m going to get that done. It will get done in my late afternoon phase, so I don’t need to spend any energy worrying about it NOW.


I encourage you to test which tasks fit better into which phases of your day.

Some tasks might be easier for you to complete in the morning than for others.

I’ve heard that it’s bad for creatives to answer emails first thing in the morning, but I love it! The world is still quiet and I get to chat with awesome peeps like you first thing – I love starting my day this way.

But laundry is a late morning phase thing for me. The thought of doing laundry first thing in the morning makes me want to cry.

So there are no rules here. Divide your day into phases and distribute your tasks as YOU like them.

Don’t force yourself to do laundry first thing in the morning just because people label such a routine as “super productive”!

Rather be realistic and honest with yourself about which tasks suit YOU better at certain times of the day.

I also like to divide my baking up into 5 phases every day:

Early Morning – Phase 1 – ADMIN for 1 hour: This is the only time of the day I check emails. One of the worst, most time-consuming mistakes you can make is to answer emails on your phone all day long. It breaks your concentration and slows you down!  I specifically removed email from my phone so I’m not tempted to respond. Set a time to answer emails on your computer and then walk away!

Morning – Phase 2 – PREP: I sift all my dry ingredients, chop everything that needs to be chopped, cut out the correct parchment sizes, etc.

Late Morning – Phase 3 – BAKING SHIFT 1: This is just to get my baking GOING. I’ll bake 1 thing just to make me feel like I’m making progress. It’s usually a layer cake because I know it needs lots of time to cool before I can start decorating it.

LUNCH – It’s super important to take a short break from your work and SIT DOWN to eat. No order is more important that your health & sanity.

Afternoon – Phase 4 – BAKING SHIFT 2: Rest of the baking work.

TEA BREAK.

Late afternoon – Phase 5 – DECORATING & CLEAN UP.

Early evening – Phase 6 – POSTING ON INSTAGRAM STORIES. Back in the day I used to share behind the scenes videos and photos of my baking throughout the day on my Instagram Stories, but that takes up soooo much more time! It works much better to take photos & videos throughout the day and then post all of it at the same time. It’s a lot better for your engagement too because when your followers start engaging with your stories they want to see what happens next! Making them wait 4 hours to see the next shot isn’t fun for them.

Dividing up my day into these phases has helped SO much to make my baking days feel less overwhelming. This structure has helped me to accomplish more in less time.


4. Do Tasks in Bulk

It’s a whole lot more efficient to simply to do things in bulk wherever it’s possible because jumping between tasks wastes heaps of time.

Doing things in bulk will streamline your productivity and business like crazy.

This also means setting aside times in the day for certain tasks and sticking to that schedule!

For example: Do not answer emails all throughout the day. You can follow my routine I listed a bit earlier. Or you can decide on 2 half hour slots per day for answering emails – one in the late morning and one in the late afternoon.

Keep your phone AWAY from your kitchen when you are baking!! Instagram is the graveyard of time!! Schedule “Insta-times” for yourself in the day, but it cannot be during baking time.

If you had a corporate job, ANY boss would be infuriated if you went on Instagram every 10 minutes, because that means you are stealing his time and being unproductive.

Well my friend, YOU are your own boss now which means that you are actually stealing your own time. Yikes!

Batching is also essential in your baking tasks. PREP IS EVERYTHING. More on this in Tip 6!


5. INVEST in TIME savers

Time is something you can NEVER get back, but Money is something you can make back.

I recently learned this from Sterling Griffin! And upon hearing this and really letting it sink in, I quickly became SHOCKED by how little value I put on my time.

I am super frugal, so I often place myself in a position where I’d rather spend my time than spend money.

This mindset is the ANTIDOTE to productivity.

YOUR TIME IS THE MOST VALUABLE COMMODITY YOU HAVE. Don’t treat it like it’s limitless – because it is absolutely not. It’s priceless.

Invest in time saving tools wherever you are able to. This will get you to your goals FASTER.

Struggling to find time for yourself and your family in your home bakery business? These AMAZING time management tips from a 6+ years full-time home baker are exactly what you need! Learn how to use what you've got to get your baking done faster. Learn how to prioritize and plan effectively so you are in charge of your schedule, make a great profit, and don't burn out in the process! #homebaking #homebakery #athomebakery #cakebusiness #cupcakebusiness

Let me use a super obvious example to illustrate my point.

There was a time when a cheese grater was a new invention… Up until then, everyone was just slicing vegetables and other foods with simple knives.

I’m SURE there were women those days that said: “I cannot afford a grater! Money is scarce! I’d rather just keep slicing my carrots by hand for my carrot cakes.”

But others saw the opportunity this grater device was offering. It would save them TIME. If they didn’t need to spend an hour on slicing carrots for 1 cake, they could now double their carrot cake production for the day and MAKE DOUBLE THE PROFIT!


Initially you may need to spend some money to buy a time saving tool, but consider your RETURN ON INVESTMENT.

Will this tool/service/course save you time?

Will this tool/service/course increase your baking capacity and grow your business?

If the answer is YES, then borrow money to invest in that tool. The tool will pay itself off and then proceed to save you time, generate more profit for you and grow your baking business.

For example, it takes up so much time to create templates for invoices, quotes, sales tracking, monthly income statements, etc. But it’s going to save you so much time and frustration to just use mine 🙂 You can get all my templates in the Confident Pricing & Profit Kit.

Another great example: I used to use cup measurements in my baking. But when I started baking for Wholesale Clients I quickly realized that cup measurements just aren’t practical in a Home Bakery! You need to wash them over and over throughout the day and it WASTES SO MUCH TIME.

Getting a digital kitchen scale was the BEST investment (around $25) to save me time and frustration. You just weigh everything directly into your mixing bowl in like 3 minutes total. It’s fantastic! Plus, no extra cups to clean and your baking turns out consistent and perfect every time.


Hard work does not necessarily equal productivity! Discover 6 amazing tips to BOOST your Home Bakery Business's productivity by working SMARTER, not harder. Click through to get the tips! #homebakery #bakingbusiness #cakebusiness #bakefromhome


6. Do as Many Tasks as Possible in Advance

The only things you need to do as late as possible is baking the goods, decorating them, and packaging them. But everything else you can do well in advance!

Baking Days and Order Collection/Delivery Days are already stressful and crazy. The last thing you want to worry about is cutting out labels or finishing the decorations on your packaging.

Here’s a list of tasks you can do way in advance:

🍪 Sift all your dry ingredients (the day before baking day) into little labelled zip seal baggies. This way you won’t have to jump between dry and wet ingredients for every single item you mix and your counter space will be less cluttered.

🍪 Create all your decorations in advance. I often decorate my bakes with Dark Chocolate Curls or messages I write with Chocolate. But since chocolate has a super long shelf-life, you can do tasks like this a week or more in advance. Constantly be on the lookout for decorating tasks you can do in advance.

🍪 Finish up your packaging way in advance. There’s zero reason for doing this on order collection day! Cut all ribbons, string & labels while you watch a movie on the weekends. If you write thank you notes, cut the paper well in advance. And whatever you can stick, write or tie in advance, do it. This way you can just pop the baked goods in their boxes in a flash!


7. Bonus Tip! REST is an Investment in Productivity

This seems boring and irrelevant, but RESTING STRATEGICALLY MAKES YOU MORE PRODUCTIVE!!!

I apologize for all the caps and exclamations, but I just had to include them because most bakers struggle to rest.

You NEED to be disciplined about resting.

I used to see resting as wasting time and kept thinking of how much I could be doing in that time.

But here’s another perspective:

You can’t be productive when you burn out, can you?

You can’t be productive if you are constantly exhausted, can you?

Lately I’ve been colouring in for 30 minutes a day with classical music and a cup of tea. You actually get Colouring in Books for Adults and IT WORKS WONDERS! No wonder life was so FUN and exciting when we were kids!

And do not watch series or movies because that won’t let the emotional part of your brain rest.

But whatever works for you, find a way to REST – even for just 15 minutes a day. The world can wait for 15 minutes. We’re not THAT important 😜

Resting at the same time every day also gives you something to look forward to! It’s a time slot that’s YOURS. Having this time to recuperate, rest your body and mind will make you more productive throughout the rest of the day.


I hope you’ve enjoyed my 7 tips to boost your productivity!

Which of these tips are you going to apply this week? Let me know in the comments below 🙂

Aurelia

Plan your Home/Micro Bakery in 1 afternoon. Download this free Home/Micro Bakery Business Plan template to start turning your passion for baking into an income.

Got a question? Something to add? Let’s chat in the comments section down below! (I respond to every single comment)

3K Shares
How to Make Caramelized Cheesecake Shards

How to Make Caramelized Cheesecake Shards

Caramelized Cheesecake Shards are a thing, yes… sort of. Well, I guess I’m the first person doing it, so IF it becomes a “thing” – remember you heard it here first 😉

What are Caramelized Cheesecake Shards?

They are thin discs of cheesecake that have been baked in the oven until they are golden brown around the edges. Think of them as thin cheesecake cookies made from cheesecake batter.

How Did They Originate?

The idea for this creation was a number of factors really.

First of all, I am an artisan baker insisting on using ONLY delicious ingredients as decorations and ZERO FONDANT, buttercream ornaments, modelling chocolate or gum-paste.

Chocolate shavings and nuts make great cake decorations, but you can’t really put them on every single cake.

Doing so makes your menu look a tad monotone eventually, which is why I’m always looking for new, TASTY decoration ideas.


There’s an absolutely delectable muffin I’ve been baking for coffee shops in particular for 5 and a half years now – Pumpkin & Cream Cheese Muffins.

This is not a “new” idea, I mean the basic recipe idea has been around for years, BUT I created my own spin on the cream cheese filling. It’s not just made up of cream cheese, but rather a type of cheesecake mixture – without any eggs.

When these muffins bake, this filling tends to ooze out a bit onto the baking tray below. These blobs obviously get exposed to more heat from the oven and the direct contact with the baking tray makes it cook faster and caramelize.

Over time I even started overfilling these muffins “by accident” so that more filling would bake out and I would have more caramelized cheesecake bits to feast on! SO YUMMY!


The most DELICIOUS cake decorating trend is on the rise! Caramelized cheesecake shards are easy cake decorations to make and taste AMAZING! Click through for the recipe and tips. #cakedecorating #cakedecoratingideas #cakedecoratingtips


After about 4 and a half years of full time baking, I decided I want to make a cake full of the stuff that I LOVE.

This included a proper, soft, moist, super flavourful vanilla cake (recipe in resource library) with my ultimate vanilla frosting, salted caramel, a little bit of chocolate ganache and these caramelized cheesecake bits that I just could not get enough of!

I made the cheesecake mixture as usual, except this time I added a bit of egg to help with the post-baked stability.

I smeared thin circles of it onto a WELL greased baking tray, baked it until deeply golden around the edges and there it was.

I’m now using these caramelized cheesecake shards as flavourful decorations on 3 different cakes in my home bakery.

I’ve even added sprinkles on top of the cheesecake circles before they go in the oven to create fun fetti caramelized cheesecake shards!

Although they are crisp for the first few hours after baking, they will lose that crunch quite soon. I do not see these shards as a “crunch” element in my bakes, but rather a flavour element. It also doesn’t hurt that they look super cool, right? 😉

How to make Caramelized Cheesecake Shards!

5.0 from 1 reviews
Caramelized Cheesecake Shards
 
Prep time
Cook time
Total time
 
Author:
Ingredients
  • 20 g Egg
  • 120 g Plain, non-aerated Cream Cheese (about 25% fat), COLD
  • ¾ tsp Vanilla Extract
  • 30 g Icing Sugar
Instructions
  1. Preheat your oven to 180°C/356°F.
  2. Beat the egg and cream cheese together in a medium sized bowl till completely smooth. Scrape down the sides of the bowl and beat again till smooth.
  3. Beat in the Icing Sugar and vanilla extract till completely combined. Set aside.
  4. Grease a large baking tray SUPER WELL with non-stick spray. Spread identical-ish blobs of the mixture out fairly thinly (about 2mm thickness) and evenly onto the bottom of the tin.
  5. Reduce oven temperature to 175°C/347°F and bake cheesecake mixture for around 30 mins. Keep an eye on it as it can catch and burn quite easily. Rotate the pan halfway through the baking time for more even caramelization.
  6. When the cheesecake shards are half golden brown and half white, they are done baking, remove them from the oven.
  7. Leave them to cool on the tray completely. Slide a knife underneath each disc of caramelized cheesecake to loosen it from the baking tray.
  8. Cut into shards as desired and use to decorate your cakes as desired! It’s so delicious that I even crumble it up between cake layers.


Thanks so much for reading! If you give this recipe a go, tag me @philosophyofyum so that I can see your work.

See you again soon

Aurelia 🙂

Plan your Home/Micro Bakery in 1 afternoon. Download this free Home/Micro Bakery Business Plan template to start turning your passion for baking into an income.

Got a question? Something to add? Let’s chat in the comments section down below! (I respond to every single comment)

32 Shares
6 Steps to Pricing your Home Baking with Confidence

6 Steps to Pricing your Home Baking with Confidence

6 Steps to Pricing your Home Baking with Confidence

Pricing your home baking can be (and should be) simple.

But how do you know if you’re doing it right?
How do you know if you’re undercharging or overcharging?
What if you charge too much and no one orders?
What if you charge too little and do yourself in? 

I understand completely how you feel right now…. When I started my home bakery, I also struggled with pricing and customers took advantage of that all the time! I don’t want that for you.

So, this post is here to make pricing quick & simple for you.

When you price the RIGHT way, you’ll earn more income from your baking and you’ll be able to make home baking your career.

This post will clear up home bakery pricing for you once and for all!

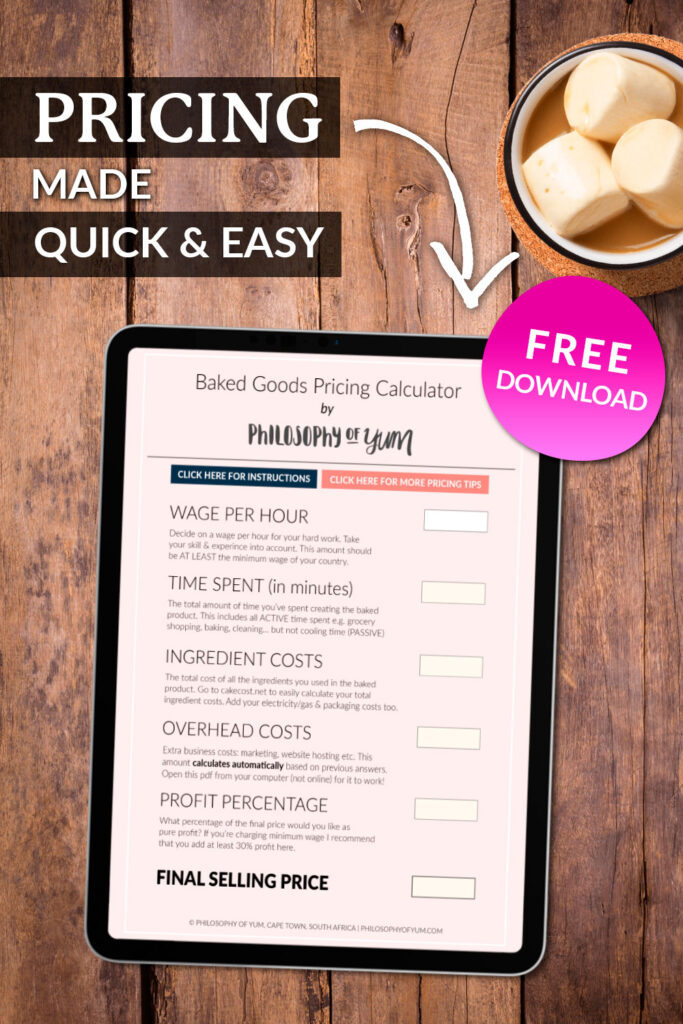
And the biggest help I can offer you is my Baked Goods Pricing Calculator that does all the complicated math FOR you.

Yup, I’m serious.

This is no joke – you can get my Baked Goods Pricing Calculator for FREE. You can download it in the Home Bakery Resource Library >> Join the Library HERE.

How do you price home baking? What if you charge too little for your home baking and don't make enough income? What if your home baking's prices are too high and no customers want to buy from you? In this post you'll learn how to do your baked goods pricing the RIGHT way, so you can make more profit and even turn home baking into your career! #homebakery #bakerypricing #bakingbusiness #cakebusiness

But before we dive into the practical side of pricing, let’s quickly talk about the emotional side of pricing.

Because if you don’t understand the emotional side of home bakery pricing, you’ll always feel too guilty or awkward to charge your customers full price.

Let’s lay the foundation right so that you NEVER have to struggle or feel awkward when you’re pricing your baked goods, sound good??


1. Understand WHY Home Bakers Feel Awkward & Guilty with Pricing

If you consider the typical prices of baked goods, they’re not exactly “expensive” compared to all the other things people buy for enjoyment…

Every day people spend thousands of dollars around the world on restaurant meals, watching movies, weekend getaways, etc.!

People easily and willingly PAY GOOD MONEY for products that make their lives better. Why should it be any different with homemade products – like home baking?

Home Baking is SUPER labour intensive, yet we feel too awkward & guilty to charge what our bakes are TRULY WORTH.

I am convinced that the reason why cake pricing remains an issue, is because we’re faced with adding a VALUE TAB to what we do… AND a value tab on what we feel WE are worth.

A lack of confidence is the REAL reason why we overwork ourselves, STRUGGLE WITH PRICING, end up jumping through hoops for demanding clients and get stuck baking things we don’t even enjoy making – for cheaper prices!

We keep thinking: “If only I had 1000 likes on my Facebook page, THEN I would know that I’m good enough to charge full price for my bakes!

And on Reality TV Shows about baking, it’s the EXACT same story. How many times have you heard contestants say:

“If I win this competition, I will finally know that I’m good enough.” “If I win this competition, it will prove to my father that I’m talented enough to make a living from dessert making.”

Here’s the secret: “If you are not enough WITHOUT that validation, you’ll never be enough WITH it.


The hard truth is that the “stamp of approval” you feel you need from customers to make you believe you’re a LEGIT Baker, won’t be enough to convince you that you’re valuable.

What YOU believe about your value is what matters here.

So, who do you truly BELIEVE you are?
And is that person valuable?
What makes that person valuable?

The price tabs you put on your work will always reflect how valuable you believe you are.

I had to get to a point where I stopped looking to my clients for validation that I’m okay.

I had to fully embrace that MY value comes from the Lord Jesus Christ. I’m valuable because He loves me. REALLY think about where your value comes from.

RELATED: How to Overcome Self-Doubt in Your Home Bakery

In the past I undercharged for my baking because I felt a need to OVER-please my customers so that the odds of them liking me are higher… I was deceived in thinking that the more customers liked & praised me, the more valuable I’d feel.

But if you’re not enough without that praise from people, you’ll never be enough with it.

“The reason we ‘people please’ is not because we care about other people. It’s because we want to control what other people think of us.” – Courtney Chaal

When YOU stop looking to people for your validation and settle it in your heart that YOU ARE VALUABLE (no matter what people think of you), it becomes so much easier to acknowledge that your baked goods are valuable too!

Now let’s Cover the Home Baking Pricing ESSENTIALS…


2. The VALUE of Home Baked Goods

You may have believed until now that Home Baking is in some way “inferior” to the baking of storefront bakeries.

But you actually have it backwards!

It’s important to realize that you’re offering a VERY UNIQUE and VALUABLE service here. You are baking SPECIALLY for ONE client with all the LOVE and QUALITY they would get from their OWN MOTHER’S baking.

They’ll also get their baked goods FRESH – not 1 week old as in the grocery store and large, mainstream bakeries.

So, on every level, small batch home baking is of HIGHER VALUE than mass-produced commercial baking.

You offer them the sentimental, high quality benefits of homemade, HAND MADE baked goods without them needing to spend ANY time or effort on it.

Home Baking has an incredibly high QUALITY, NOVELTY and CONVENIENCE value. That’s worth A LOT my friend.


3. Cheap Prices Attract Cheap Clients

If you’ve been charging too little for your baked goods, you’ve probably run into some pretty darn demanding, unrealistic, bartering sort of clients. Am I right?

Chances are, that’s what drove you to start looking for cake pricing answers! The type of clients you have are just becoming unbearable and you’re constantly second guessing yourself as a baker and business owner.

So here’s the deal. Cheap prices will attract budget clients who enjoy nothing more than saving money wherever they can.

They unfortunately are the type of clients who take advantage of you. They’ll get you baking things you hate, on short notice for less money.

The way you get ideal, committed clients with better character is by CHARGING MORE. This separates the cheapskates from the true cake appreciators.


Pricing - ugh! How do you know if you're charging too much or too little? What if you charger too much and no one orders? Or what if you charge too little and don't make enough profit to survive? In this post you'll get everything you need to settle your home baking pricing issues - forever! Get a free pricing calculator (pricing chart) download to do all the fancy math for you in your Home Bakery Business! Click through to get started :D #homebakery #cakepricing #cakebusiness #bakingbusiness


4. Cheap prices “for the love”?

When I started my Home Bakery I kept all my bakes SUPER cheap because I wanted them to be affordable for everyone.

I was buying the best ingredients, investing hours of my time and barely turning ANY profit.

There are so many bakers on Instagram that say: “You should do it for love, not for money.”

But this is FLAWED LOGIC. Let me explain why.

Let’s look at doctors for example. They fill an amazing role in society and bless so many people with their gifts and talents. Keeping people alive is their heart’s desire.

Medicine is a SUPER demanding career and there’s no doubt that doctors choose to STAY in this career for love and not money… The convenience & excitement of money wears off pretty fast when you need to work 36 hour shifts – repeatedly.

Yet we GLADLY pay them generous sums of money SO THAT THEY CAN KEEP ON HELPING US.

Charging DECENT prices for your bakes (charging what they are worth) will enable you TO KEEP ON BAKING DELICIOUS BAKES FOR PEOPLE.

If they don’t pay you WELL, you’ll need to end your Home Bakery and get a desk job somewhere… It’s pretty hard to “love people with your baking” then, isn’t it??


On this point we also need to talk about pricing your bakes for close friends & family.

Baking for family and friends is a tough one; because we love them and feel guilty to accept and ask for payment.

But, here’s another perspective: Your friends and family love you and want you to succeed – that is why they are ordering from you.

I decided a while ago to have a standard discount for all my close friends and family. The discount is 10% off my direct client prices. To offer them a discount will already seem very generous and courteous to them.

If your friend sells you a car (for example) you will be ELATED if they give you a 10% discount, right?

Set up a fixed discount rule for friends & family that you are comfortable with (I recommend a 10% discount MAX), and stick to it no matter what.

Making a rule like this for yourself and your family/friends eliminates the need to make an awkward decision every time a family member or friend orders something.


5. Transition From a Freelancer to a BOSS

I recently watched a video by online entrepreneur Courtney Chaal on this topic. All home bakers start out as freelancers meaning that someone asks for a certain bake for a certain day and we proceed to make it for them.

They then start manipulating you by saying their budget is so tight this month because of this and that, so you end up giving them a discount…

The client calls the shots. They determine what we make, when we make it and they influence what they pay for it. This means that we base our business strategy and pricing by just REACTING to our customers.

You might still be running your Home Bakery this way and be thinking “well, what other way is there??”

There is another way my friend and that is to become a BOSS and start running your business like a boss.

A boss decides what services and products they do and do not offer. They decide what the prices are. They call the shots and determine the course of their business.

A freelancer is just reacting to clients and their business will end up going wherever their clients end up taking them – which could be in circles or downward, and not forward.

There is a COLOSSAL difference between a freelancer and a boss!!

RELATED: How to Create a Home Bakery Business Plan (Includes free workbook!)

Feel too guilty or awkward to charge full price for your home baking? Pricing has always been an issue for Home Bakers, but it's not because we're bad at maths (obvs!). In this post you'll get everything you need to settle pricing issues - forever! Take the 6 steps with deeper insights on being CONFIDENT when you price your cakes instead of awkward. Get a free pricing calculator download to do all the fancy math for you in your Home Bakery Business! Click through to get started. #homebakery #homebaking #cakebusiness #bakingbusiness


ALL Home Bakers do start out at freelancers, but if you desire success for your Baking Business, you’ll need to make the mindset shift into the boss world – sooner rather than later.

Your customers will no longer be deciding what you bake and when you bake it for. They will no longer be influencing your prices.

YOU’LL now be the one deciding how your business is going to operate on every level – and I’m SO EXCITED FOR YOU!!


6. Download your FREE Pricing Calculator

You’ve successfully completed this training on Pricing your Home Baking and now I invite you to join my Home Bakery Library to get access to my FREE Pricing Calculator!

It’s the BEST tool for any Home Bakery Business! You simply type in:

>> Your rate per hour for your labour.
>> The time you spend on the bake from start to finish.
>> Your ingredient costs (including electricity/gas costs, decoration costs, packaging costs, etc. as well here).
>> Your profit percentage.

And then it calculates the recommended selling price FOR you! Tada!

INSTRUCTIONS FOR USING THE PRICING CALCULATOR:

1. Join the Free Resource Library to get the Free Pricing Calculator.

2. When you’ve signed up for the Library check your email (spam & promo folders too!) for the Resource Library’s link and password 😉

3. Make sure you actually DOWNLOAD the pricing calculator. Don’t just open it online – in which case you’ll be able to enter numbers, but it won’t calculate anything. In the Library, click the pink download button – this will open the calculator online. Then click the download button in the top right corner. Open the downloaded pricing calculator on your computer and start typing in your info.

4. To use the Pricing Calculator you need to at least have a PDF reader on your computer like Adobe Acrobat Reader – which is free to download. Click here to download it for free. Follow all the prompts and install it.

5. Don’t forget to add your electricity/gas/propane AND packaging costs to your ingredient costs! If you’re struggling to figure out how much to charge for this, click here to learn how.

6. After calculating a product’s selling price, close the Pricing Calculator and don’t save it. Then open it again and start calculating the prices of your next product. This helps the built-in calculation functions not to get confused.

7. If you want to calculate delivery prices, use the calculator in the same way. Open it on Adobe. Add your fuel costs into the ingredient costs section. Add your wage per hour. Add in the time you’ll be spending driving there AND back. Add 30% profit. And then you’ll get the final delivery price your client needs to pay.

This Pricing Calculator works great on computers. If you want to use it on your cell phone, you’ll need to download the Adobe Acrobat Reader App from the App store.

Here’s a video to SHOW you how to use the Pricing Calculator step-by-step 👇

 “What if I feel overwhelmed & anxious about pricing & managing my business’s finances?”

There’s no shame in that. I struggled with the same thing for YEARS! Pricing your bakes, doing your bookkeeping and taxes… This is where a business gets REAL. And it can be very overwhelming if you’re not used to crunching the numbers!

NOW I HAVE SOME QUESTIONS FOR YOU:

🍩 Are you worried that you’re charging too much or too little for your home baking?

🥧 Do you feel burnt out because you need to bake all the time for your biz to survive?

🧁 Do you know how much profit (exactly) your business is actually making? Or do you just kind of hope (and worry in the back of your mind) that it’s making a profit?

All of these are symptoms of not doing your pricing and finances correctly.

Managing your finances shouldn’t be such an overwhelming, complicated mission! You could just use all my templates and handle your finances in 10 minutes per week.

If you want your pricing and bookkeeping to be QUICK and EASY, then the “Confident Pricing & Profit Kit” is the perfect fit for you! It’s an online course where I teach you easy-as-pie Home Bakery pricing and bookkeeping systems to help you earn more income and run your business like a pro 💁‍♀️

👉 Click here to check out the Confident Pricing & Profit Kit

I trust that this post has FINALLY given you everything you needed to settle the issues of Home Bakery Pricing!

If you have any further questions, share them with me in the comments below and I’ll get back to you as soon as I can! 😉

Chat soon

Aurelia

Plan your Home/Micro Bakery in 1 afternoon. Download this free Home/Micro Bakery Business Plan template to start turning your passion for baking into an income.

Got a question? Something to add? Let’s chat in the comments section down below! (I respond to every single comment)

5K Shares

5 Tips to Save Money in Your Home Bakery

5 Tips to Save Money in Your Home Bakery

5 Tips to Save Money in Your Home Bakery

Home Bakers aren’t exactly loaded, are we?

More often than not, we are resourceful people looking to make an extra income while we stay at home and take care of our families on a super tight budget.

When I started my home baking business back in 2012 I had almost nothing. I had a $10 hand mixer, 2 cheap plastic hand-me-down mixing bowls, 1 square tin and 1 muffin/cupcake tin (and a $5500 student loan to pay off, lol!). That’s it! That’s all you need.

I completely understand how daunting it can be to build up a home bakery on a super tight budget, so I’ve put together 5 tips to save money in your home bakery without compromising on the quality of your bakes.

Even though my business and finances are stable now, I still use all 5 of these money saving tips in my home bakery – because saving money is so much funnnn!

Saving money literally makes me giddy. My husband thinks that’s weird, but I’m having a great time 😂🥳


1. Create Recipes with Leftovers

“Waste not, want not” will ALWAYS be one of the most valuable phrases known to man.

When I watch cooking and baking shows I always cringe when they leave like 10% of the batter in the bowl… I don’t get why anyone would do that and it upsets me deeply.

Or sometimes people crack eggs into the bowl so fast that lots of the white never makes it into the bowl and gets flung into the trash! So painful for me to watch.

My close friends and family know me as “Miss Frugal”, but I seriously don’t mind because I have saved $100’s of dollars by being so fugal. So, boom!

When I started baking from home I mostly made cupcakes and brownies.

But cupcakes require frosting and now my frugal nature was faced with a massive problem…

I’m sure you know from experience that you always have to make more frosting than what you actually end up using, so you always end up with left over frosting.

Desperate to not waste the excess of my ultimate vanilla frosting, I always scooped the left overs into a bowl and put it in the freezer. After accumulating about a liter of this left over frozen frosting, the time had come to do something with it.

I had heard about Pumpkin & Cream cheese muffins and decided to try using my left over frozen frosting as the filling since it is about 60% cream cheese anyway.

The result was spectacular!! 5 years later I still sell 100 of these Pumpkin & Cream Cheese muffins every week – the customers call them “crack muffins”! And the best part is that all my left over frosting does not go to waste!

Sofra Bakery in Cambridge, Massachusetts has created “morning buns” from their left over croissants.

They cut up the croissants in cubes, bake them with custard (like bread pudding) and brush them with an orange blossom glaze. Genius!

Almost every breakfast joint has their version of French toast. We all LOVE French toast, but when you think about it, it is nothing more than a left over recipe! It was a way to use up stale bread and not wasting it.

Some of the best recipes are ones where people had to get creative and prevent waste. I’m confident that you can do the same 🙂 So, brainstorm some ideas of how you can use leftover ingredients, off-cuts, etc. to create new products for your Home Bakery.

Build your home bakery on a super tight budget with these 5 insider tips to save money in your home baking business - without compromising on the quality of your bakes! Even though my business and finances are stable now, I still use all 5 of these money saving tips in my home bakery - because saving money is so much funnnn! #homebakery #homebusiness #cakebusiness #bakingbusiness


2. DIY it Baby!

It’s quite shocking how much money you can save by making things yourself – especially when it comes to ingredients.

Shocking as it may seem, the last time I bought icing sugar was 3 years ago. Icing sugar is expensive. It costs 250% more than regular granulated sugar.

There had to be a way around buying this expensive ingredient that doesn’t exactly contribute to a “better flavour” or anything.

I decided to buy a Nutribullet (high speed food processor). Sure, it cost me $150, but I’ve already made up that difference AGES ago.

Making my own icing sugar (oat flour, almond flour, hummus, peanut butter, smoothies, and more) has saved me heaps of money.

Another way I love to save money is by making my own muffin & cupcake liners from baking parchment. Fluted cupcake liners are really inexpensive, but they make muffins look smaller and less rustic.

I was keen to buy muffin liners (they look more handmade, with 4 little “ears” on top), but they costed like $0,12 each – that adds up super fast!

Instead of spending that money, I rather figured out how to make my own muffin liners in mere minutes for just $0,01 each. I sell 100 muffins a week, so added up, that’s a $11 weekly saving. For me, that’s worth it.

And then one of my favourite money saving tips involves my Home Bakery’s Packaging.

Beautiful, expensive branding and packaging can be a very tempting expense. But if a wrapper is beautiful and the candy tastes bad, will you ever buy it again? No.

So, don’t spend hundreds of dollars on printing amazing packaging. Just go for simple packaging to start off with.

You can seriously get away with 50 cents per box. I like to splatter metallic gold paint on my boxes to add some flare! Here’s a video tutorial of how I jazz up my boxes.

And then you should also put your business’s details on the box. Just design a large sticker with your logo on Canva. Print out the stickers and stick one on each box. Easy, beautiful and cheap!


3. Buy Ingredients from the Right Suppliers

Source ingredients in bulk or from direct suppliers wherever you can. When you cut out middle men, you eliminate all those extra mark ups you pay for in the grocery store.

For example, I used to buy all my cocoa powder, chocolate, frozen berries (and so much more!!) in the grocery store, which was super expensive.

I eventually found a supplying company with super high quality products that sell ingredients even to small businesses like home bakeries.

Now I save like 40% in ingredient costs WITHOUT COMPROMISING ON THE QUALITY OF MY INGREDIENTS! So rad!

I also went directly to a local chocolaterie and buy 1 kg blocks of chocolate from them.

This way I get to support a local business, get higher quality chocolate AND pay less for it than in the grocery store because I buy it in bulk.

Such a win-win-win!


4. Invest in Tools that Increase your Productivity

The one thing that is just as important as saving money is saving TIME. If you can save time then you will have more time to bake things to sell for profit.

Learning to work faster is important, but you can also invest in tools that will make your baking process faster like stencils, cookie cutters, a food processor, etc.

And then there is a “tool” of sorts that is FREE… It is my favourite productivity booster! And it is simply to do things in bulk wherever it’s possible.

If I make 10 of my Pumpkin & Cream Cheese muffins at a time with all of their DIY components (liners, filling, crumble, dry ingredients, and more) from start to finish, it will take me 2 whole hours I reckon!

But by making 100’s of muffin liners at a time, making my filling a few litres at a time, sifting ALL my dry ingredients for the day and putting them in labelled baggies and more, I save SO MUCH time.

Doing things in bulk will streamline your productivity and business like crazy.

5 Amazing Tips to Save Money in your Home Bakery without compromising on the quality of your baked goods! Building a Home Bakery does not have to be expensive. Click through to learn how you can save money where it counts. #homebakery #cakebusiness #bakingbusiness #cupcakebusiness


5. Increase Your Profit

One of the biggest mistakes I made in my Home Bakery (for 3 long years) was being so set on saving money that I did not INVEST my money in making more profit in the future.

I know it feels great to save money – trust me, I am known as “Miss Frugal” among my friends and family! But honestly, making money is even better than saving money… NEVER forget this.

MAKING money is better than SAVING money.

Making INVESTMENTS in order to get more orders and baking done, is better than saving money.


Here’s an example from my own Home Bakery Journey:

In the name of “saving money”, I refused to employ someone to wash dishes and clean for me for the first 18 months of my Home Bakery.

Now, I feel so stupid for not doing it sooner! I always made the excuse that “there’s no way I can afford to employ someone to clean!”

What I didn’t realize is that employing someone to clean for me twice a week would free up more time and energy for me to do more of what actually makes money – BAKING.

Since I’ve made the investment of employing Jane to clean twice a week, I’ve been able to increase my baking profits by 30%!

It’s the BAKING that brings in profit, so free up your time so that you can spend more time BAKING.

I’ve also trained Jane to do prep work for me. This includes chopping chocolate, grating carrots, slicing apples, etc. These super exhausting and time consuming tasks can easily be taught to someone else. It’s wonderful!

Easy, delegate-able tasks include: all cleaning and prep work. Later on you can expand to deliveries, errands, etc.

And while we’re talking about this point of “MAKING money is better than SAVING money”…

Let’s talk about how you can make more money in your Home Bakery:

To get more orders, you need customers to pay attention to your business. You need to know how to attract customers to your business.

And the way you do that is with effective marketing. And I’m NOT talking about spending money on ads!

Effective marketing is all about the (free) words you use to help customers understand and believe that YOUR business is the perfect fit for them.

🌟 If you want to learn how attract more customers and orders with marketing, then this blog post is your next step >> The 4 Essentials of Home Bakery Marketing.


I hope you’ve enjoyed this post!

Which money saving tip is your favourite?
Are there any other things you’ve done to save money in your Home Bakery Business?
Let me know in the comments below.

Chat soon

Aurelia 🙂

Plan your Home/Micro Bakery in 1 afternoon. Download this free Home/Micro Bakery Business Plan template to start turning your passion for baking into an income.

Got a question? Something to add? Let’s chat in the comments section down below! (I respond to every single comment)

97 Shares
How to Write on Cake Without Free-Handing

How to Write on Cake Without Free-Handing

How to Write on Cake Without Free-Handing

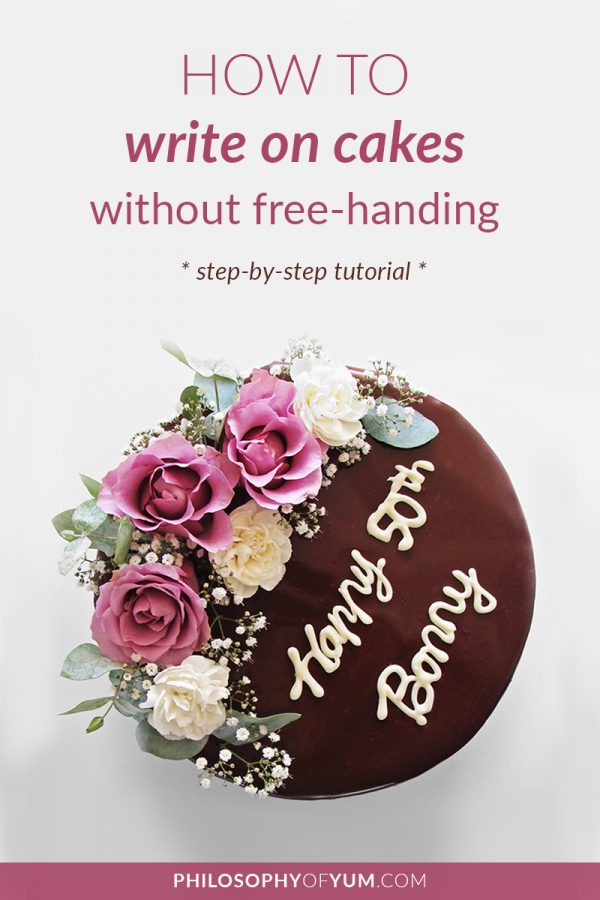
Writing on Cake without Free-handing is possible and actually quite easy 🙂

I simply HAD to figure this out because no matter how much I practiced, I’ve always SUCKED at free hand piping! As I’ve said before, artisan home baking is my thing, cake decorating is NOT my passion.

My MAIN focus is to make my bakes DELICIOUS, not pretty.

That being said, the motivation behind learning how to write on cakes is actually not to make them “pretty” per se, but rather that it makes a cake more personal. Home Bakeries are founded on being personal!

For some people the whole “neat handwriting and accurate spacing” thing comes naturally. Unfortunately the last time I had a neat handwriting I was 9.

When I tried to write something free hand on a cake I ALWAYS ended up running out of space and needing to squash in those last 3 letters. And on a good day I would win at the spacing, but still have UGLY writing.


To me, artisan home baking is the ULTIMATE approach to baking, but here’s the sad news…


Even if you bake cakes that make people pass out from YUM-overload, you will need to write special and personal messages on cakes at some point. It is absolutely inevitable.

And unfortunately, ugly writing on a cake CAN put a damper on a client’s whole experience of your cake.


So if your handwriting is ATROCIOUS (like mine) and if you SUCK at free handing (like me) – what do you do??

Fret not my friend, there is a solution for writing on cake without free-handing! It’s relatively simple and after trying it a few times, you will rock it. And most importantly your writing will look SUPER professional 😀

This process might take 3 or so attempts before you are comfortable with it (especially with working through my lengthy instructions), but then it’s so quick and easy!

I thought it best to rather explain as thoroughly as possible so that you have a great chance at success from the very first attempt!

I know you can do it – you’ve got this!!

How to Write on cake without free-handing: step by step tutorial #homebaking #chocolatedecorations #cakedecorating #cakedecoratingtips #cakedecoratingideas


Chocolate is the Answer

Since my Ultimate Vanilla Frosting and Ultimate Chocolate Frosting BOTH have quite a high water content, using something like Royal Icing to write on my cakes was not an option. The royal icing (and all other high sugar decorations) melt into the frosting within a few minutes.

I was not about to switch to overly sweet buttercream or flavourless fondant – EVER! So I had to find another ingredient to use.

Chocolate ended up being the perfect “ink” to work with for several reasons:

  • It has a higher fat content which prevents the sugar from melting into my frosting.
  • Chocolate is obviously way more delicious than royal icing!
  • Top Quality Chocolate sets hard (technically it crystallizes), so this enables you to write neatly on a printed template and transfer the words onto the cake.
  • Chocolate comes in a variety of shades! I use white or dark chocolate, depending on the shade of frosting or ganache coating the cake. Using a contrasting colour of chocolate really makes the writing “pop”.

But using chocolate means that there will be tempering involved. BUT, before you panic, just consider that I have a SUPER EASY chocolate tempering method to share with you today!

RELATED: How to Make Gorgeous Chocolate Shavings


Why Does the Chocolate Need to Be Tempered?

  • Un-tempered chocolate melts VERY quickly! If the chocolate starts to melt while you are trying to transfer the words onto the cake it is one huge and panicked MESS.
  • Un-tempered chocolate tends to bloom when it sets. Blooming refers to those weird light spots or streaks you see on chocolate. It looks a bit like mould I guess. Although blooming doesn’t make the chocolate taste bad, it really just looks severely unappetizing. These light spots & streaks are cocoa butter that has separated out of the chocolate.
  • Tempered chocolate sets (technically it crystallizes) nice and hard, making it a breeze to transfer without it ever beginning to melt and stick to the palette knife!
  • Tempered chocolate has a lovely sheen to it which makes it a very beautiful centerpiece for your cake 🙂


How to Temper Chocolate – EASILY

Tempering chocolate was this ridiculously intimidating thing I could never master.

I even went for a short chocolate course and did the whole marble slab thing. Even though I did it more or less correctly in the class, I totally sucked at it back home and I just could not get it to work!


When it comes to tempering chocolate, REMEMBER THIS ONE THING:

DO NOT OVERHEAT THE CHOCOLATE.

That is it.


Struggling to pipe lettering on cakes? You're not alone! Here's a simple trick to help you out. Writing on Cake Without Free-Handing is simple and ideal for "non-decorators"! This step by step tutorial will teach you how to write beautiful messages in ANY font you want. #cakedecorating #cakedecoratingtips #cakedecoratingideas #homebaking #bakingtips


When you overheat chocolate, you break the structure of its crystallization – specifically the structure of the cocoa butter. Successfully tempered chocolate has optimal cocoa butter structure. When you overheat chocolate it basically means it won’t be stable – it will melt easily. It also won’t be shiny, but it will be dull or have blooming. And it won’t have a nice snap.

Click here if you want to read more on the polymorphic structure of chocolate.

The classic tempering with a marble slab allows you to overheat the chocolate and then bring it back to the right temperature on the marble slab with correct technique and experience. But it is difficult to master and super sensitive.

So don’t even go there! Why make life so difficult when it’s not necessary?

It’s far easier to just not overheat the chocolate in the first place and rather maintain the crystal structure it already has. Prevention is better than cure.


The best way to prevent chocolate from overheating comes down to three things:

  1. The container you melt your chocolate in. ALWAYS melt your chocolate in a PLASTIC BOWL. Ceramic, glass or aluminium bowls conduct heat FAR too easily and quickly. They also remain hot for a very long time. This will force up the temperature of your chocolate within 20 seconds – seriously..
    .
    PLASTIC BOWLS are poor heat conductors, so they do not become hot easily and they lose their heat very fast. The plastic bowl basically becomes “invisible” in the chocolate melting process, allowing the chocolate to melt at its own pace.
  2. The type of heat you apply. Although the bain-marie thing (bowl of chocolate over barely simmering water) is quite a standard way to melt chocolate – it’s not ideal. Sorry if I’m being controversial here, but it really isn’t ideal because it overheats the chocolate.
    .
    Firstly because you can’t place a plastic bowl over a bain-marie. It could melt the bowl and as we have established – plastic doesn’t conduct heat very well. Even if the water is barely steaming, it will still be enough to overheat your chocolate.
    .
    Chocolate melts with VERY LITTLE heat. It melts at 30°C/86°F! So the heat you use needs to be super subtle and above all – controllable!
    For this reason I like to use my microwave. I can control exactly how hot things get and stop it abruptly at any point I wish.
    .
  3. How long you apply the heat for. If you apply any source of heat for too long, your chocolate is going to overheat. For this reason it’s best to melt the chocolate with 30 second bursts in the microwave. Dark chocolate can take a bit longer to melt, but BE PATIENT! Stick to 30 second bursts!

    Take it out of the microwave after EVERY 30 second burst, squash and stir it a bit (even when it’s not melting yet) and then return to the micro for the next 30 second burst. I know it’s tempting to put it in there for longer, but don’t do it!

Now that you understand the science and super important basics, let’s move on to the FULL method: Writing on Cake without free-handing, from start to finish.


Writing on Cake Without Free Handing – Step by Step

IF you happened to skip to this part, go back up and read the full post. All the info above was shared with great reason. If you do not understand this whole process, the chances of you failing at this really increase drastically.


Create and Print Your Desired Template

  1. Measure the space you want to fill on top of your cake.
  2. On your computer, in Photoshop or Canva (free program), create a block a bit smaller than the measured size. A little bit smaller is always a good idea here.
  3. Choose a good font. Cursive is better here because the letters are all connected into one item. This means that “Birthday” becomes one item to transfer instead of 8 separate letters to transfer. My favourite font to use is “Dragon is Coming”! I downloaded it for free on dafont.com – click here.
  4. Type your desired message and print it on ordinary paper.
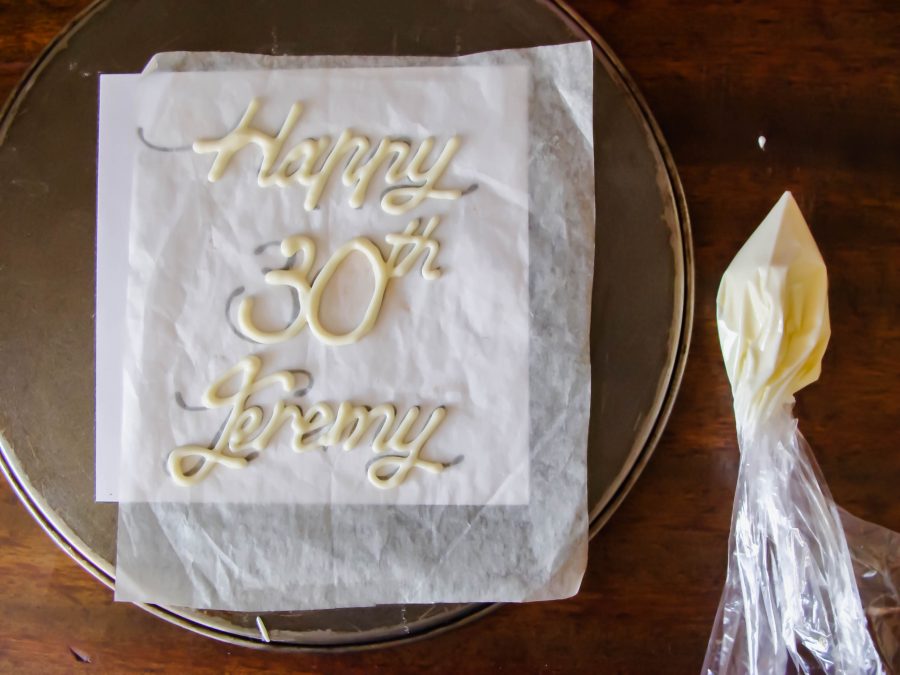
  5. Cut around your message to make the size of the paper smaller. Stick it onto the bottom of a cake tin base plate with some sticky tape. If the tin’s base has a lip, make sure it faces the bottom so that your top surface is completely smooth and level.
  6. Cut a square of NON-STICK, opaque baking paper/parchment (not wax paper) big enough to cover the writing. You should be able to see the writing through the baking paper. Make sure there are no bumps or kinks in the paper and that it is absolutely clean. Place it over the writing template and secure it in position with a few pieces of sticky tape.

How to write beautiful lettering on cakes - without free-handing! Step by step tutorial


Temper the Chocolate

  1. Chop 50 g of your desired chocolate. There should be no pieces larger than 1 cm x 1 cm. SUPER IMPORTANT: Use TOP quality chocolate!! Commercial chocolate bars like Nestlé and Cadbury contain too much sugar and not enough cocoa butter, so they are always too soft and unstable. Lindt is always a safe bet.
  2. Place the chopped chocolate into a small PLASTIC bowl.
  3. Microwave in 30 second bursts. Dark chocolate can take a bit longer to melt, but BE PATIENT! Stick to one 30 second session at a time! Take it out of the microwave after EVERY 30 seconds, squash and stir it a bit (even when it’s not melting yet) and then return to the micro for the next 30 second burst. I know it’s tempting to put it in there for longer, but don’t do it!
  4. While you wait you can prepare your “piping bag”. Even though I have many piping bags, I prefer using a small, plastic sandwich bag for this (not Ziploc though. It gets in the way). Open it up and place it with one point facing down into a glass or cup. Fold the edges of the plastic bag over the side of the glass.
  5. When the chocolate BEGINS to melt reduce your next microwave session to 20 seconds. And now the next bit is crucial.
  6. THE TRICK TO GOOD TEMPERING IS TO MELT MOST, BUT NOT ALL OF THE CHOCOLATE IN THE MICROWAVE. The bits of melted chocolate may be enough to melt the rest of the chocolate pieces in the bowl, so stir and squash it thoroughly to see if the rest will melt. And keep tabs on the temperature of the chocolate by testing a bit of it on your lip. If it’s the same temperature or cooler you are on the right track. (If the temperature is warmer you have overheated it. Rather start again with new chocolate.)
  7. If the heat of the melted chocolate is not enough to melt the remaining solid pieces, return it to the microwave for 10 seconds at a time. Stir super thoroughly after each 10 seconds to see if the rest of the chocolate melts completely. YOU WANT THE LAST FEW PIECES TO MELT OUTSIDE THE MICROWAVE.
  8. Once everything is melted and smooth, stir the chocolate thoroughly another few times. Test the temperature again – it should be roughly the same temperature (or a little bit cooler) as your lip.
  9. Immediately scrape the melted chocolate into the prepared plastic baggie. Tempered chocolate does set quite quickly so you want to get it in the bag and close to your hand as soon as possible. The warmth from your hand will keep the chocolate melted.


Piping the Chocolate Lettering

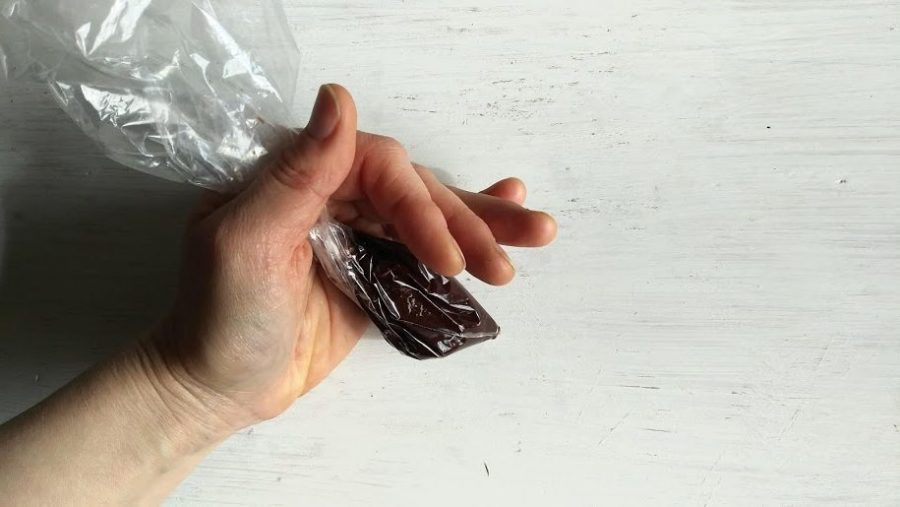
  1. Twist the end of the baggie thoroughly (but not all the way up against the chocolate. You don’t want the melted chocolate to be under pressure and burst out when you snip off the end) and secure with a paper clip, clothes pin or anything you want. I mostly just keep the twisted end closed by pinching it in the space between my thumb and index finger while I’m piping (see image below).
  2. Snip off a tiny bit at the end. You can always snip off more. You can test to see how thick your line will be. The ideal line thickness is about 2 mm, but it’s totally up to you.
  3. Whenever you want to stop the flow of chocolate, just lift the tip of the baggie vertically upwards.
  4. Pipe the lettering with the melted chocolate while constantly keeping the side of your hand on the surface for some stability. Slide your hand on the surface as you move along. Do not let your hand hover in the air. I’m left handed, so I need to write the words backwards, starting from the right. If you’re right handed you can start from the left.

writing on cake without free-handing step by step tutorial


Transferring the Chocolate Lettering

  1. The chocolate will have begun to set once you are done piping the words, but allow the chocolate to set fully in the fridge for 5 minutes.
  2. Depending on how well you tempered the chocolate, this next bit could be super easy or a bit more difficult.
  3. The first thing you need to do now is loosen the lettering from the baking paper/parchment. Remove the sticky tape keeping the non-stick baking paper/parchment in place. Slide the parchment with the lettering on it to the edge of your work surface. Starting from the one side, grab the paper firmly on either side with your hands.
    Carefully slide the parchment over the edge, pulling the parchment down with your one hand
    . Go about 1 – 2 inches in. You obviously don’t want to crack the lettering or have it fall on the floor! Rotate the paper 90 degrees and repeat the process. Repeat for remaining two sides as well. Test with your clean and dry palette knife if the lettering is nice and loose on the paper.
  4. In my experience it it’s better to transfer the MIDDLE word first. Guessing the exact middle of your cake is much easier than guessing the top third. The middle is a great reference point.
  5. Carefully slide your clean and dry palette knife under a bit more than the top half of the word, keeping the bottom half unattached (see image below). Carry it over to your cake.
  6. Let the unattached bottom half make contact with the surface of the cake where you desire to place it. Allow it to ease off into position as you gently lift away the palette knife.
  7. Repeat with remaining lettering and then you’re done!!

writing on cake without free-handing step by step tutorial


This process might take around 3 attempts of practice before you are comfortable with it (especially with working through all my instructions), but then it’s so quick and easy!

I thought it best to rather explain as thoroughly as possible so that you have a great chance at success from the very first attempt! I know you can do it – you’ve got this!!

RELATED: How to Make Gorgeous Chocolate Shavings

If you use my method for writing on cake without free-handing, please let me know by tagging me @philosophyofyum because I would love to give you a virtual high ten 😀

Chat soon

Aurelia

Plan your Home/Micro Bakery in 1 afternoon. Download this free Home/Micro Bakery Business Plan template to start turning your passion for baking into an income.

Got a question? Something to add? Let’s chat in the comments section down below! (I respond to every single comment)
2K Shares

X